Call of Duty 5: Loadscreen Creation: Difference between revisions
Jump to navigation
Jump to search
New page: Image:Nutshell.png This tutorial will explain you how you can create a loadscreen for your multiplayer map. =Convert loadscreen texture= Please go over importing a custom texture as t... |
|||
| Line 20: | Line 20: | ||
=Setting up your map's Zone file= | =Setting up your map's Zone file= | ||
Now run the converter from the applications tab in Launcher. | *Now run the converter from the applications tab in Launcher. | ||
Open your [levelname].csv in Zone Source and add | *Open your [levelname].csv in Zone Source and add the line: | ||
material,loadscreen_yourmapname | |||
Build the fast file and see if you have your load screen. | Build the fast file and see if you have your load screen. | ||
Revision as of 16:18, 3 December 2008
![]() This tutorial will explain you how you can create a loadscreen for your multiplayer map.
This tutorial will explain you how you can create a loadscreen for your multiplayer map.
Convert loadscreen texture
Please go over importing a custom texture as this covers the converting of the texture into Call of Duty World at War: Create Custom Textures
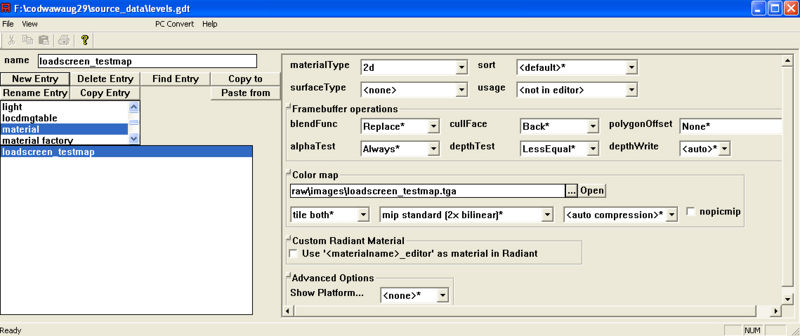
New texture convert settings
Your load screen must be 1024x1024 pixels in size.
Change materialType to 2D and surfaceType to <none>.

Setup the map to use the load screen
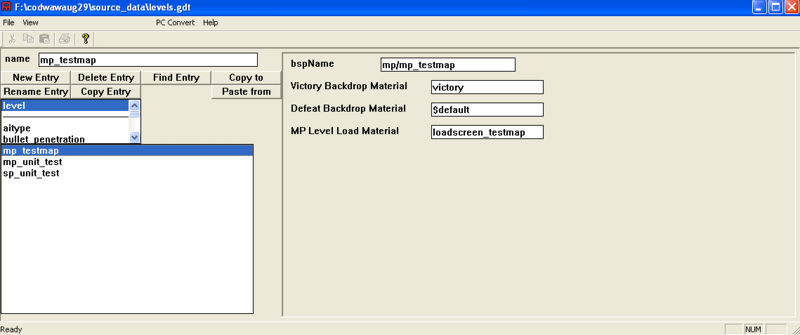
In the list where you selected "material", choose "level" and make the new name the same as your map name. Then fill it out according to the picture.
Save the file as "mp_mapname.gdt" in your "source_data" folder.

Setting up your map's Zone file
- Now run the converter from the applications tab in Launcher.
- Open your [levelname].csv in Zone Source and add the line:
material,loadscreen_yourmapname
Build the fast file and see if you have your load screen.
Sources: Treyarch's Wiki
