Call of Duty 4: Create a mp burg like map
Foreword by Deavius

I believe the mp_burg map is an absolute masterpiece. It looks very wonderful and balanced, when I play it it still amazes me. Credits go to Mapicted, the author of this map. You can download the map here: ![]() DOWNLOAD
DOWNLOAD
I made this tutorial so other people can make such maps as well.
Preparations
Firstly, CoD4 lacks a good medieval stone texture, so we'll want to make one. I believe the texture used in mp_burg comes from an old CoD (namely, CoDUO), I'm not sure, but it looks rather familiar to me.
Download the following texture:
![]() DOWNLOAD
DOWNLOAD
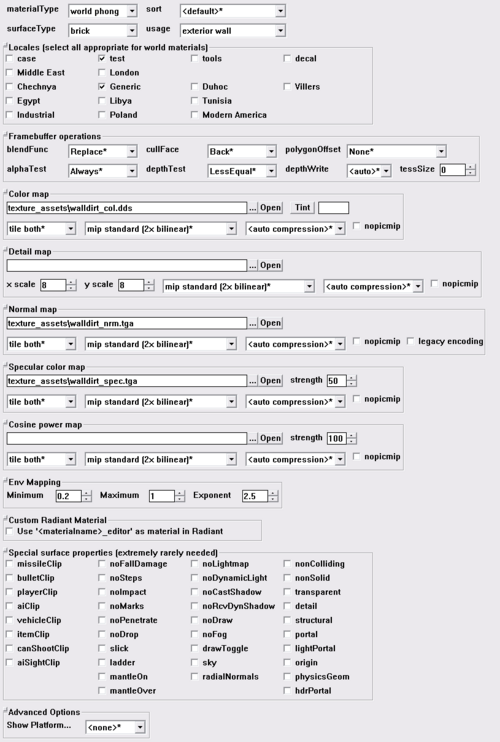
It contains a colour map (the texture), a normal map (creates a depth field of the texture for realistic shadows) and a specular colour map (used to make it shine, as if water is on the texture). Open the assets manager, open levels.gdt, create a new material and call it 'walldirt'. Now use the following settings:
Save levels.gdt, and click PC Convert -> This Asset Only. 3 textures (.iwi files) will appear in '[root]/raw/images/'; 'walldirt_col.iwi', 'walldirt_nrm.iwi' and something similar named as '~walldirt_spec-r-25g-25b-25&$~ae6da276.iwi'. These files should be put in your .iwd file, in the images directory, if you want to play your map with the custom texture.
Making a tunnel
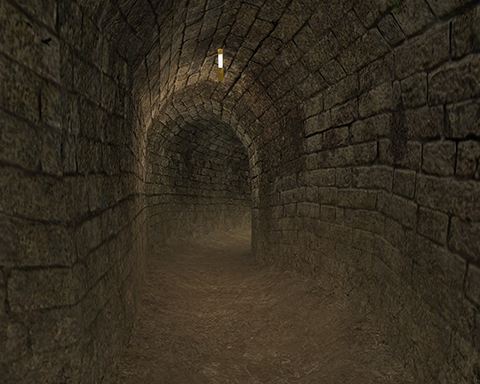
Making a tunnel can be quite tricky. You want to get the textures right and don't want any lightmap errors. I found my method for doing this, which I will explain here.
We will make a tunnel part. This is a straight piece of tunnel which we can use multiple times by connecting the ends of 2 parts. Decide what length you want it to have. I choose it to be '384' worlds units occupied by 7 vertexes, but choose what fits best for you.
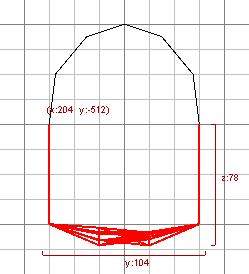
Create a terrain mesh which is 9 (or more, if you want to make it more detailed / rounded) in width and 7 (more or less, depends on your choice), press Ctrl + I to switch the normal direction and start bending the vertex columns (so you keep pressing Ctrl + Tab till you see the side of the mesh which has 9 vertexes) by selecting the column and moving it downwards. The picture on the right is token with a grid of 16x16, I used a grid of 2x2 for making it. Make it more or less how the picture displays it (don't mind the selected parts, these are for later on). Apply the walldirt texture to it.
Now create another texture mesh, with the same height as the previous one, but now with 4 vertexes in width (or more for more detail). This will be the ground. Make it a bit deeper in the middle using the advanced patch editing options window. Be sure that the ground MUST touch the wall, if you accidentally unattached them, then deselect everything, then select the wall, then the ground and reattach the vertexes. Apply texture 'me_ground_mud1'.
Select the ground mesh, press Ctrl + C, Ctrl + V and apply the 'ch_ground_mud02_decal' texture. Press 'v', select the rows in the middle of the path, the press 'g' and make it transparent.
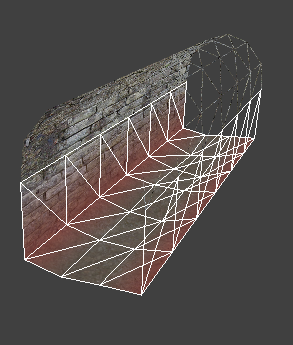
Select the stone-texture mesh and press Space, go to the front view of your tunnel part and select the first or the second vertex (column) above the vertex (column) that touches the ground. Press Ctrl + Shift + X, deselect both and do the same for the other side. Now delete the top part (the ceiling), and assign the texture 'ch_ground_mud02_decal' to both sides. Make the top vertex columns transparent (and any vertex in between should be given a shade of transparency). Now move it to the same position the stone texture mesh is (the Space bar copies and moves, we move it back onto place).
Select the non-ground meshes (the ceiling / wall and the dirt we applied), press 's' and select Natural. For the 2 ground meshes we select CAP. Now press Shift + L, select all meshes and select Natural (this is important to get rid of those lightmap errors).
We can now copy-paste the tunnel part, connect two parts and changing directions. Be sure that whenever you connect two part, you'll have to reconnect the vertexes so it looks like one tunnel.
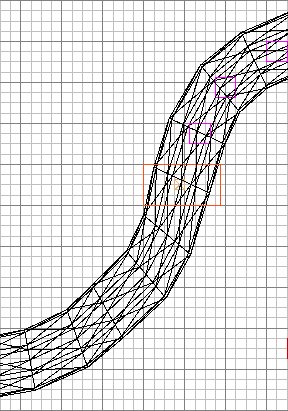
Changing direction is fairly easy, you go to top-view and select a row of the tunnel part. The go to Selection -> Rotate -> Arbitrary Direction, in the Z field you add a value like 10 (soft turning) or 20 (quick turning). I usually use 15. The next row would then get the value 30, the 45, 60, etc. You move each row so you get a nice turn.
Now we have one final step to do, and that is adding light. First we want to have a light source, the 'com_utility_light_on' model is the one we'll use. Place it in the middle of the tunnel, up to the ceiling. Now add a light object (right click in the grid -> light), just beneath the model, about 8 units beneath. I changed the following key / value pairs:
"_color" ".9 .7 .5"
"radius" "200"
This gives a bit of an orange light source, which simply looks better then plain white :P
You should now have the ability to make some awesome tunnel network ;-), good luck!
Made by Daevius
