Call of Duty 4: Minimap: Difference between revisions
| Line 39: | Line 39: | ||
==Add it to your map== | ==Add it to your map== | ||
Bring up the [[Call of Duty 4: Assets Manager| | *Bring up the [[Call of Duty 4: Assets Manager|Asset Manager]], and click File -> Open. Go to '[root]/source_data/' and open 'levels.gdt'. | ||
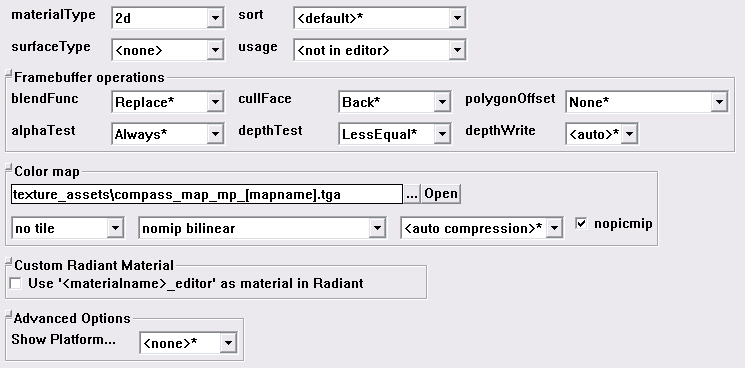
On the left side, click 'material', and press 'New Entry'. In the textbox enter 'compass_map_[mapname]'. Now simply be sure the right panel looks exactly like this: | *On the left side, click 'material', and press 'New Entry'. In the textbox enter 'compass_map_[mapname]'. Now simply be sure the right panel looks exactly like this: | ||
[[Image:Call of Duty 4 tutorials minimap asset manager.png|center]] | [[Image:Call of Duty 4 tutorials minimap asset manager.png|center]] | ||
When you're done, click PC Convert -> Current Asset Only. If no errors appear, you've done it right. | *When you're done, click PC Convert -> Current Asset Only. If no errors appear, you've done it right. | ||
In '[root]/raw/images/' a new image has appeared, called 'compass_map_[mapname].iwi'. [[Call of Duty 4: .IWD file|Copy this into your [mapname].iwd, in the images directory]]. Now go to '[root]/raw/maps/mp/[mapname].gsc' and open it using Notepad (if it doesn't yet exists, copy one from an existing map, and rename that map's name to your map name) and add the following (or modify) lines: | *In '[root]/raw/images/' a new image has appeared, called 'compass_map_[mapname].iwi'. [[Call of Duty 4: .IWD file|Copy this into your [mapname].iwd, in the images directory]]. Now go to '[root]/raw/maps/mp/[mapname].gsc' and open it using Notepad (if it doesn't yet exists, copy one from an existing map, and rename that map's name to your map name) and add the following (or modify) lines: | ||
maps\mp\_compass::setupMiniMap("compass_map_[mapname]"); | maps\mp\_compass::setupMiniMap("compass_map_[mapname]"); | ||
setdvar("compassmaxrange","2000"); | setdvar("compassmaxrange","2000"); | ||
The compassmaxrange value should be changed to what you like. The lower the number, the shorter the minimap's range, but the more precise. | *The compassmaxrange value should be changed to what you like. The lower the number, the shorter the minimap's range, but the more precise. | ||
Now, in the CoD4 Compile Tools program, you select your map and [[Call of Duty 4: Update Zone File|update your zone file]]. Add this line: | *Now, in the CoD4 Compile Tools program, you select your map and [[Call of Duty 4: Update Zone File|update your zone file]]. Add this line: | ||
material,compass_map_[mapname] | material,compass_map_[mapname] | ||
Now you should [[Call of Duty 4: Releasing General|finalise your map and run it]] your map and run it. The compass should now work. | *Now you should [[Call of Duty 4: Releasing General|finalise your map and run it]] your map and run it. The compass should now work. | ||
''Made by Daevius'' | ''Made by Daevius'' | ||
--[[User:Zeroy|Zeroy.]] 18:10, 17 October 2008 (UTC) | |||
Revision as of 18:10, 17 October 2008
![]() This tutorial will explain you how you can create a minimap for your multiplayer map.
This tutorial will explain you how you can create a minimap for your multiplayer map.
Throughout this tutorial I will use '[mapname]' and '[root]'. Single-quote around text simply indicate where it starts and ends, and should never be copied along. Basically, you should replace '[mapname]' with your map name, include the 'mp_' prefix. '[root]' indicates the root directory of your Call of Duty 4 installation, for most users this would probably be
C:/Program Files/Activision/Call of Duty 4 - Modern Warfare/
but it can differ depending on where you installed it (obviously ^^).
Prepare your map
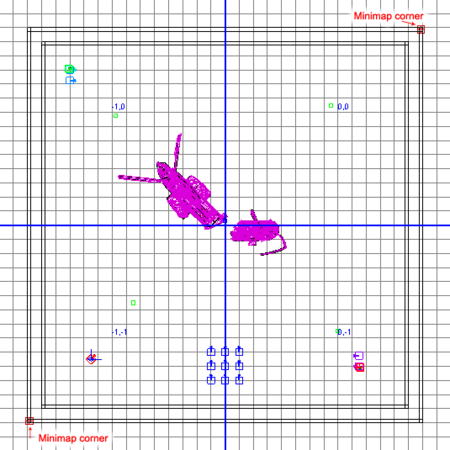
- In your map, you'll have to add two objects indicating the corners of your map. To do this, we right click with the mouse in the 2D grid, then click 'misc' and 'prefab'. Now go to '[root]/map_source/prefabs/' and select minimap_corner.map
- Now press Space, to copy the object, and place the 2 corners in the right position. One in the top-right corner, and one in the bottom-left corner, both should be around the highest building's roof in height. Also, try to limit the unplayable space inside the square of the 2 corners.
- Now fully recompile your map (you can check 'fast' and uncheck 'extra' in Light Options, as well as uncheck 'Connect Paths'). Move the '[mapname].ff' and '[mapname]_load.ff' files (which are located in '[root]/zone/english/') to '[root]/usermaps/[mapname]/' (create those directories if they do not yet exist). Also place the .iwd, if you have one already, in the same directory.
Take the screenshot
Before we can run the map, create a new shortcut for Call of Duty 4 (either copy an existing one or create one from '[root]/iw3mp.exe').
- Right click the shortcut, go to Properties and to the first text field (after 'Destination' I suppose) add the following text (append it) if you have the AWE4 mod in '[root]/Mods/':
+set thereisacow 1337 +set developer 1 +set developer_script 1 + set sv_punkbuster 0 +set fs_game Mods/awe4 +devmap [mapname] +set r_fullscreen
If you don't have AWE4, put this text at the end:
+set thereisacow 1337 +set developer 1 +set developer_script 1 + set sv_pure 0 +devmap [mapname] +set r_fullscreen
- Now double click the new shortcut. When the map has loaded, bring up the console and enter '/exec minimap'. This will get rid of all HUD elements. Now type '/scr_minimap_height 20000'. 20,000 indicates how high we will be taken and will probably be too high. Adjust the height by re-entering the command till the white box fits in the screen (try to make it as big as possible). Now take a screenshot.
- I suggest you use Photoshop, if you have it, Paint Shop Pro or Gimp can do the job as well but Paint is just a little too basic.
- Cut out the square _inside_ the white border, add some nice effect you like (I suggest a black fade from the sides), resize it to 512x512 (be sure to have 'Bicubic Sharper' selected in Photoshop) and save it as a .tga (Targa) file of 24 bits per pixel in '[root]/texture_assets/' (create the directory if it's not yet there).
Add it to your map
- Bring up the Asset Manager, and click File -> Open. Go to '[root]/source_data/' and open 'levels.gdt'.
- On the left side, click 'material', and press 'New Entry'. In the textbox enter 'compass_map_[mapname]'. Now simply be sure the right panel looks exactly like this:

- When you're done, click PC Convert -> Current Asset Only. If no errors appear, you've done it right.
- In '[root]/raw/images/' a new image has appeared, called 'compass_map_[mapname].iwi'. Copy this into your [mapname].iwd, in the images directory. Now go to '[root]/raw/maps/mp/[mapname].gsc' and open it using Notepad (if it doesn't yet exists, copy one from an existing map, and rename that map's name to your map name) and add the following (or modify) lines:
maps\mp\_compass::setupMiniMap("compass_map_[mapname]");
setdvar("compassmaxrange","2000");
- The compassmaxrange value should be changed to what you like. The lower the number, the shorter the minimap's range, but the more precise.
- Now, in the CoD4 Compile Tools program, you select your map and update your zone file. Add this line:
material,compass_map_[mapname]
- Now you should finalise your map and run it your map and run it. The compass should now work.
Made by Daevius
--Zeroy. 18:10, 17 October 2008 (UTC)

