Call of Duty 5: Vehicles in MP
![]() This tutorial will explain how to add Tanks to your Multiplayer levels.
This tutorial will explain how to add Tanks to your Multiplayer levels.

From Stock (non-custom)
The Stock Tanks are as follow:
Panzer IV: Armored MG
T34      : Armored MG
They all have fully working FXs, Sounds, Damage, HUD stuff;
Pre-requisite
In Radiant
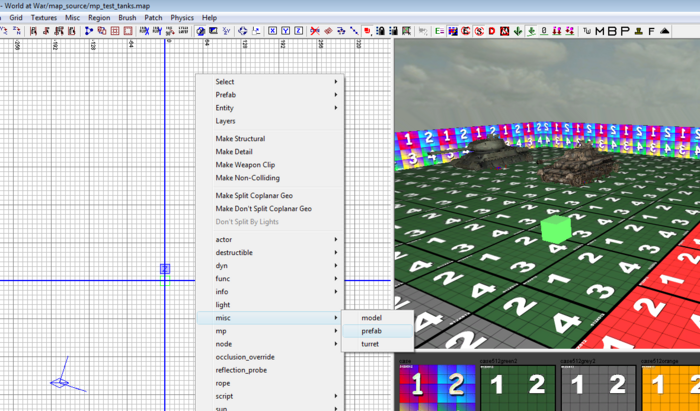
- Open your map in Radiant and place the Tank prefabs by right-clicking on the 2D view > misc > prefab
- Browse to ..\Call of Duty - World at War\map_source\_prefabs\MP\ and pick the desired prefab
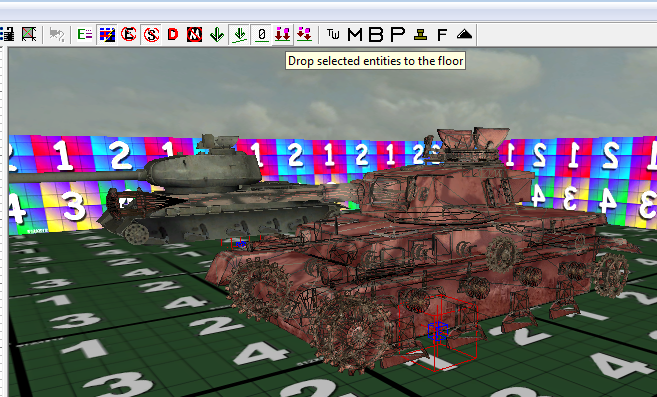
- Place in map and drop to ground using the drop to ground tool as shown below:
- Add more tank prefabs if desired
- Save your map and exit radiant
Check Map GSC file
- Check that your main Map GSC contains the line maps\mp\_load::main(); as shown in the example map in pack:
main()
{
	maps\mp\_load::main();

	game["allies"] = "marines";
	game["axis"] = "japanese";
	game["attackers"] = "allies";
	game["defenders"] = "axis";
	game["allies_soldiertype"] = "pacific";
	game["axis_soldiertype"] = "pacific";

}
Create Clientscript File
- You now need to create a new file similar to your Map GSC
- Assuming your Map GSC in \raw\maps\mp\ is like this:
main()
{
	maps\mp\_load::main();

	game["allies"] = "marines";
	game["axis"] = "japanese";
	game["attackers"] = "allies";
	game["defenders"] = "axis";
	game["allies_soldiertype"] = "pacific";
	game["axis_soldiertype"] = "pacific";

}
Then create a new file mp_yourmap.csc under \raw\clientscripts\mp\ with the following in:
#include clientscripts\mp\_utility;

main()
{
	// If the team nationalites change in this level's gsc file,
	// you must update the team nationality here!
	level.allies_team = "marines";
	level.axis_team   = "japanese";

	// For tanks Eexhaust and treads
	clientscripts\mp\_panzeriv::main( "vehicle_ger_tracked_panzer4_mp" );
	clientscripts\mp\_t34::main( "vehicle_rus_tracked_t34_mp" );

	// _load!
	clientscripts\mp\_load::main();

	//clientscripts\mp\mp_yourmap_fx::main();

	thread clientscripts\mp\_fx::fx_init(0);
	thread clientscripts\mp\_audio::audio_init(0);

	//thread clientscripts\mp\mp_yourmap_amb::main();

	// This needs to be called after all systems have been registered.
	thread waitforclient(0);

	println("*** Client : mp_test_tanks running...");
}
You will notice that in the example above the two Tanks type are called:
clientscripts\mp\_panzeriv::main( "vehicle_ger_tracked_panzer4_mp" );
clientscripts\mp\_t34::main( "vehicle_rus_tracked_t34_mp" );- If you were only using the Panzer IV then the file would only have those lines:
clientscripts\mp\_panzeriv::main( "vehicle_ger_tracked_panzer4_mp" );
//clientscripts\mp\_t34::main( "vehicle_rus_tracked_t34_mp" );
Update the Zone file
- Open your Map Zone File (in ..\Call of Duty - World at War\zone_source\) and add the following lines:
include,vehicles_drivable_mp
rawfile,clientscripts/mp/mp_yourmap.csc
sound,vehicles,veh_mp,all_mp ![]() Make sure to comment out or remove the line impactfx,mp_test_tanks or the map will not start!!
Make sure to comment out or remove the line impactfx,mp_test_tanks or the map will not start!!
- Example Zone file:
col_map_mp,maps/mp/mp_test1234.d3dbsp
rawfile,maps/mp/mp_test1234.gsc
//impactfx,mp_test1234
sound,common,mp_test1234,!all_mp
sound,generic,mp_test1234,!all_mp
sound,voiceovers,mp_test1234,!all_mp
sound,multiplayer,mp_test1234,!all_mp
character,char_usa_raider_player_rifle
character,char_usa_raider_player_cqb
character,char_usa_raider_player_assault
character,char_usa_raider_player_lmg
character,char_usa_raider_player_smg
character,char_jap_impinf_player_smg
character,char_jap_impinf_player_rifle
character,char_jap_impinf_player_lmg
character,char_jap_impinf_player_cqb
character,char_jap_impinf_player_assault

include,vehicles_drivable_mp
rawfile,clientscripts/mp/mp_yourmap.csc
sound,vehicles,veh_mp,all_mp- Save and close
- Using Launcher compile your map and test!
Problems?
- If you previsously had the _vehicles.gsc modded belwo then you might get a script error, if this happens simply open up you original 1.0 ModTools Archive and restore the file /maps/mp/_vehicles.gsc.
- Getting a message "Exceeded 400Fxs assets"? Make sure to comment out or remove the line impactfx,mp_yourmap from your Zone File to fix;
Custom Tanks addition
The tanks contained in the pack below (second download) are as follow:
Panzer IV: Armored MG, Unarmored MG - Armored Flamethrower, Unarmored Flamethrower
T34      : Armored MG, Unarmored MG - Armored Flamethrower, Unarmored Flamethrower
They all have fully working FXs, Sounds, Damage, HUD stuff;
Pre-requisite
- The latter contains soundaliases/sound/vehicle/destructibledef/destructiblepieces/gsc/clientscripts/physic and map example;
- Simply unzip in your Call Of Duty 5 Installation folder;
![]() All files contained in the pack are custom or stock but a few stock files are modded /maps/mp/_vehicles.gsc and /soundaliases/vehicles.csv so make sure to backup those files!
All files contained in the pack are custom or stock but a few stock files are modded /maps/mp/_vehicles.gsc and /soundaliases/vehicles.csv so make sure to backup those files!
In Radiant
- Open your map in Radiant and place the Tank prefabs by right-clicking on the 2D view > misc > prefab
- Browse to ..\Call of Duty - World at War\map_source\_prefabs\MP\ and pick the desired prefab
- Place in map and drop to ground using the drop to ground tool as shown below:
- Add more tank prefabs if desired
- Save your map and exit radiant
Check Map GSC file
- Check that your main Map GSC contains the line maps\mp\_load::main(); as shown in the example map in pack:
main()
{
	maps\mp\_load::main();

	game["allies"] = "marines";
	game["axis"] = "japanese";
	game["attackers"] = "allies";
	game["defenders"] = "axis";
	game["allies_soldiertype"] = "pacific";
	game["axis_soldiertype"] = "pacific";

}
Create Clientscript File
- You now need to create a new file similar to your Map GSC
- Assuming your Map GSC in \raw\maps\mp\ is like this:
main()
{
	maps\mp\_load::main();

	game["allies"] = "marines";
	game["axis"] = "japanese";
	game["attackers"] = "allies";
	game["defenders"] = "axis";
	game["allies_soldiertype"] = "pacific";
	game["axis_soldiertype"] = "pacific";

}
Then create a new file mp_yourmap.csc under \raw\clientscripts\mp\ with the following in:
#include clientscripts\mp\_utility;

main()
{
	// If the team nationalites change in this level's gsc file,
	// you must update the team nationality here!
	level.allies_team = "marines";
	level.axis_team   = "japanese";

	// For tanks Eexhaust and treads
	clientscripts\mp\_panzeriv::main( "vehicle_ger_tracked_panzer4_mp" );
	clientscripts\mp\_t34::main( "vehicle_rus_tracked_t34_mp" );
	clientscripts\mp\_panzeriv_flm::main( "vehicle_ger_tracked_panzer4_mp" );
	clientscripts\mp\_t34_flm::main( "vehicle_rus_tracked_t34_mp" );

	// _load!
	clientscripts\mp\_load::main();

	//clientscripts\mp\mp_yourmap_fx::main();

	thread clientscripts\mp\_fx::fx_init(0);
	thread clientscripts\mp\_audio::audio_init(0);

	//thread clientscripts\mp\mp_yourmap_amb::main();

	// This needs to be called after all systems have been registered.
	thread waitforclient(0);

	println("*** Client : mp_test_tanks running...");
}
You will notice that in the example above (taken from map example) all 4 Tanks type are called:
clientscripts\mp\_panzeriv::main( "vehicle_ger_tracked_panzer4_mp" );
clientscripts\mp\_t34::main( "vehicle_rus_tracked_t34_mp" );
clientscripts\mp\_panzeriv_flm::main( "vehicle_ger_tracked_panzer4_mp" );
clientscripts\mp\_t34_flm::main( "vehicle_rus_tracked_t34_mp"- If you were only using the main Panzer and T34 then the file would only have those lines:
clientscripts\mp\_panzeriv::main( "vehicle_ger_tracked_panzer4_mp" );
clientscripts\mp\_t34::main( "vehicle_rus_tracked_t34_mp" );
Update the Zone file
- Open your Map Zone File (in ..\Call of Duty - World at War\zone_source\) and add the following lines:
// added for tanks
include,vehicles_drivable_mp
rawfile,clientscripts/mp/mp_yourmap.csc
sound,vehicles,veh_mp,all_mp
rawfile,clientscripts/mp/_t34_flm.csc
rawfile,clientscripts/mp/_panzeriv_flm.csc
rawfile,maps/mp/_t34_flm.gsc
rawfile,maps/mp/_panzeriv_flm.gsc
rawfile,maps/mp/_vehicles.gsc ![]() Make sure to comment out or remove the line impactfx,mp_test_tanks or the map will not start!!
Make sure to comment out or remove the line impactfx,mp_test_tanks or the map will not start!!
- Save and close
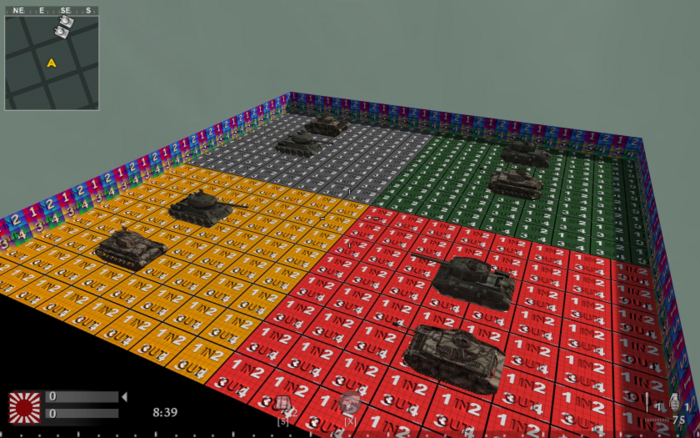
- Using Launcher compile your map and test! All going well you will have something like this:
Problems?
- Getting a message "Exceeded 400Fxs assets"? Make sure to comment out or remove the line impactfx,mp_yourmap from your Zone File to fix
Thanks to Sven71, ChrisP.
--Zeroy. 02:04, 25 January 2009 (UTC)


