Call of Duty 5: Paulo88 Radiant Tips

ALIGN TEXTURE ON BRUSH
To align a texture around a corner on a brush, select the face you want to align to, Then ALT+Middle-Click on the face you want to align. The newly aligned face will also become selected so you can just keep going on more faces, like around a pillar.
For really smooth texture corners, don’t forget to use this method on the lightmaps as well.
HIDING ITEMS
If your finding it difficult to see what your doing in the XY or 3D view simply select the brushes / patches or even models you want to work with and press ALT + H. This will hide everything else, leaving you with a nice clear view.
Press SHIFT + H to bring everything back.
MOVING BRUSH EDGE
Whilst holding CTRL + LEFT MOUSE CLICK you can drag the edge of a brush.
Simply hold the above keys then drag the edge of the brush you want to move. Very useful if you want to a brush on an angle, whilst retaining its width.
SMOOTH CURVE PATCH
If you want to smooth out a curve patch then simply select the patch and hit SHIFT + ] this will add more verts to the patch. Very usefull if you wish to smooth out an archway.
Should you wish to remove verts simply hit SHIFT + [
PLACING MODELS
If your wanting to place a model around your level with a random size and rotation, then simply select the following:
(Random Drop & Drop level to terrain )
Then
- Place the model you want to copy into the level
- Select the model in radiant (so that is is highlighted)
- Then whilst holding CTRL + ALT simply click in the 3D view where you want your models placed.
This is great for adding grass models ;)
ASSET VIEWER
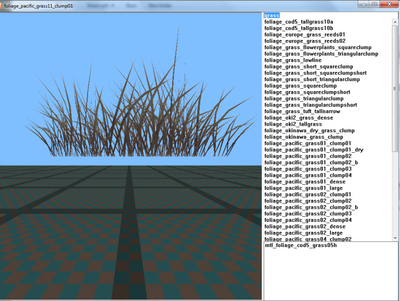
Asset Viewer is your friend !
Type a keyword in the top window to search for that ideal model.
Here I typed grass (lower case) as below...
COPYING PATCH
If you want to copy a patch but dont want to re-align it (usually this happens when pressing SPACE BAR), simply press CTRL+C then CTRL+V.
This will copy and paste the patch in exactly the same place, avoiding the need to re-align it.
ADDING CUSTOM FILTERS
All you have to do is edit the RadiantFilters.txt file with the relevant textures.!!Back up your file before altering it!!
So, in order to add the various clip filters for example locate RadiantFilters.txt, its in ..\Call of Duty - World at War\bin\ - Simply add :
Geometry MonsterClip fdhide
    {
    Texture clip_ai
    }
    Geometry PlayerClip fdhide
    {
    Texture clip_player
    }
    Geometry clipClip fdhide
    {
    Texture clip
    }
    Geometry fullClip fdhide
    {
    Texture clip_full
    }
    Geometry playerviechle fdhide
    {
    Texture clip_player_vehicle
    }
    Geometry vehicleclip fdhide
    {
    Texture clip_vehicle
    }
    Geometry wepcliptex fdhide
    {
    Texture clip_weapon
    }
Placed this just after :
Geometry Clip fdhide
    {
    Texture *clip
    }
Its that simple !
ROTATING PREFABS/MODELS ON CUSTOM ORIGIN
Did you know that you can rotate a model / prefab at a different origin of your chosing ?
- select the model / prefab you wish to rotate.
- press 'R' to go into rotate mode.
- Hold SHIFT and MIDDLE CLICK at the point of the model /prefab you wish to be the new origin.
( You should see the Pink Origin square move)
- You can now hold LEFT MOUSE to move the model / prefab around its new origin.
This is a great tip for positioning open doors etc
ALIGN DECAL
Ever had trouble aligning a decal or texture on a patch ?
Apart from using the obvious Horizontal / vertical shift in the surface inspector, did you know that you can also select the nearest verts on the patch, then siply use SHIFT + ARROW KEYS to align texture
ALIGN DECAL {Pt2}
Have you ever applied a decal or texture to a patch and after pressing "FIT" the texture aligns the wrong way.
Eg: A door / window texture that appears horizontal instead of vertical !
The reason for this is Radiant thinks that the "TOP" of the patch is actually the side. (This usually happens when using "Face to Terrain", or when you create a patch in the top down view then rotate it.)
Well did you know you can tell radiant which verts are the top !
Heres how :
Simply select the patch and press SHIFT + CTRL + M, then re FIT the texture. You will notice the the "TOP" of the patch has moved and the texture will align to the new "TOP".
Simply keep pressing SHIFT + CTRL + M until the "TOP" is correct.
NOTE : Simply rotating the texture will not usually work as, as soon as you hit FIT the texture will align incorrectly again.
PLACING DOG NODES (CODWAW)
There is no real easy way to place path nodes for dogs etc. However there is a way to help space them out.
If you add a KVP of:
Radius
250
Then you should see a small circle appear around the nodes.
You can use this as a guide for spacing your nodes. Of course don't forget to test your nodes by standing in corners and on top of stairs etc to ensure your dogs will path properly
--Zeroy 10:17, 26 May 2011 (IST)

