Call of Duty 5: Import a custom model: Difference between revisions
Jump to navigation
Jump to search
mNo edit summary |
mNo edit summary |
||
| Line 4: | Line 4: | ||
==Setup of Plugins== | |||
''(Not documented yet)'' | ''(Not documented yet)'' | ||
==Prepare the model== | |||
# Create and skin your model in Maya 8.5. | |||
# Call of Duty is a Z up system so you may need to rotate your model. Chances are you will have to rotate on the X axis 90 degrees. | |||
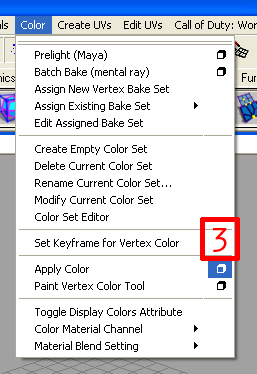
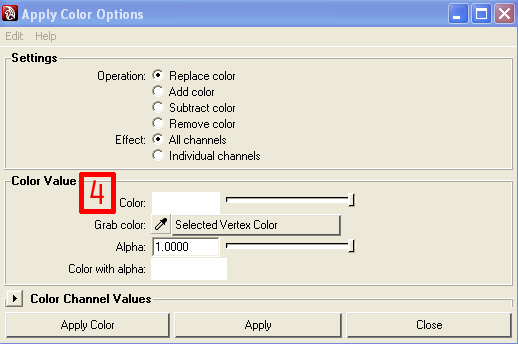
# With your model selected goto “Color → Apply Color Options (Box)”. | |||
# Change “Color” to White and “Apply”. | |||
[[Image:CoD5_Custom_Model_Import_3.jpg]] [[Image:CoD5_Custom_Model_Import_4.jpg]] | |||
==Export== | |||
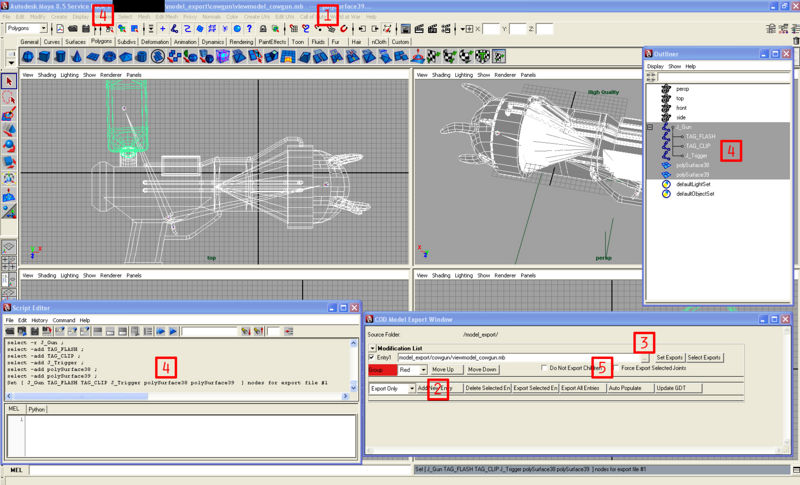
# Open the Model Exporter, “Call of Duty: World at War ? Model Exporter”. | |||
# Click on “Add New Entry” and check the box to the left of “Entry1”. | |||
# To the right, click on “...” and select the file currently open and you want to export. | |||
# Click Yes to replace if asked. | |||
# Open “Window ? Outliner” and select everything (Ctrl Click) you want to export, meshes and bones if you have them. Once everything is selected click on “Set Exports”. | |||
# If you have bones then also select “Force Export Selected Joints”. | |||
# It should say “Successfully exported...” in Maya's console. | |||
[[Image:CoD5_Custom_Model_Import_1.jpg|800px]] | |||
==Asset Manager== | |||
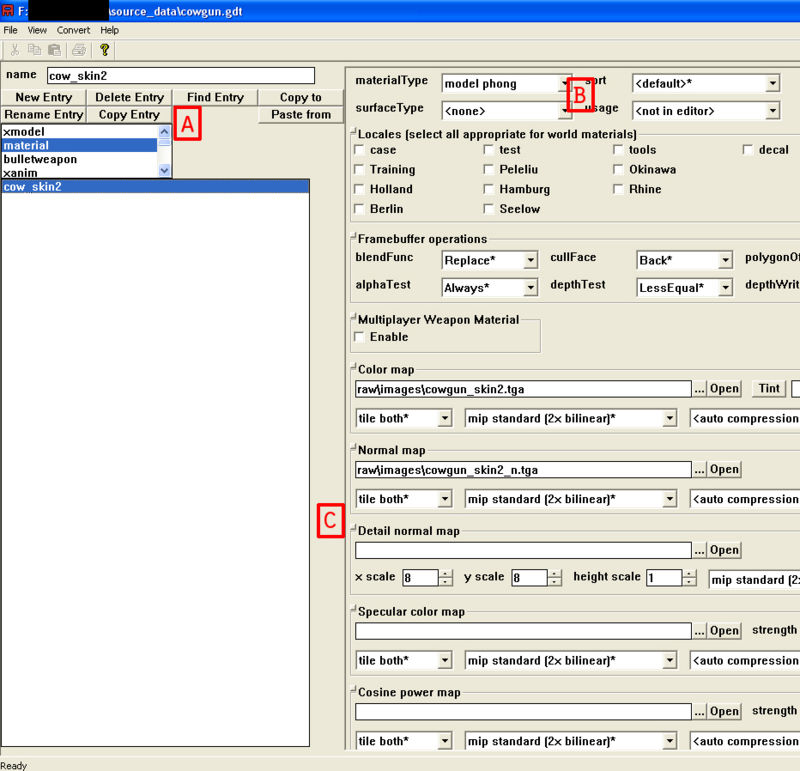
1. Open Asset manager and make a new .gdt with your model's name.<br> | 1. Open Asset manager and make a new .gdt with your model's name.<br> | ||
2. Setup your skin.<br> | 2. Setup your skin.<br> | ||
| Line 48: | Line 45: | ||
**2. Normal map is the bumps, white is high and black is low, uses entire greyscale.<br> | **2. Normal map is the bumps, white is high and black is low, uses entire greyscale.<br> | ||
**3. Detail normal map are tiny bumps when viewed very close.<br> | **3. Detail normal map are tiny bumps when viewed very close.<br> | ||
**4. Specular color map is the shininess, white is full shine, black is no shine.<br> | **4. Specular color map is the shininess, white is full shine, black is no shine. [CoDEmanX: It's rather the reflection color texture]<br> | ||
**5. Cosine power map is modifications to the spec map, very rarely used.<br> | **5. Cosine power map is modifications to the spec map, very rarely used. [CoDEmanX: This is actually the shininess texture]<br> | ||
3. Save and Convert<br> | 3. Save and Convert<br> | ||
*a. File → Save.<br> | *a. File → Save.<br> | ||
| Line 60: | Line 57: | ||
** CODWW is your installation directory.<br> | ** CODWW is your installation directory.<br> | ||
**3. You can make more of the same model with less polys and export it separately for a lower LOD.<br> | **3. You can make more of the same model with less polys and export it separately for a lower LOD.<br> | ||
5. Save and Convert. | 5. Save and Convert. | ||
[[Image:CoD5_Custom_Model_Import_5.jpg|800px]]<br><br> | [[Image:CoD5_Custom_Model_Import_5.jpg|800px]]<br><br> | ||
[[Image:CoD5_Custom_Model_Import_7.jpg|800px]] | [[Image:CoD5_Custom_Model_Import_7.jpg|800px]] | ||
==Viewing your new model== | |||
Goto CODWW/bin/asset_viewer.exe<br> | Goto CODWW/bin/asset_viewer.exe<br> | ||
Scroll down or search for your model and if it shows up then you have successfully exported your object.<br> | Scroll down or search for your model and if it shows up then you have successfully exported your object.<br> | ||
| Line 82: | Line 80: | ||
**raw/material_properties<br> | **raw/material_properties<br> | ||
<br>[[Image:CoD5_Custom_Model_Import_2.jpg|800px]] | <br>[[Image:CoD5_Custom_Model_Import_2.jpg|800px]] | ||
Sources: [http://wiki.treyarch.com/wiki/Importing_A_Custom_Model Treyarch's Wiki] | Sources: [http://wiki.treyarch.com/wiki/Importing_A_Custom_Model Treyarch's Wiki] | ||
[[Category:Call of Duty 5]] | [[Category:Call of Duty 5]] | ||
[[Category:Modtools]] | [[Category:Modtools]] | ||
Latest revision as of 16:29, 11 February 2012
This tutorial assumes that you already know how to create, compile & create GSCs,CSVs & FastFiles for your maps
![]() This tutorial will show you the basics of importing a new weapon model into CoD5.
This tutorial will show you the basics of importing a new weapon model into CoD5.
Setup of Plugins
(Not documented yet)
Prepare the model
- Create and skin your model in Maya 8.5.
- Call of Duty is a Z up system so you may need to rotate your model. Chances are you will have to rotate on the X axis 90 degrees.
- With your model selected goto “Color → Apply Color Options (Box)”.
- Change “Color” to White and “Apply”.
Export
- Open the Model Exporter, “Call of Duty: World at War ? Model Exporter”.
- Click on “Add New Entry” and check the box to the left of “Entry1”.
- To the right, click on “...” and select the file currently open and you want to export.
- Click Yes to replace if asked.
- Open “Window ? Outliner” and select everything (Ctrl Click) you want to export, meshes and bones if you have them. Once everything is selected click on “Set Exports”.
- If you have bones then also select “Force Export Selected Joints”.
- It should say “Successfully exported...” in Maya's console.
Asset Manager
1. Open Asset manager and make a new .gdt with your model's name.
2. Setup your skin.
- a. Scroll down to material and click on New Entry. This is the same name as in your Maya phong.
- b. The only changes you should make from the default are:
- 1. materialType / model phong
- 2. surfaceType / <none>
- 3. usage / <not in editor>
- 1. materialType / model phong
- c. Then select your skin.
- 1. Color map is the image.
- 2. Normal map is the bumps, white is high and black is low, uses entire greyscale.
- 3. Detail normal map are tiny bumps when viewed very close.
- 4. Specular color map is the shininess, white is full shine, black is no shine. [CoDEmanX: It's rather the reflection color texture]
- 5. Cosine power map is modifications to the spec map, very rarely used. [CoDEmanX: This is actually the shininess texture]
- 1. Color map is the image.
3. Save and Convert
- a. File → Save.
- b. Convert → Current Asset Only F10
4. Setup your xmodel.
- a. Scroll down to “xmodel” and click on “New Entry”. You can name this whatever you want.
- 1. type / rigid.
- 2. filename / your_model_export_file.XMODEL_EXPORT
- 1. type / rigid.
- b. This file is where your maya file is saved, move it to “CODWW'/model_export”.
- CODWW is your installation directory.
- 3. You can make more of the same model with less polys and export it separately for a lower LOD.
- CODWW is your installation directory.
5. Save and Convert.
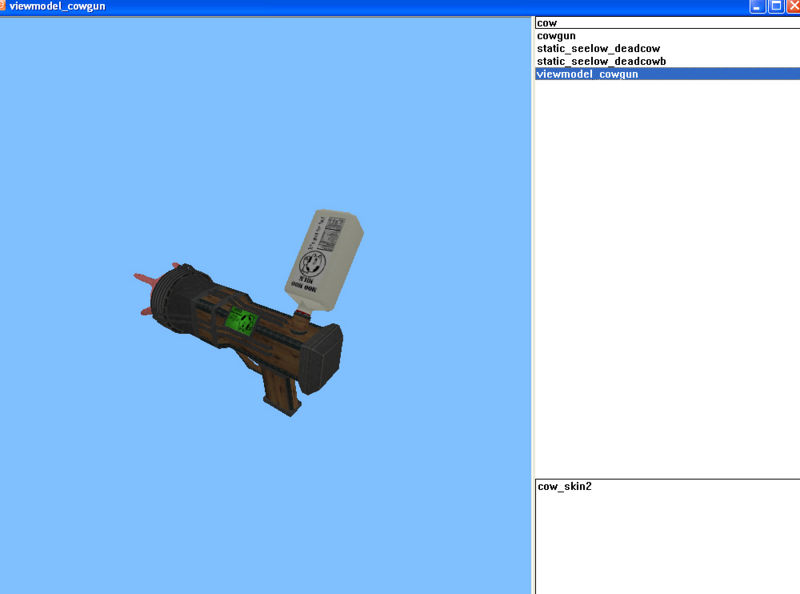
Viewing your new model
Goto CODWW/bin/asset_viewer.exe
Scroll down or search for your model and if it shows up then you have successfully exported your object.
If your object is too small or too big than you wanted then you will have to resize it in Maya and export again. 1 unit in Maya = 1 unit in Radiant.
To ship your map with the model then in your zone file add “xmodel,modelname”.
- Only “raw/images” has to be in your .iwd, even
There actually 6 files to your model if you send it off alone.
- Model:
- raw/xmodel
- raw/xmodelparts
- raw/xmodelsurfs
- raw/xmodel
- Skin:
- raw/images
- raw/materials
- raw/material_properties
- raw/images
Sources: Treyarch's Wiki

