Call of Duty 5: Custom Textures
![]() This Tutorial will explain how to create Custom Texture for use in Radiant and in your Custom maps. We will cover Standard and Blendable Textures.
This Tutorial will explain how to create Custom Texture for use in Radiant and in your Custom maps. We will cover Standard and Blendable Textures.
Pre-requisite
- First of all you must have Asset Manager in working order. Should you have any problems, please check HERE.
- To store the Texture assets (source files) TGAs or DDS you want to create a new folder:
C:\Program Files\Activision\Call of Duty - World at War\texture_assets\
- Under this folder i would advise to create sub folder to store your different textures set but that's up to you. The main thing is that the TGA or DDS files are place under the COD5 root.
- You can use any program that will save an image as either a .tga or .dds, Adobe Photoshop is the industry standard so we'll start in there.
If your using Adobe Photoshop then download this plug-in and install:
 The ATI Normal map generators is the easiest to use, it converts pre-made .tga files.
- You can use your color map or a bump map. The Nvidia plugin can do normal maps too in the "Normal map settings" button in the picture. Another program to consider is CrazyBump.
Preparing the Assets
- Once you have your source pictures - TGAs or DDS - you must make sure to resize correctly!
- Resize your image as (n^2)x(n^2) and "n" can be any number.
Example:
(8^2)x(16^2) = 64 x 256 pixels, this would be useful for trim.
 Some other sizes: 64 x 64, 512 x 512, 1024 x 512, 256 x 128, etc...
- Save the resulting file as either .tga or .dds in the folder created previously:
C:\Program Files\Activision\Call of Duty - World at War\texture_assets\
Information on Format
- TGA is only useful for opaque textures, this is easiest to use as there are no options.
- DDS can be used for textures that have transparency like windows.
- DXT1 has only 1 bit alpha, like an on / off switch. There is no fading and a pixel is either opaque or see through.
- DXT5 has the most detailed alpha so fading between opaque and transparent looks good, good for dirty glass.
- DXT3 has a less detailed alpha channel so its good for fading but only if there's a little of it.
The Conversion
Now that your asset(s) is(are) ready its time to convert it!
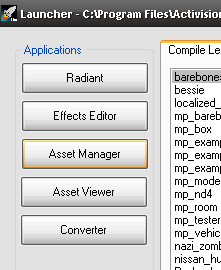
- Open the Launcher and then click on Asset Manager as shown here:
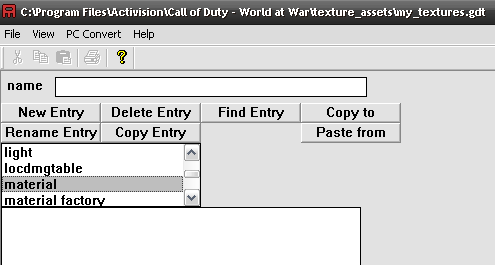
- Once in the Asset Manager - or Assman, go to File > Save As.. > and browse to:
C:\Program Files\Activision\Call of Duty - World at War\texture_assets\
- Pick a name for your Custom Gamedata file (.GDT) and OK.
Standard/Plain texture
For a standard/plain texture,
- In the drop down list, go down and select Material:
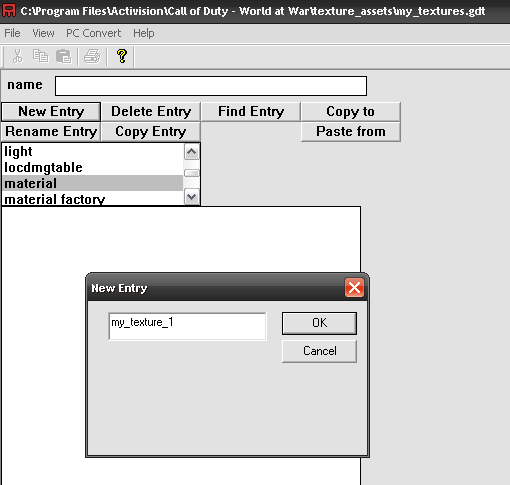
- Click New Entry, name the texture, for this example i called mine my_texture_1, but it could be anything.
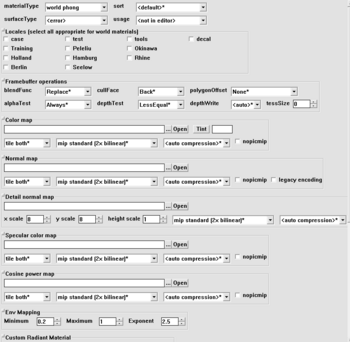
- A new panel is now showign on the right with all scary options!
No panic! Here is a quick run-down of the options you need to know:
- The top section has
MaterialType: Usually World Pong unless Effect or other, take a look at the list;
SurfaceType: Unless Decal or Sky then leave at Default;
Sort: Important, thats for the Impact Fxs/Markings, pick depending on the Surface;
Usage: Pick under which sections it will show in Radiant Textures Menu;
Locales: Again, Radiant stuffFramebuffer operations:
- BlendFunc: Transparancy settings, Replace is for most materials, Blend is for standard transparency like glass, multiply is used for grime decals, the rest are mostly for fx
- Cullface: Back will only draw outside faces, Front will only draw inside faces, None will draw both.
- PolygonOffset: Only adjust this for decals.
- AlphaTest: GE128 = punchout alpha, black and white (for Glass Windows!!). Always = everything else
- DepthTest: Adjusts the rendering order of the material. Dont touch :)
- DepthWrite: Turns z buffer info on or off, leave on default unless you know what you are doing!
Color Map:
Normal Map:
Detail Map:
Specular Map:


