Call of Duty 5: Breakable Brushes
 This tutorial assumes that you are already familiar with Radiant, Triggers and Entities
![]() Here's how to create breakable brushes
Here's how to create breakable brushes
Intro
These can be things such as windows, wooden planks and roofing. There are 2 ways this can be done in CODWaW:
- Using Radiant and script_exploder (EASY)
- Using Stock Destructable GSC Scripting (A little harder)
Breakables using Radiant - Easy
In Radiant
- Create the wall (before its been destroyed)
- Select the brushes used for the wall
- Right click on the brushes (whilst selected) and convert them to a scriptBrushModel (Script>Brushmodel)...
Next whilst having the brushmodel selected, Press n to bring down the console, then type in the following entities (Keys & Values)...
Key: script_exploder
Value: 10
The value can be any number, just make when you do this to the next part of the tutorial, they are the same number, this is so they are connected in some way
- Next you need to create the broken peices of the wall, so best way to do this is using the clipping tool...
- Once you have made the broken part of the wall, select all the brushes and Convert it to a scriptBrushModel (Script>Brushmodel)...
- Then type in the entities below (Keys & Values)...
Key: targetname
Value: exploder
and next
Key: script_exploder
Value: 10
- Then slide your new brushmodel over the old wall
- Once you have done all of that, you need to create a trigger
- For this I will use a damage trigger
- So create a brush covering the wall about 8 units over by every axis
- Next texture your trigger with a texture in usage > tools > trigger
- After you have done that right click the trigger and convert it to triggerdamage (Trigger>Damage)
Then type in the entities below:
Key: script_exploder
Value: 10
Extra parameters
A number of parameters can be set to the Trigger for different behaviors, here is a summary of these:
- Damage trigger will trigger if a bullet intersects them or if a projectile or grenade explodes inside the trigger.
wait		        -1 = one time only, otherwise triggers every frame.
accumulate	If set, this much damage must be accumulated before it will trigger
threshold	        If set, the min amount of damage that must be done to it to trigger it

''Note that accumulate & threshold can used at the same time.''
PISTOL_NO 	turns off response to pistol damage
RIFLE_NO 	turns off response to rifle damage
PROJ_NO 	turns off response to projectile damage from grenades and rockets.

''Note that turning off projectile damage will also turn off splash damage, whether or not the splash is on.''
SPLASH_NO 	turns off response to splash damage from grenades and rockets.
FIRE_NO 	        turns off response to flame/fire damage
MELEE_NO 	turns off response to melee damage
MISC_NO 	turns off response to all other misc types of damage
Note #1: Setting accumulate to anything >= 1 will result in only Explosives been able to destroy the brushes.
Note #2: Unfortunetly bullet damage needed is only 1 shot for this method.
Breakables using GSC scripts
A method using Stock GSC script which can be also applied to Models, Check out the raw/fx/destructibles/ folder for available stock FXs.
In Radiant
This example will look at a small wall made of several planks.
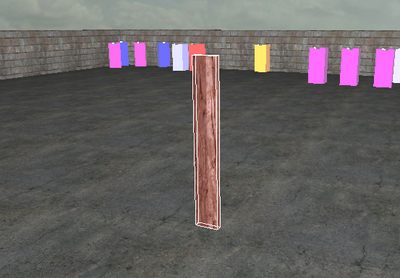
- Create your first plank brush (in the example i used 16*112*4)
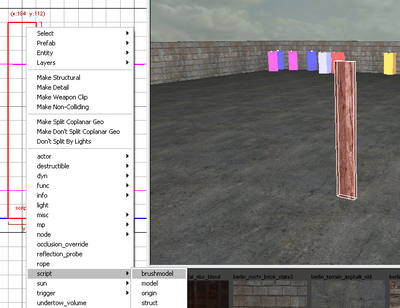
- Now Select the brush and right-click in 2D View > Script > Brushmodel
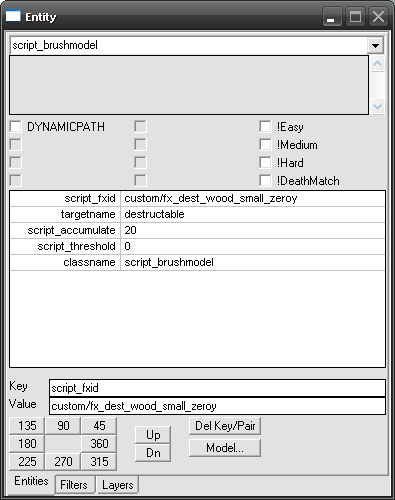
- Still with the brush selected, bring up the properties by pressing n and enter the following values
key: script_fxid
value: custom/fx_dest_wood_small_zeroy
Note: for use of this FX in the above you must download the example files HERE
key: targetname
value: destructable
key: script_accumulate
value: 20
Note: If not set the default value here is 40 - which would translate to 4 shots from a weapon
key: script_threshold
value: 0
Note: I dont use this option is this example. Basically this would set a threshold before accumulate damage starts
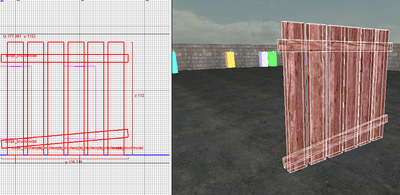
What is should look like:
- Now the first plank is ready I clone it (usign Spacebar) and adjust to make a small fence:
- You could save this as a prefab if you like by selecting all the brushes > right-click in 2D view > Prefab > Save Selected as a new prefab
- The Radiant part is now completed
GSC Scripts
- In your map/level GSC add the follwing line after maps\mp\_load::main();:
maps\mp\_destructables::init();
- Your GSC File might now look like this:
main()
{
	maps\mp\_load::main();
	maps\mp\_destructables::init();

	game["allies"] = "marines";
	game["axis"] = "japanese";
	game["attackers"] = "axis";
	game["defenders"] = "allies";
	game["allies_soldiertype"] = "pacific";
	game["axis_soldiertype"] = "pacific";
}
Zone File
- In your Zone file add the following line (the sound line might already be there)
sound,common,mp_yourmap,all_mp
rawfile,maps/mp/_destructables.gsc
fx,custom/fx_dest_wood_small_zeroy.efx
Note: mp_yourmap refers to the name of your Level of course.
- Save and Compile!
Example Files
![]() Download the prefab for the First tutorial (EASY) HERE
Download the prefab for the First tutorial (EASY) HERE
![]() Download the prefab for the Second tutorial HERE
Download the prefab for the Second tutorial HERE
![]() Download the FX used in the Second tutorial HERE
Download the FX used in the Second tutorial HERE
Note To use these simply unpack in the map_source/_prefabs folder for the first 2 and in /raw/fx/ for the third file.
--Zeroy. 12:49, 9 September 2009 (UTC)


