Call of Duty 4: Textures
Most model phong and world phong materials use a combination of 4 images: color map, normal map, specular map and cosine power map. Most color and normal maps are easy to find as their names are usually tagged with "_col" or "_nml", etc. The specular and cosine power maps are combined into a single .iwi image whose name is prefixed with a "~". The beginning of their name is usually similar to their color map name and the end usually has some extra stuff added.
I use IWI_X_DDS to convert the .iwi's to .dds's. (Not IWI2DDS, which is rather lame as you have to individually drag and drop images).
IWI_X_DDS is available at:
http://www.diegologic.net/CoD/iwi_x_dds.htm
Be sure to check to see if you have the latest version, as he's updated it a number of times.
Note that while it seems that this utility will convert color maps straight away, normal map images and spec+cos map images need to be tweaked in Photoshop before you'll have a full source image.
Specular & Cosine map
The specular+cosine map images are the easiest to convert. The dds image you open in Photoshop will be an RGBA image (with an alpha channel). The RGB information is what makes up the specular map, and the alpha channel is what makes up the cosine power map. Note that while the specular map image (RGB) is usually monotone, for some materials (like metals) there is actually definite color information. I usually just copy the alpha channel to a new RGB image by itself, save that as the cosine map, delete the alpha channel from the original image which can then be saved as the specular map.
Specular Color  RGB <--> RGB
Power grayscale RGB <--> Alpha
To separate it,
- convert the IWI to DDS
- open it in Photoshop
- delete the alpha channel and save as TGA (24bit is enough 'cause it's RGB only)
- undo to get the alpha channel back
- activate alpha channel only and set mode to grayscale, confirm discard channels
- save as TGA (put "_cos" in the name or something to make it clear)
Normal map
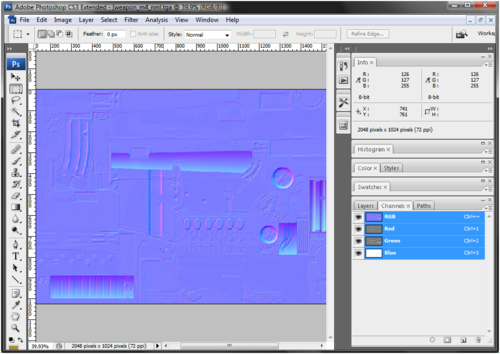
The normal map images are a little more difficult to convert back to the original image. Before we go any further, I want to clarify the terms I'll be using to distinguish between different versions of images. The following image shows the normal map image for the M4, which IW provided at the following location:
\Call of Duty 4 - Modern Warfare\model_export\modern_weapons\m16\weapon_m4_nml.tga
Here's the image (Normal map):
This is what I'll refer to as a "source" normal map image. It's the image you'll specify in Asset Manager in order to generate what I'll refer to as a "compiled" normal map image. (In reality, what's happening here is that the normal map image is being saved in a DXT5+alpha format in order to create the highest possible quality image with a minimum of DXT-related artifacts).
First of all when examining the source normal map image, we notice it's an RGB image with no alpha channel. Next, we'll look at the individual channels.
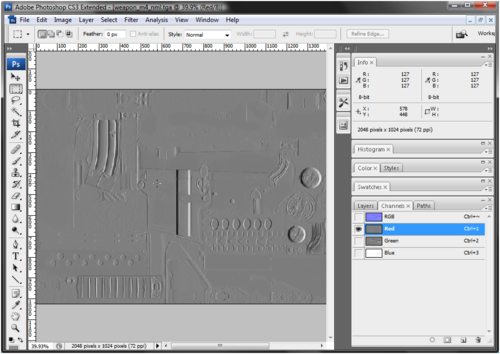
The Red channel:
The Red channel appears as a grayscale image where the subject in the image appears to be lit directly from the right.
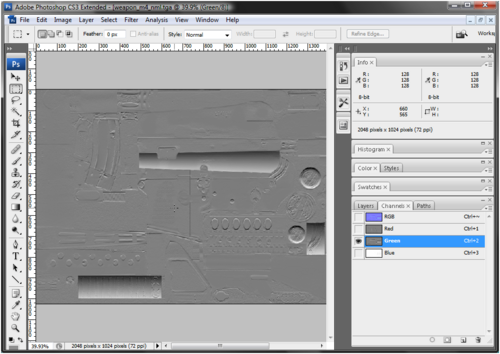
The Green channel:
The Green channel appears as a grayscale image where the subject in the image appears to be lit directly from the bottom.
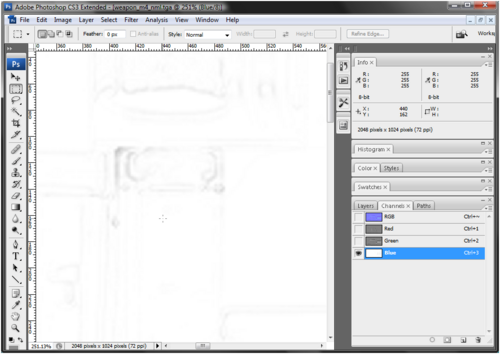
The Blue channel:
The Blue channel is mostly solid white, with only a small amount of discernible detail (I've zoomed in on one such spot in the image above).
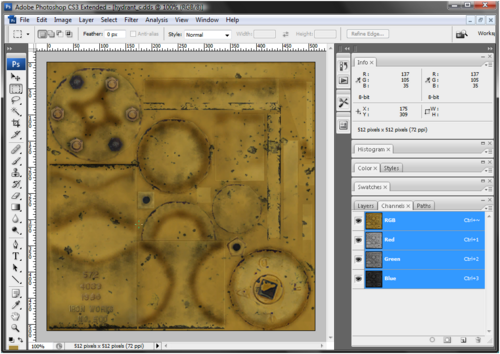
Next, we'll take a look at a compiled normal map image like you'll find in the various stock .iwd files. The following image is the color map for the fire hydrant model used in the game ("hydrant_c.iwi") (I'm showing this merely for reference, so that you know what object the normal map image corresponds to):
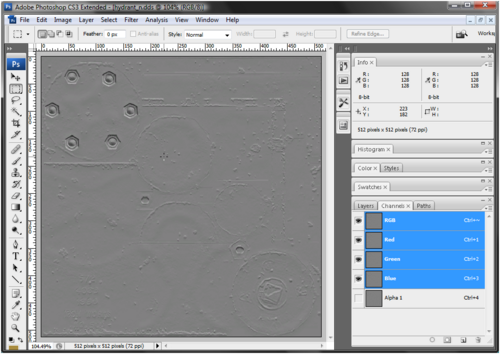
The following image shows the compiled form of the corresponding normal map image ("hydrant_n.iwi"):
This .dds image was converted from the original hydrant_n.iwi. This compiled normal map image appears quite different than the source normal map image shown above. It doesn't have the usual blue/pink/purple hue that a source normal map image has; instead, it's essentially monotone in appearance. Moreover, it has an alpha channel unlike the source normal map image shown above.
You cannot directly use a compiled normal map image as a source normal map image; doing so will produce unexpected results. It may not appear immediately obvious, but if we take a closer look at the compiled normal map image, we can figure out how to "reverse" the compile process and arrive at a usable source version of our normal map image.
If you look once again at the R, G, and B channels of the hydrant normal map image shown above, it appears as if the subject in the image is lit directly from the bottom. This is similar to the green channel in our example source normal map image shown earlier.
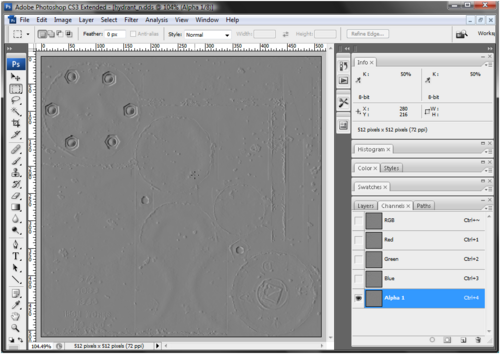
If you then look at the alpha channel in the compiled normal map image, you'll notice that it appears as though the subject in the image is being lit directly from the right. This is similar to the red channel in our example source normal map image shown earlier.
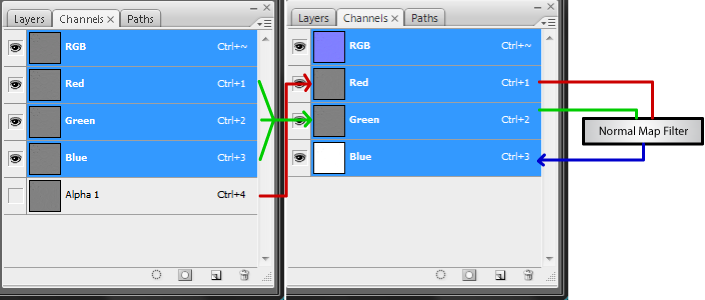
So, by now we've formed a tentative game plan:
- The composite information from the Red, Green, and Blue channels of the compiled normal map image will become the green channel of our source normal map image.
- The information from the Alpha channel of the compiled normal map image will become the red channel of our source normal map image.
- We will initially fill the Blue channel of our source normal map image with pure white.
- We'll then use the nvidia normal map filter on our source normal map image thus far to generate the small amount of data (the "height" information) into our Blue channel.
The above game plan can be represented graphically as the following:
Now, step by step.
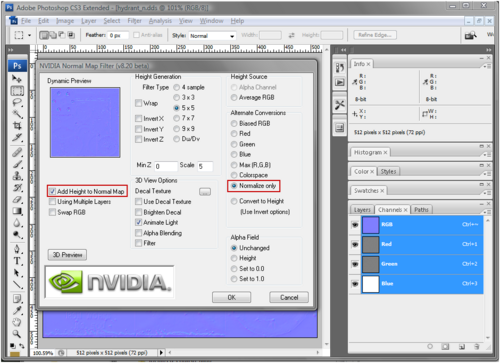
Select the Red, Green, and Blue channels of the compiled normal map image. Switch to the Layers palette, and Select All. Copy the Selection, then switch back to the Channels palette. In the Channels palette, select only the Green channel (click directly on it and all other channels will be deselected). Now paste the information into the green channel. Now click on the Alpha channel in the Channels palette so only it is visible. You should still have a marquee with the entire image selected, now Copy the information in the Alpha channel. As before, in the Channels palette, select only the Red channel and paste the information from the Alpha channel into it. Select only the Blue channel, make sure all of the image is selected (Ctl-A), then choose Edit > Fill... and fill the selection with White. Delete the Alpha channel and then click on "RGB" in the Channels palette to select all three channels (R, G, and B). Then, you need to apply the Nvidia normal map filter with settings as follows:
The important filter settings are outlined in Red. Note that the usual settings such as sample size (4 sample, 3 x 3, 5 x 5) and Min Z Scale (directly above the "3D View Options" text) shouldn't have any effect on the outcome, since the "Normalize only" option (which means that the image is already a normal map, and that we just want to re-normalize it) will determine the entire output.
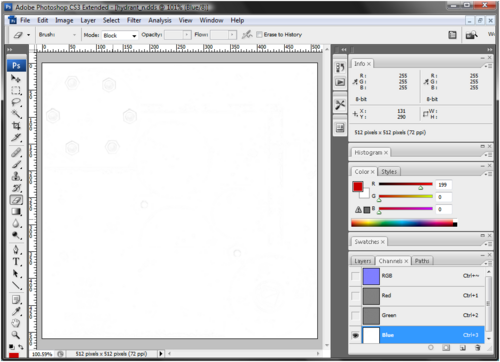
If you recall, our blue channel was entirely white prior to running this filter. As you can see in the image below, after running the filter with these settings, we now have the small amount of height information present in the blue channel (look for the faint outlines of the hex nuts in the upper left corner):
You should then flatten this image and save it as a Targa image (.tga) to be used in Asset Manager. Since there are only 3 channels in this image, saving it as a 24-bit .tga is sufficient. (32 bit targa is only needed if there's an alpha channel).
I've saved this procedure as an Adobe Photoshop CS3 Action for those who have Photoshop:
http://www.markdouma.com/cod/COD4Actions.zip (.zip, ~ 1 KB).
Make sure you have the latest version of the Nvidia DDS plugin also. They're available at:
http://developer.nvidia.com/object/photoshop_dds_plugins.html
Hope this helps.
- http://www.diegologic.net/CoD/iwi_x_dds.htm
- http://www.markdouma.com/cod/COD4Actions.zip
- http://developer.nvidia.com/object/photoshop_dds_plugins.html
- http://www.photoshopsupport.com/tools/actions-tutorials/photoshop-actions-for-photographers.html
Sources: Modsonwiki.com
