Call of Duty 4: Loadscreen Creation
By exsolvedh3
You can use any photo software to make the loading image. I will leave that part up to you. You'll want to make it 24bit target ( .tga ) and a size of 1024x1024 pixels.
Save the file to: [root]\texture_assets\loadscreen_[levelname].tga
[root] would be the default game path where the games .exe files are located [levelname] is the name of the bsp for the level.
In my example I used the test level called mp_test that was included in the mod tools. In my example I saved the loadscreen image to the following:
c:\program files\activision\call of duty 4 - modern warfare\texture_assets\loadscreen_mp_test.tga
Creating Material
Creating a material in the game using your custom targa image
- On the 'applications' tab of CoD4CompileTools click on the "Launch Asset Manager" button to launch the Asset Manager program. Now open the file
[root]\source_data\levels.gdt. You should see there is already a level entry for map names "test" and "mp_test" but we'll come back to those in a minute. Scroll down the list of asset types in the upper left and select "Material" in the list, then click the button "New Entry". You will not be prompted to enter the name of the new material you are creating. I named mine "loadscreen_mp_test" without the quotes.
You should now see many properties for the material you just created.
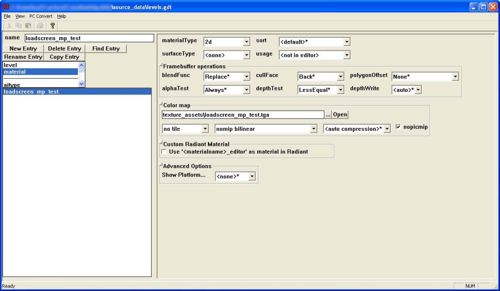
- First, change materialType to 2d. This will remove a lot of options that aren't needed for 2D materials. Next, set surfaceType to , and usage to .
- Because this is a loading image only, we do not need it to have a surface type to indicate bullet impact fx and sounds, and we also do not need it to show up in the editor. We don't plan on using this material on any world geometry.
- The default blend options should be fine, but make sure yours match the ones in the image below to make sure.
- For color map click the "..." button and select the tga image you made in the previous step. Set it to no tile, nomip bilinear, and check the nopicmip box.
Once you have the settings like the image below continue reading.
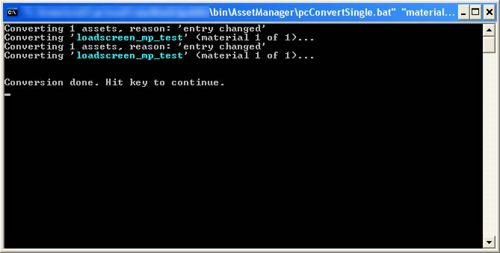
- Now that you have all the settings correct lets make sure the material converts properly without any errors. Click "PC Convert" -> "Current Asset Only" from Asset Managers drop down menus. This will convert this asset in a command line window and show you the results. If you have done everything correctly up to this point it should say that converted the material and finished without any errors.
- You might notice that the material has been converted to .iwi format and new files have been created:
raw\images\loadscreen_mp_test.iwi
raw\materials\loadscreen_mp_test
raw\material_properties\loadscreen_mp_test
When you package the map into a .iwd file you'll want to include the .iwi file. The others aren't necessary to be in the .iwd because they will be contained within the fast file for that level.
Tell your custom map to use the new material
You have now successfully created a material that the game can use as a load screen. We just need to tell the game to use that material when loading your map. You should still be in Asset Manager in the file levels.gdt. You can now select "level" asset type from the list. You should see those two levels listed there as we did when we first opened this file. You'll want to click the "New Entry" button here to create a new asset of type "level" in this GDT.
- Type in the name of your level ( it must be exactly the same name as your bsp ) and click ok.
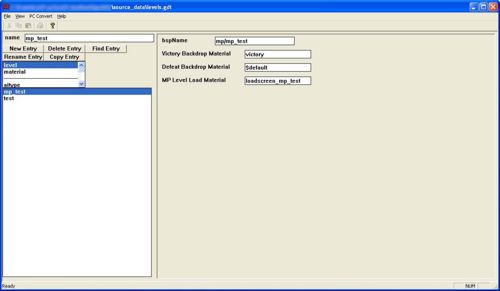
- There are just a few settings we need to set here. First is the bspName. In my example I set it to "mp/mp_test" because that is the path and filename to my bsp.
- This is a MP map so I don't care about victory or defeat materials so I'll just enter some generic materials used for that.
- Now "MP Level Load Material" is the one where you'll specify the custom material you just made in the previous step. In my example I created "loadscreen_mp_test" in the previous step, so I'll enter it here.
- Save the GDT and from CoD4CompileTools click "Run Converter" under the "Applications" tab. Converter will run and convert the level asset you just created. You shouldn't get any errors if you did everything correctly, and a new file should have been created:
raw\maps\[levelname].csv.
In my example it created:
raw\maps\mp_test.csv
- This csv file tells the game what materials to use when the level is loaded. You should never edit this file directly. Always make the changes in Asset Manager and then run converter.
The game will no longer load the loadscreen from the raw files.
Congrats, if you followed me correctly you should now have a custom loading image for your multiplayer map. Visit the forums if you are having trouble and we'll be more specific in this tutorial.


