Call of Duty 4: Loadscreen
Throughout this tutorial I will use '[mapname]' and '[root]'. Single-quote around text simply indicate where it starts and ends, and should never be copied along. Basically, you should replace '[mapname]' with your map name, include the 'mp_' prefix. '[root]' indicates the root directory of your Call of Duty 4 installation, for most users this would probably be 'C:/Program Files/Activision/Call of Duty 4 - Modern Warfare/', but it can differ depending on where you installed it (obviously ^^).
Making the screenshot
Run your map and take a nice position for a good photo. Open up the console, press '/exec minimap' to get rid of the HUD elements, and take a screenshot. Start your favourite photo-editing software and load the screenshot.
I found out that you have to resize the screenshot to 768x1024 (so the image gets compressed in width if you had 1280x1024 as resolution when you took the picture, if you use Photoshop make sure the Resample Image technique is Bicubic Sharper for extra quality). Now add 2 128 pixel black bars on the left and the right (Canvas Size... in Photoshop), so the final image is 1024x1024. Now you can save the file as a Targa file (.tga) in the 24 bits per pixel format. Safe it in '[root]/texture_assets/' as 'loadscreen_[mapname].tga'.
Creating the in-game image format
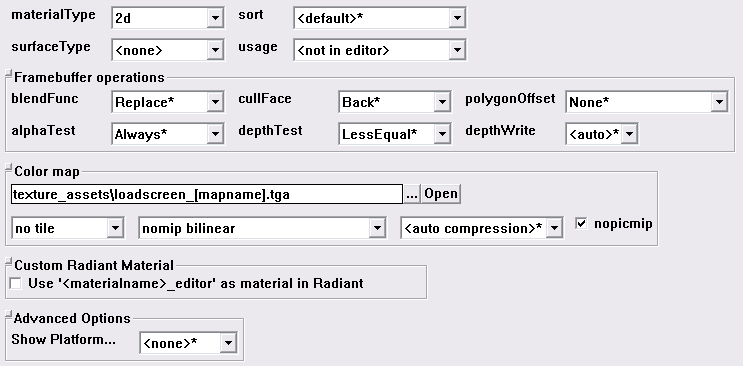
Start the assets manager and open a new file called 'levels.gdt' in '[root]/source_data/'. On the left panel you should scroll down and click 'material' and then 'New Entry'. Call it 'loadscreen_[mapname]' and fill in everything like in this picture:

Now go to PC Convert -> Current Asset Only...if no errors appear you've done it correctly.
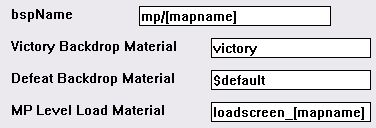
Now select 'level' on the left panel, create a New Entry and call it '[mapname]', fill the fields according to this picture:

Save levels.gdt and exit the assets manager.
Adding it to your map
Now update your zone file and add this line:
material,loadscreen_[mapname]
Then repack your .iwd file and add the .iwi file, which can be found in '[root]/raw/images/loadscreen_[mapname].iwi', to the package.
You can now rebuild your Fast File, move it into the usermaps/[mapname] directory, together with the [mapname].iwd file, and run your map. You should now have a working loadscreen.
Made by Daevius
