Call of Duty 4: Custom Textures: Difference between revisions
mNo edit summary |
(updated a bit) |
||
| Line 4: | Line 4: | ||
[[Category:Advanced Editing]] | [[Category:Advanced Editing]] | ||
{{warning_forpro}} | {{warning_forpro}} | ||
[[Image:Nutshell.png]] This tutorial will show you how to add a new custom texture to the game, | [[Image:Nutshell.png]] This tutorial will show you how to add a new custom texture to the game, to be used in Radiant. | ||
<br> | <br> | ||
''By | ''By NovemberDobby'' | ||
[[Image:warning.png]] Custom textures will show as white unless you are running a mod, as textures must be stored in an IWD archive. | [[Image:warning.png]] Custom textures will show as white unless you are running a mod, as textures must be stored in an IWD archive. | ||
[[Image:rgn_warning.png|right]] | [[Image:rgn_warning.png|right]] | ||
The game won't read custom IWD's at all unless a mod is running. | The game won't read custom IWD's at all unless a mod is running. | ||
Note: Custom textures will show as white unless you are running a mod, as textures must be stored in an IWD archive. COD4 won't read custom IWD's at all unless a mod is running. | |||
First of all, you'll need a texture file. This can be a .dds, .tga, or .jpg image - no other extensions will work with the converter. | |||
Open Asset Manager through the Cod4CompileTools, or by finding it in COD4\bin\asset_manager.exe. | |||
In the list box at the top left, select 'material', and click 'New Entry'. Pick a relevant name for the material, and make sure there are no spaces in it. | |||
Set the first four settings at the top of the options to: | |||
materialType: world phong | |||
* | sort: <default>* | ||
surfaceType: whatever you want, this will determine how bullets hit the material. Be sure to change it from 'error'. | |||
usage: this can be anything, but it'll help you sort the texture into a group with similar other materials in Radiant. | |||
In the 'Locales' section, pick one or more locales to access the texture from. Picking an appropriate locale is not vitally important, but make sure you pick at least one so you can find it in Radiant later. | |||
In the 'Color Map' option section, click the ellipses (...) button on the right of the text box. Navigate to your dds/jpg/tga texture and open it. This should be somewhere inside a sub-directory of COD4, as Asset Manager won't let you use one from any other location. | |||
If you have a Normal Map (AKA a bumpmap) for your texture, click the ellipses next to the Normal Map box, and navigate to that file. It must be in an uncompressed RGB format, such as .tga. | |||
Go to File>Save, and put the GDT file in \Call of Duty 4\source_data. Give it any name, bearing in mind you'll have to open this file again if you want to change/reconvert this texture. | |||
Go to PC Convert>Current Asset only, or hit F10. Choosing to convert all assets would convert every single stock asset that came with the mod tools, which can take quite a while and cause problems if interrupted. | |||
'''You should see something like this:''' | '''You should see something like this:''' | ||
[[Image:custom_669.png]] | |||
[[Image: | [[Image:warning.png]] But if there are any errors, the compiler will warn you. | ||
It will only re-convert if you have changed the input texture filename, changed the texture itself, or any other material option in Asset Manager. | |||
You should now be able to find your texture in Radiant, by going to textures>locales and selecting your chosen locales, or by using the material/surfaceType. | |||
If your texture appears gritty at a distance, then open up the image editing program you used to save it in, and make sure Mipmaps are generated (and reconvert). | |||
Distortion textures can be added by setting the materialType to distortion, and finding a colour map. | |||
-NovemberDobby | |||
Revision as of 01:09, 6 May 2009

![]() This tutorial will show you how to add a new custom texture to the game, to be used in Radiant.
This tutorial will show you how to add a new custom texture to the game, to be used in Radiant.
By NovemberDobby
 Custom textures will show as white unless you are running a mod, as textures must be stored in an IWD archive.

The game won't read custom IWD's at all unless a mod is running.
Note: Custom textures will show as white unless you are running a mod, as textures must be stored in an IWD archive. COD4 won't read custom IWD's at all unless a mod is running.
First of all, you'll need a texture file. This can be a .dds, .tga, or .jpg image - no other extensions will work with the converter.
Open Asset Manager through the Cod4CompileTools, or by finding it in COD4\bin\asset_manager.exe.
In the list box at the top left, select 'material', and click 'New Entry'. Pick a relevant name for the material, and make sure there are no spaces in it.
Set the first four settings at the top of the options to:
materialType: world phong
sort: <default>*
surfaceType: whatever you want, this will determine how bullets hit the material. Be sure to change it from 'error'.
usage: this can be anything, but it'll help you sort the texture into a group with similar other materials in Radiant.
In the 'Locales' section, pick one or more locales to access the texture from. Picking an appropriate locale is not vitally important, but make sure you pick at least one so you can find it in Radiant later.
In the 'Color Map' option section, click the ellipses (...) button on the right of the text box. Navigate to your dds/jpg/tga texture and open it. This should be somewhere inside a sub-directory of COD4, as Asset Manager won't let you use one from any other location.
If you have a Normal Map (AKA a bumpmap) for your texture, click the ellipses next to the Normal Map box, and navigate to that file. It must be in an uncompressed RGB format, such as .tga.
Go to File>Save, and put the GDT file in \Call of Duty 4\source_data. Give it any name, bearing in mind you'll have to open this file again if you want to change/reconvert this texture.
Go to PC Convert>Current Asset only, or hit F10. Choosing to convert all assets would convert every single stock asset that came with the mod tools, which can take quite a while and cause problems if interrupted.
You should see something like this:
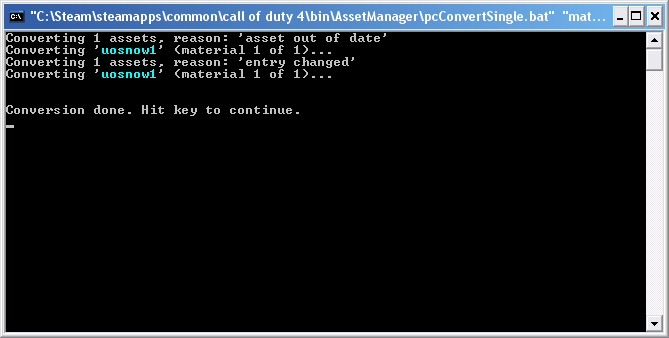

But if there are any errors, the compiler will warn you.
It will only re-convert if you have changed the input texture filename, changed the texture itself, or any other material option in Asset Manager.
You should now be able to find your texture in Radiant, by going to textures>locales and selecting your chosen locales, or by using the material/surfaceType.
If your texture appears gritty at a distance, then open up the image editing program you used to save it in, and make sure Mipmaps are generated (and reconvert).
Distortion textures can be added by setting the materialType to distortion, and finding a colour map.
-NovemberDobby