Call of Duty 5: SP Tutorial Tree Snipers
Tree Snipers
There are two types of tree snipers that we used in World at War. One was the kind that had the sniper already perched up in the trees, and the other has the enemy run up the tree and climb into the platform. We'll be using the latter in this example.
Setting Up a Tree Sniper:
- 1. Place the tree sniper prefab into the map. (the prefab is included for you in the example_ambush.zip file).
- It's located here: _prefabs/scripter/tree_sniper_platform_bare
- 2. Place a script_origin in the center of the platform on top of the tree. Place it at '0' height on top of the tree. It should look like it's halfway inside the platform.
- 3. Place a single crouch_cover pathnode on top of the platform. Make sure and check the 'DONT_LINK' checkbox.
- You can optionally check the 'DONT_STAND' checkbox so that the sniper remains crouching on the platform.
- 4. Place an appropriate enemy actor (actor_axis_jap_reg_type99riflescoped or actor_axis_jap_reg_type99riflebayonet). You can use any enemy type honestly, but it might seem silly if a guy with a shotugn climbs the tree to snipe you.
- Check the 'SPAWNER' checkbox and make sure you give the spawner the following key value pairs:
- Key: script_noteworthy
- Desc: This makes the guy be a tree sniper and sets him up to climb the tree.
- Value: climb
- Check the 'SPAWNER' checkbox and make sure you give the spawner the following key value pairs:
- 5. Place a trigger in the map and check the 'TRIGGER_SPAWN' checkbox. Give it the following key value pairs:
- Key: targetname
- Desc: This sets the trigger up for tree sniper usage.
- Value: tree_snipers
- 6. Now we need to link everything together:
- a. Select the trigger then select the spawner and press W to target the trigger to the spawner.
- b. Select the spawner then select the cover node placed on top of the platform and press W to target the spawner to the node.
- c. Select the node and then select the script_origin and press W to link the node to the script_origin.
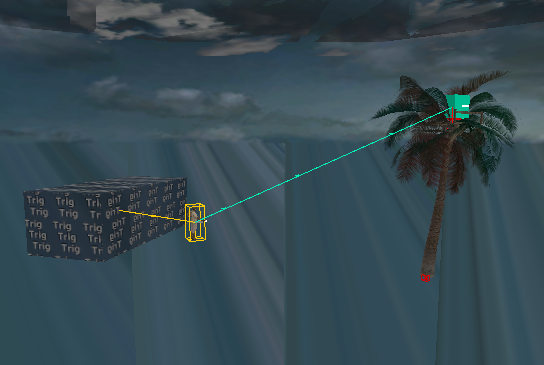
- 7. You should now have everything done in Radiant for the tree sniper. The setup should look something like the pic below:
- 8. The last step is to make sure you've got all the required elements in your level zone file, (.csv ), and your level script file, (.gsc).
- Put the following lines into the .csv file. The include file is provided for you in the example_ambush.zip file.
- include,tree_snipers
- Add the following line of script to your level script AFTER the call to _load::main()
- maps\_tree_snipers::main();
That's it! You should now have everything you need to get the Tree Snipers working!
Now we will move on to setting up the Flare Initiation.

