Call of Duty 5: Menu Modding Basics
![]() Tutorial on Menu scripting and scripting related to it
Tutorial on Menu scripting and scripting related to it
By xholyx
Item contains in the Tutorial are:
Well to start off, i recommend you to have a proper Text editor or Programming tool to have a good overview how to edit everything.
My mod folder i start with is going to be called : menumod
To start you have this to be done
- You have the modtools , and you understand how to make a proper mod folder.
- Downloaded wscite GSC programming tool HERE
- You have this program opened
- Open launcher.exe ( placed in Activision/Call of duty World at war/bin
- A few things you need to have copied from the RAW folder is
maps/mp/gametypes/_globallogic.gsc
ui_mp/wm_quickmessages
Also make a new folder in your mod folder called :functions
If you have this and you checked this twice! then we can start off.
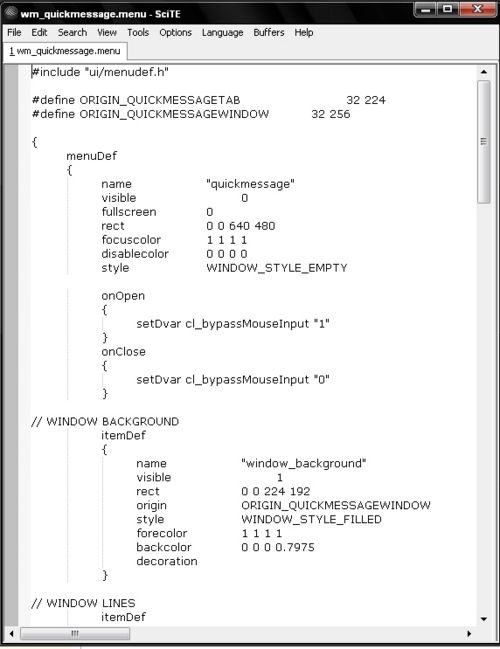
First we are going to open ui_mp/wm_quickmessages.menu with the Programming tool.
You will see this:
scroll down to the most lower point of the page .
You will see this
itemDef
        {
            name            "window"
            visible            1
            rect            16 52 0 0
            origin            ORIGIN_QUICKMESSAGEWINDOW
            forecolor        1 1 1 1
            textfont        UI_FONT_NORMAL
            textscale        .24
            textaligny        8
            text            "@QUICKMESSAGE_3_RESPONSES"
            decoration
        }
        execKey "3" { close quickmessage; open quickresponses }

        itemDef
        {
            name            "window"
            visible            1
            rect            16 68 0 0
            origin            ORIGIN_QUICKMESSAGEWINDOW
            forecolor        1 1 1 1
            textfont        UI_FONT_NORMAL
            textscale        .24
            textaligny        8
            text            "@QUICKMESSAGE_ESC_EXIT"
            decoration
        }
these 2 item defs are functions also called items.
itemdef{} is the function, you can fill in a lot things but we are going to do this:
- add a new button
- change the text
- change coordinates of the buttons
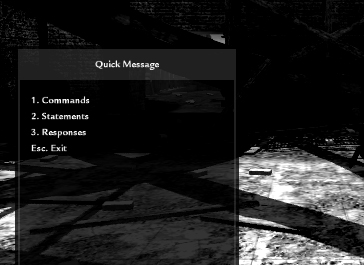
in the quickmessage menu it will look like this in-game
You see there is no space between the buttons to place anything, as we want to place a new button between Esc. and button 3. What we are going to do is to place the Esc button a bit to below and insert the button with same coordinates a.k.a RECT
![]() note: rect coordinates are like this
note: rect coordinates are like this
rect x y width height
So if i want to make a image in a menu that is below on left side of screen ( 400 y below ) and the image is 64 high and 128 wide then do this
rect 0 400 64 128
- Now lets off and start the coordinates first to have something about standard values, the standard y size for this font size is 16 , so we need to add 1 line ,
this means the Esc button will go 16 y's below ( thats +16 ) so 68 + 16 = 84
- Also we are going do add a new button so we just copy the itemdef of button3 like below and we are just editing it with the same coordinates as Esc button rect 16 68 0 0
With the new button we want to open a new menu , this one will be called mymenu . So we also change the execkeyint as we want to open it with 4 and if we press 4 it will open a new menu called mymenu ,plus it closes this menu to prevent a lot of menus be opened at the same time.
itemDef
        {
            name            "window"
            visible            1
            rect            16 <font color="red">64</font> 0 0
            origin            ORIGIN_QUICKMESSAGEWINDOW
            forecolor        1 1 1 1
            textfont        UI_FONT_NORMAL
            textscale        .24
            textaligny        8
            <font color="red">text            "4.Open my menu"</font>
            decoration
        }
        execKey <font color="red">"4" { close quickmessage; open mynewmenu</font> }
Then insert it below and change escape button coordinates to + 16
itemDef
        {
            name            "window"
            visible            1
            rect            16 52 0 0
            origin            ORIGIN_QUICKMESSAGEWINDOW
            forecolor        1 1 1 1
            textfont        UI_FONT_NORMAL
            textscale        .24
            textaligny        8
            text            "@QUICKMESSAGE_3_RESPONSES"
            decoration
        }
        execKey "3" { close quickmessage; open quickresponses }

               itemDef
        {
            name            "window"
            visible            1
            rect            16 64 0 0
            origin            ORIGIN_QUICKMESSAGEWINDOW
            forecolor        1 1 1 1
            textfont        UI_FONT_NORMAL
            textscale        .24
            textaligny        8
            text            "4.Open my menu"
            decoration
        }
        execKey "4" { close quickmessage; open mynewmenu}

        itemDef
        {
            name            "window"
            visible            1
            rect            16 <font color="red">84</font> 0 0
            origin            ORIGIN_QUICKMESSAGEWINDOW
            forecolor        1 1 1 1
            textfont        UI_FONT_NORMAL
            textscale        .24
            textaligny        8
            text            "@QUICKMESSAGE_ESC_EXIT"
            decoration
        }
- Now SAVE it and go to your mod folder where you saved it - > ui_mp/wm_quickmessages .
- Copy this one and paste it in your Raw folder
Call of duty world at war-> Raw
- Go to your ModTool - ( launcher.exe ) Select the Modbuilder tab
- Select in the dropdown box menumod .
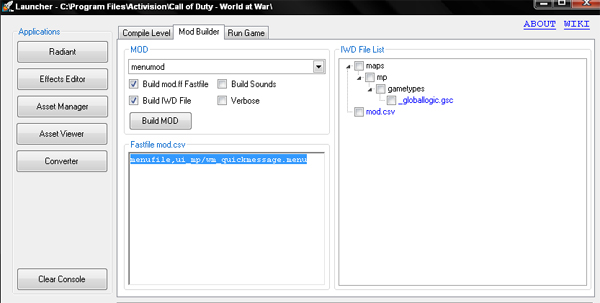
- And type like below:
menufile,ui_mp/wm_quickmessage.menu
Example:
- Now we have a backup for everything. Although we edited a menu, we now need our mymenu , because else we dont have anything that will open it :O!.
- As reference im going to use the quickmessage menu as layout (NOTE : Using other menus is much easier as reference point and editing them, because making a layout yourself is a time-spending event.
- So lets open our quickmessage menu in your mods folder (ui_mp/wm_quickmessages)
- Now first we are going to save it as mymenu.menu
Upper corner you see FILE - > Save as..
- Now save it in ui_mp of your raw folder as mymenu.menu.
- Now you did this we are going to remove the buttons 2, 3 and 4.
- Select them and just delete the part and save it ( Ctrl+S ).
- If it is correct you only have this left:
#include "ui/menudef.h"

#define ORIGIN_QUICKMESSAGETAB            32 224
#define ORIGIN_QUICKMESSAGEWINDOW        32 256

{
    menuDef
    {
        name            "quickmessage"
        visible            0
        fullscreen        0
        rect            0 0 640 480
        focuscolor        1 1 1 1
        disablecolor        0 0 0 0
         style            WINDOW_STYLE_EMPTY

        onOpen
        {
            setDvar cl_bypassMouseInput "1"
        }
        onClose
        {
            setDvar cl_bypassMouseInput "0"
        }

// WINDOW BACKGROUND
        itemDef
        {
            name            "window_background"
            visible            1
            rect            0 0 224 192
            origin            ORIGIN_QUICKMESSAGEWINDOW
            style            WINDOW_STYLE_FILLED
            forecolor        1 1 1 1
            backcolor        0 0 0 0.7975
            decoration
        }

// WINDOW LINES
        itemDef
        {
            name            "window_lines"
            visible            1
            rect            3 0 2 187
            origin            ORIGIN_QUICKMESSAGEWINDOW
            style            WINDOW_STYLE_FILLED
            backcolor        1 1 1 .125
            decoration
        }
        itemDef
        {
            name            "window_lines"
            visible            1
            rect            219 0 2 187
            origin            ORIGIN_QUICKMESSAGEWINDOW
            style            WINDOW_STYLE_FILLED
            backcolor        1 1 1 .125
            decoration
        }
        itemDef
        {
            name            "window_lines"
            visible            1
            rect            5 0 214 2
            origin            ORIGIN_QUICKMESSAGEWINDOW
            style            WINDOW_STYLE_FILLED
            backcolor        1 1 1 .125
            decoration
        }
        itemDef
        {
            name            "window_lines"
            visible            1
            rect            3 187 218 2
            origin            ORIGIN_QUICKMESSAGEWINDOW
            style            WINDOW_STYLE_FILLED
            backcolor        1 1 1 .125
            decoration
        }

// TITLE
        itemDef
        {
            name            "title"
            visible            1
            rect            0 0 224 32
            origin            ORIGIN_QUICKMESSAGETAB
            style            WINDOW_STYLE_FILLED
            forecolor        1 1 1 1
            backcolor        0 0 0 0.7975
            type            ITEM_TYPE_TEXT
            text            "@QUICKMESSAGE_QUICK_MESSAGE"
            textfont        UI_FONT_NORMAL
            textscale        .24
            textaligny        24
            textalign        ITEM_ALIGN_CENTER
            decoration
        }
        itemDef
        {
            name            "title_quickmessage_gray"
            visible            1
            rect            3 3 218 29
            origin            ORIGIN_QUICKMESSAGETAB
            style            WINDOW_STYLE_FILLED
            backcolor        1 1 1 .125
            decoration
        }

        itemDef
        {
            name            "window"
            visible            1
            rect            16 20 0 0
            origin            ORIGIN_QUICKMESSAGEWINDOW
            forecolor        1 1 1 1
            textfont        UI_FONT_NORMAL
            textscale        .24
            textaligny        8
            text            "@QUICKMESSAGE_1_COMMANDS"
            decoration
        }
        execKey "1" { close quickmessage; open quickcommands }


        itemDef
        {
            name            "window"
            visible            1
            rect            16 68 0 0
            origin            ORIGIN_QUICKMESSAGEWINDOW
            forecolor        1 1 1 1
            textfont        UI_FONT_NORMAL
            textscale        .24
            textaligny        8
            text            "@QUICKMESSAGE_ESC_EXIT"
            decoration
        }
    }
}
Script response
After you done this we still have the wrong "Response" sending out to the engine, because what we want to do is making a Text come up in our screen, what we are going to do is in a few steps:
- make a new response
- make a .gsc that will see our response
- the .gsc will send out to the player a text in screen if he sees the response
First we are going to edit the button, and change the response of ExeckeyInt
The engine gets his responses by this command
ScriptMenuResponse
Our ScriptmenuResponse is going to be "helloworld.
So below we are going to edit it
itemDef
        {
            name            "window"
            visible            1
            rect            16 20 0 0
            origin            ORIGIN_QUICKMESSAGEWINDOW
            forecolor        1 1 1 1
            textfont        UI_FONT_NORMAL
            textscale        .24
            textaligny        8
            text            <font color="red">"Hello world!"</font>
            decoration
        }
        <font color="red">execKey "1" { close quickmessage; ScriptMenuResponse "helloworld" }</font>
- Also we need to name it to our own menu:
search below the first lines of the file to MenuDef if you scroll down you see
name "quickmessage"
We are going to change it to our own name like below
menuDef
    {
        <font color="red">name            "mymenu"</font>
        visible            0
        fullscreen        0
        rect            0 0 640 480
        focuscolor        1 1 1 1
        disablecolor        0 0 0 0
         style            WINDOW_STYLE_EMPTY

        onOpen
        {
            setDvar cl_bypassMouseInput "1"
        }
        onClose
        {
            setDvar cl_bypassMouseInput "0"
        }
Now save the edited menu! It should look now like this your menu :
#include "ui/menudef.h"

#define ORIGIN_QUICKMESSAGETAB            32 224
#define ORIGIN_QUICKMESSAGEWINDOW        32 256

{
    menuDef
    {
        name            "mymenu"
        visible            0
        fullscreen        0
        rect            0 0 640 480
        focuscolor        1 1 1 1
        disablecolor        0 0 0 0
         style            WINDOW_STYLE_EMPTY

        onOpen
        {
            setDvar cl_bypassMouseInput "1"
        }
        onClose
        {
            setDvar cl_bypassMouseInput "0"
        }

// WINDOW BACKGROUND
        itemDef
        {
            name            "window_background"
            visible            1
            rect            0 0 224 192
            origin            ORIGIN_QUICKMESSAGEWINDOW
            style            WINDOW_STYLE_FILLED
            forecolor        1 1 1 1
            backcolor        0 0 0 0.7975
            decoration
        }

// WINDOW LINES
        itemDef
        {
            name            "window_lines"
            visible            1
            rect            3 0 2 187
            origin            ORIGIN_QUICKMESSAGEWINDOW
            style            WINDOW_STYLE_FILLED
            backcolor        1 1 1 .125
            decoration
        }
        itemDef
        {
            name            "window_lines"
            visible            1
            rect            219 0 2 187
            origin            ORIGIN_QUICKMESSAGEWINDOW
            style            WINDOW_STYLE_FILLED
            backcolor        1 1 1 .125
            decoration
        }
        itemDef
        {
            name            "window_lines"
            visible            1
            rect            5 0 214 2
            origin            ORIGIN_QUICKMESSAGEWINDOW
            style            WINDOW_STYLE_FILLED
            backcolor        1 1 1 .125
            decoration
        }
        itemDef
        {
            name            "window_lines"
            visible            1
            rect            3 187 218 2
            origin            ORIGIN_QUICKMESSAGEWINDOW
            style            WINDOW_STYLE_FILLED
            backcolor        1 1 1 .125
            decoration
        }

// TITLE
        itemDef
        {
            name            "title"
            visible            1
            rect            0 0 224 32
            origin            ORIGIN_QUICKMESSAGETAB
            style            WINDOW_STYLE_FILLED
            forecolor        1 1 1 1
            backcolor        0 0 0 0.7975
            type            ITEM_TYPE_TEXT
            text            "@QUICKMESSAGE_QUICK_MESSAGE"
            textfont        UI_FONT_NORMAL
            textscale        .24
            textaligny        24
            textalign        ITEM_ALIGN_CENTER
            decoration
        }
        itemDef
        {
            name            "title_quickmessage_gray"
            visible            1
            rect            3 3 218 29
            origin            ORIGIN_QUICKMESSAGETAB
            style            WINDOW_STYLE_FILLED
            backcolor        1 1 1 .125
            decoration
        }

        itemDef
        {
            name            "window"
            visible            1
            rect            16 20 0 0
            origin            ORIGIN_QUICKMESSAGEWINDOW
            forecolor        1 1 1 1
            textfont        UI_FONT_NORMAL
            textscale        .24
            textaligny        8
            text            "Hello world!"
            decoration
        }
        execKey "1" { close quickmessage; ScriptMenuResponse "helloworld" }

        itemDef
        {
            name            "window"
            visible            1
            rect            16 68 0 0
            origin            ORIGIN_QUICKMESSAGEWINDOW
            forecolor        1 1 1 1
            textfont        UI_FONT_NORMAL
            textscale        .24
            textaligny        8
            text            "@QUICKMESSAGE_ESC_EXIT"
            decoration
        }
    }
}
Prepare for use
Copy the new menu and copy it to multiple folders
- Cut the mymenu.menu from ui_mp in the mod folder to a new folder you create , this will be called scriptmenus
- Now copy this mymenu.menu from the ui_mp/scriptmenus to your raw folder and place it in ui_mp/scriptmenus
- Now add this line to your Modbuilder ( the Launcher.exe )
- menufile,ui_mp/scriptmenus/mymenu.menu
Ok now we need to make a .gsc that checks the response
SO LETS START!
First go to your mod folder and open maps/mp/gametypes/_globallogic.gsc with the GSC programming tool.
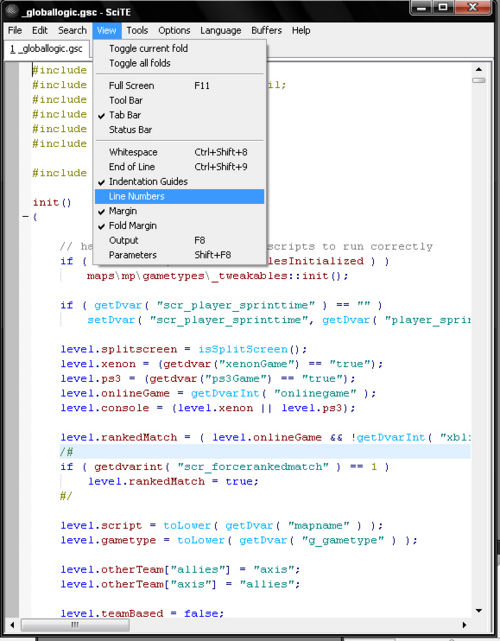
If you did this select above in the programming tool this:
- Select it so its checked.
- Now you see line numbers.
- Go to line:4348
- Add this:
thread functions\_mymenu::init();
I shall explain what this means. This function well execute the function init() in folder functions called _mymenu.gsc. What we need to do now is make a new file with the programming tool (Above you see a workbar and on the left upper corner you see File -> New select this )
- Now type here this:
init()
{
game["mymenu"] = "mymenu"; //mymenu is the name of menu so keep this.
Precachemenu(game["mymenu"]);
thread Onplayerconnect();
}

Onplayerconnect()
{
while(1)
{
level waittill("connecting",player);
player thread OnSpawnPlayer();
}


}

OnSpawnPlayer()
{

while(1)
{
self waittill("spawned");
self thread MenuResponses();
}

}


MenuResponses()
{
}
First i will explain what it will do. When the game is loading it will load the functions into the game;
so it will read like this:
- Init - >precache the menu ( load it ) ->do function OnPlayerconnect -> wait till anybody is connecting , and wait till its a variable player - > if this is done -> do function OnSpawnPlayer on the *player - > Player waits till it is spawned - > Engine says the player is spawned - > now do a function MenuResponses
The while(1) is a loop command, so you have to see it as a command that repeats time over time , so if it has waitted if someone has connected then it will thread the command and wait again to someone connects , and over again.
Now we did this we are going to focus on the Scripting part of Menuresponses, we need a few things:
- a loop
- a check ( waittill ) that waits till we have a response sended out by the engine
This will look like this: ( this is a standard thing, cant change it, just do it like this)
MenuResponses()
{
while(1)
{
self waittill("menuresponse",menu,response)
      if(menu == game["mymenu"] ) // if the response sended out is the menu called mymenu then proceed with the script
        {
         if(response == "helloworld")
self iprintlnbold("Hello world :O!!! =D");// print in a text inscreen that only the player that pressed the button will see

         }


}
}
Now we have this in our script below, save it as _mymenu.gsc ( File -> save as ) in your mod folder ( menumod folder ) -> functions
init()
{
game["mymenu"] = "mymenu"; //mymenu is the name of menu so keep this.
Precachemenu(game["mymenu"]);
thread Onplayerconnect();
}

Onplayerconnect()
{
while(1)
{
level waittill("connecting",player);
player thread OnSpawnPlayer();
}


}

OnSpawnPlayer()
{

while(1)
{
self waittill("spawned");
self thread MenuResponses();
}

}

MenuResponses()
{
while(1)
{
self waittill("menuresponse",menu,response)
      if(menu == game["mymenu"] ) // if the response sended out is the menu called mymenu then proceed with the script
        {
         if(response == "helloworld")
              self iprintlnbold("Hello world :O!!! =D");// print in a text inscreen that only the player that pressed the button will see

    }


}
}
If we have done this, check and make sure if you have this:
- mymenu.menu placed in raw/ui_mp/scriptmenus
- mymenu.menu placed in mods/menumod/ui_mp/scriptmenus
- mymenu.menu placed in
- Vista : C:\Users\Username\AppData\Local\Activision\CoDWaW\mods\menumod\ui_mp\scriptmenus
- XP : C:\Documents and Settings\[username]\Local Settings\Application Data\Activision\CoDWaW\mods\menumod\ui_mp\scriptmenus
- wm_quickmessages.menu placed in raw/ui_mp/
- wm_quickmessages.menu placed in mods/menumod/ui_mp/
- wm_quickmessages.menu placed in
- Vista : C:\Users\Username\AppData\Local\Activision\CoDWaW\mods\menumod\ui_mp\
- XP : C:\Documents and Settings\[username]\Local Settings\Application Data\Activision\CoDWaW\mods\menumod\ui_mp\
- The Functions and Maps folder (the gsc files) placed in mods/menumod/
- The Functions and Maps folder (the gsc files) placed in
- Vista : C:\Users\Username\AppData\Local\Activision\CoDWaW\mods\menumod\ui_mp\
- XP:: C:\Documents and Settings\[username]\Local Settings\Application Data\Activision\CoDWaW\mods\menumod\ui_mp\
Now if you have this go to your launcher , then select the Modbuild tab, Select your menumod , then press the Build Mod button.
If it is ready with compiling select the Run Game Tab - > select MP - > Select the menumod from dropdown box
Check below that if these things are checked:
developer 2
devmap  mp_dome (this is our testmap)
If it works, well done you made a menu mod :) !!!


