Call of Duty 5: Zombie Mapping 101
![]() This tutorial will explain step-by-step how to add Zombie Game-Mode to your Map
This tutorial will explain step-by-step how to add Zombie Game-Mode to your Map
Naming your map
So im guessing you have made your Geo/Map and are ready to implement Zombies to your map! Sweet! The first thing we need to do to make sure there are no errors when compiling or when ever later.. We all hate errors !!
Save your map name with the prefix nazi_zombie_ then your map name so obviously it will be nazi_zombie_yourmapname! Great lets go to step 2.
Making spawn points
- Next we need to add your Spawn points for you and your buddys!
- Right click in the 2D Grid and go to Info>>>Player>>>Start You will only need one of these due to the fact that the other spawn points will be Script_structs
- Right, now add (4) script_structs, you add these by right clicking in the 2D Grid and go down to Script>>>Struct
- Then give all 4 of the Script_structs the key and values as shown here... *Press N to bring up the entity window*
Key: "targetname"
Value: "initial_spawn_points"
Placing zombies in your map
Now we will have to place the zombie spawn points, So right click in the 2D Grid view and go to Actor>>Axis>> and Select zombie_ger_ber_sshonor now give him
- Some Keys & Values. *Press N to bring up the entity window*
"script_noteworthy" "zombie_spawner"
"count" "9999"
"script_forcespawn" "1"
"targetname" "zombie_spawner_init"
"spawnflags" "3"
Once you have given the zombie the Keys and Values,
Place about 2 or 3 at each spawn location!
Placing nodes/Walkways for your zombies
- Now once you have placed your zombies in the map, We are going to have to make a walkway for the zombie to walk along or they will be just stood there
- So Right click in the 2D View and goto Node then click on pathnode, now you should see a pink box, Great! now you have to set a trail from where your zombie
- Spawns to a window or door so the zombie can attack etc. Place pathnodes at regular intervals (128 units) throughout the map and ensure they do not overlap
- With any other nodes. (I advise you to make 2 or 3 different paths for the zombie to walk on, because they will all be following 1 path!
Placing boards on your windows
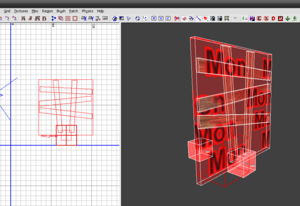
- To simply add boards to your windows Right click in the 2D View and goto Misc>>>Prefab and then go into the folder ZombieMode and select Window_Med.map
- Place it over your window.. You will see arrows pointing out from the 2 red boxes.. This means the direction the arrows are pointing, thats the way the Zombies come through the windows!
- Now that is done we need to add the animation for when the zombie reaches the window and then he climbs through! This is done with traversals, Dont worry there is a prefab already done for you!
- Just right click in the 2D Grid View and goto Misc>>>Prefab select Traverse, Find and select the prefab Wall_Hop.map,
- Now place it on your windows, (You will see a brush with the texture traverse on it) this allows us to correctly line up our window for a perfect wall_hop animation.
Placing Blockers & buy triggers
So you want to block a place off and use it later on if you get into trouble with zombies? Ok its simple..
I assume you have your place made that you want blocked off? ok good!
Now make a script_model and assign any model you want to block off the path to your other room! Now lets give it some keys & Values
- Press N to bring up the entity window*
"script_linkTo" "1" (this needs to be 1 to make it unique, Read below)
"spawnflags" "1"
"targetname" "couch1" << Im using couch1 because its easier for me and you to understand (you can use anyname you want)
"script_firefx" "poltergeist"
"script_fxid" "large_ceiling_dust"
"script_noteworthy" "jiggle"
- Now thats done we need to make a script_struct so when you buy the blocker it has a place to move to..
so right click in the 2D grid view and goto script_struct and place it where you want the blocker to move to, once you placed it we need to give it some keys
and values so *Press N to bring up the entity window*
"script_linkName" "1"
- As you notice here its "1" the same as script_linkto why these are both "1" that means they are linked to each other, but if you want more than one blocker
- You need to change this to "2" and so on and so forth *obviously*
- Right once you done both of them you should see a Red Line connected to the Script_struct and the Blocker you made if you see this then GREAT!! if not, re-read carefully, i know its abit confusing! Now we need create the trigger so you can actually buy the blocker..
- So create a brush where you want to buy the blocker, then right click on the brush you made in the 2D View and go to Trigger>>>Use now lets give it some Keys and Values.. *Press N to bring up entity window*
"targetname" "zombie_debris"
"zombie_cost" ""
"target" "couch1" << This is the same as the targetname we gave our couch earlier
Zombie cost is left blank because you have to set the price yourself, Below are the prices available to use.
Zombie Costs ______________________________________________________ 100, 200, 250, 500, 750, 1000, 1250, 1500, 1750, 2000 | ______________________________________________________|
Right, I think maybe some of you are wondering when your playing zombies and you go upstairs or open the room with the magic box in it, why zombies start to
go to them rooms, Well its simple You make another zombie spawn location and you have to target the couch TO the zombies, But if you want to do this then
when you make the NEW zombie you have to give him a DIFFERENT targetname than the rest of the zombies because when you select the couch then the zombie and
press W you will see all of the zombies connect, but we only want the NEW ZOMBIE to connect so you have to give the new zombie a different targetname than
the others it can be anything! So when you give him a new targetname, Select the couch, then the NEW zombie and press W, he should be connected, so when you
buy the blocker, he will start to spawn! Easy to follow? Yay!
Ohh almost forgot, When you make the new zombies target the blocker, you have to make the zombie target a script_strict to tell it to goto this window, so you make a script_struct and place it near the window you want the zombie to goto, then select the script_struct THEN select the zombie and press W!
Buyable Guns
Buyable guns are unique like blockers
Right so you have your zombies setup and your blockers now you want to add guns? Ok cool, So right click in the 2D View and make a Script_model. and assign the model of the gun you want and place it on the wall. Right now we need to make the Buy Trigger..
so make a brush where you want to buy the gun from, and then right click in the 2D View and go to Trigger>>Use Now Select the Trigger THEN the Gun model and
Press W, You should see a red line connect to it now Ok good, Now we need to give the TRIGGER some keys and values, So select the trigger enter these..
"targetname" "weapon_upgrade"
"zombie_weapon_upgrade" ""
The Zombie_weapon_upgrade needs the value of the WEAPON FILE, Below are the Weapon file names
Pistols
colt
colt_dirty_harry
walther
sw_357
Semi Auto
m1carbine
m1garand
gewehr43
Full Auto
stg44
thompson
mp40
Bolt Action
kar98k
springfield
Scoped
ptrs41_zombie
kar98k_scoped_zombie
Grenade
molotov
fraggrenade
stielhandgranate
Grenade Launcher
m1garand_gl
m7_launcher
Flamethrower
m2_flamethrower_zombie
Shotgun
doublebarrel
doublebarrel_sawed_grip
shotgun
Bipod
fg42_bipod
mg42_bipod
30cal_bipod
Heavy MG
bar
Rocket Launcher
panzerschrek
Special
ray_gun
Playable area
Playable area is used to make sure power ups don't spawn outside the contained areas of map where players aren't able to reach the power up.
To make a playable area, make a trigger_multiple in your map and give it the keys and values
"targetname" "playable_area"
You can only have ONE playable area trigger in your map! You can split it up however, but you can only have one.
Treasure Chest and weapon cabinet
Treasure Chest
The treasure chest is a prefab that you can easily through into your map, it is: _prefabs\zombiemode\treasure_chest.map
Weapon Cabinet
The weapon cabinet is a prefab that you can easily through into your map, it is: _prefabs\zombiemode\weapon_cabinet.map
Now we need to make the FX .gsc so make a new gsc in your /raw/maps folder and call it the name of your map with the extended _fx so it will be nazi_zombie_yourmap_fx.gsc and copy and paste this script in it then SAVE.
Zone Source
There are two important zone sources here: yourmapname.csv and zombiemode.csv, both go in [root]\zone_source
 DONT FORGET TO CHANGE IN THIS SCRIPT YOURMAPNAME has to be your map name obviously!!
Okay, Were all done, Compile and have fun slaying zombies!! BELOW is the .map and the scripts for my zombie test map so if you get confused take alook in there..
Sources: ModsOnline Tutorial by Hercules


