Call of Duty 5: SP - Enviromental Audio System
![]() The Environmental audio system is a collection of simple objects that allow you to detail out the audio in a map, in full Surround Sound, without ever needing to create a background track by playing everything at world coordinates in a map.
The Environmental audio system is a collection of simple objects that allow you to detail out the audio in a map, in full Surround Sound, without ever needing to create a background track by playing everything at world coordinates in a map.
The system works completely within Radiant and a few script definitions. You can use as many of these elements as you wish without hurting game performance.
NOTE: all sound must be set to 3D and be MONO sounds.
Overview
Below is the quick hit list of the objects that make up the Environmental Sound System.
- looper - This is a locational loop based sound.
- random - This is a locational one shot sound that will play with random intervals.
- line_emitter - This is a sound entity that is constrained by a line, but it will always follow the player if he is moving parallel to the line.
- ambient_room - This is a designation of space that you can use to add reverb and control 'Room Tones'...which is just like an old school background track, but instead of having all of your environmental sound in a static track, you playback only non spatialized sounds, room tone (or blend), or even nothing at all (which is what World at War usually does).
- ambient_package - An ambient package is a collection of one shot sounds that follow the player around. These are Ambient Accents...or one shot sounds that spawn around the player in 3D space, but are not constrained to a specific location in a map.
Not much to it...so here's how you actually put them in the game:
LOOPING SOUND EMITTER
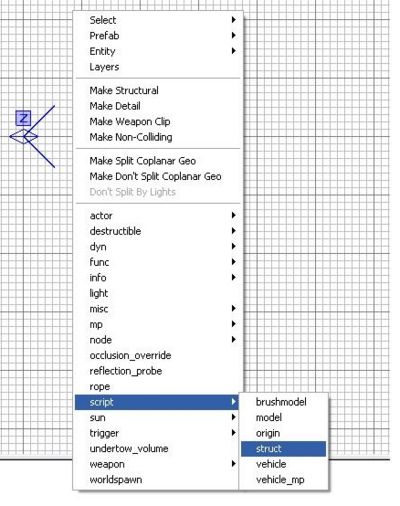
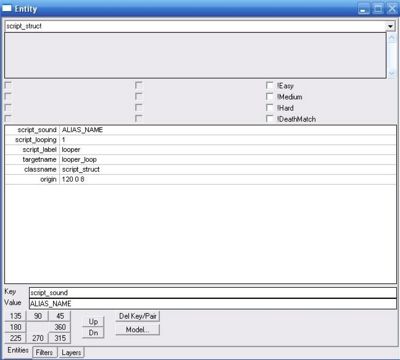
- add a script_struct to your map
- select it and press "n" to bring up the entities menu
- give it a targetname (looper_loop in the screenshot)
- in the key window, type script_label
- 5in the value window, type looper and press enter
- in the key window, type script_looping
- in the value window, type 1
- in the key window, type script_sound
- in the value window, type ALIAS_NAME - replace that with the looping alias you want to play
Following the above steps will play your sound alias as a loop at the structs location.
RANDOM SOUND EMITTER
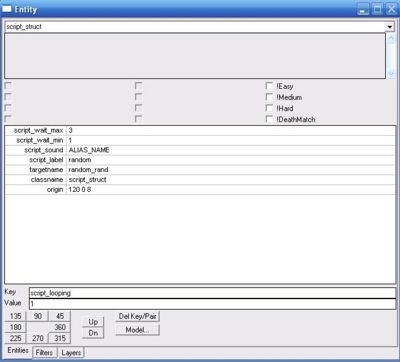
- add a script_struct to your map
- select it and press "n" to bring up the entities menu
- give it a targetname (random_rand in the screenshot)
- in the key window, type script_label
- in the value window, type random and press enter
- in the key window, type script_wait_min
- in the value window, type 1
- in the key window, type script_wait_max
- in the value window, type 3
- in the key window, type script_sound
- in the value window, type ALIAS_NAME - replace that with the looping alias you want to play
Following the above steps will play your sound alias between the script_wait_min value and the script_wait_max value at the structs location. (The time here is in seconds).
LINE SOUND EMITTER
- add two script_structs to your map
- select them both and press w to weld them together.
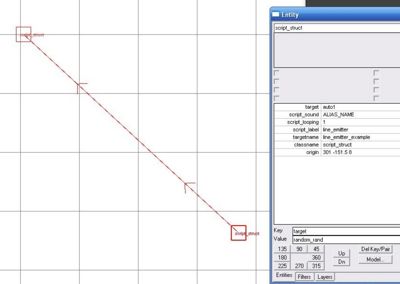
- deselect them both and then reselect the first point (where the arrows are going away from the struct) and press n to bring up the entity view.
- give the first point a unique targetname (line_emitter_example in the screenshot.
- in the key window, type script_label
- in the value window, type line_emitter and press enter
- in the key window, type script_looping
- in the value window, type 1
- in the key window, type script_sound
- in the value window, type ALIAS_NAME - replace that with the looping alias you want to play
Following the above steps will create a line that your looping sound will play on. As you walk down the line, the sound will slide with you...but as you walk away from it, the sound will stay put. This is useful for a lot of things, but a river would be a good simple example...you just play a looping river sound on a line that follows the river and it will sound right (and be positioned correctly) no matter how the player moves through the environment.
If the crosshairs in the picture above is the player, then the sound would be sitting near the end of the line. If the you move along the line, the sound will slide along with you.
DESIGNATING ROOMS AND PACKAGES
OVERVIEW
There are two parts to designating an ambient room & package. The first part of this is in Radiant. The second part of this is in script.
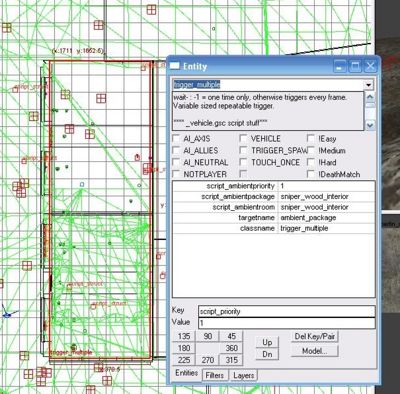
Really, all you are doing is creating a trigger_multiple and assigning it values that the audio engine can understand. "script_ambientroom" is the name of the room that you'll define in the second part of this tutorial. "script_ambientpackage" is a 'package' of one shot ambient sounds that will spawn around you, based on some definitions that we'll also take care of in the second part of the tutorial. "script_ambientpriority" tells the game engine what package to use in case the player is in multiple triggers at once (the highest number prevails).
PART ONE
Let's say you have a building that you can go into and you want to change the reverb settings and maybe the Accent sounds that are playing when you go inside. You simply:
- 1) create a trigger_multiple
- 2) make the trigger fit the space exactly!
- 3) select the trigger and press n to bring up the entity window.
- 4) type script_ambientroom in the key window
- 5) type ROOM_NAME in the value window and press enter (replace ROOM_NAME with the name of your choice...you'll define it in the next section)
- 6) type script_ambientpackage in the key window
- 7) type PACKAGE_NAME in the value window and press enter. (replace PACKAGE_NAME with the name of your choice...you'll define it in the next section)
- 8) type targetname in the key window
- 9) type ambient_package in the value window and press enter. (NOTE: These MUST be named ambient_package or they will not work!)
- 10) type script_ambientpriority in the key window
- 11) type 1 in the value window and press enter.
So now you have a trigger with the right parameters, but you need the audio engine to understand what it all means...so lets go define these rooms.
PART TWO
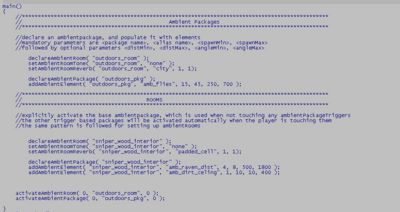
As you can see from the picture above my room is called "sniper_wood_interior" and my package (heh) is called "sniper_wood_interior". I named them the same because it was a lot easier to keep track of hundreds of rooms during development. You can name these any way you like, but its good to have some consistency so you know that a specific package also goes with a specific room.
So, the first thing you need to do is open the .csc file that corresponds to your map. We'll use Sniper as the example.
- 1) open your_level.csc
- 2) anywhere in the main() function in this file, you can set up your rooms.
- 3) use declareAmbientRoom("ROOM_NAME"); this should correspond to the room name you listed in Radiant in part 1.
- 4) use setAmbientRoomTone("ROOM_NAME", "SOUND_ALIAS"); (as you can see in the screenshot below, I didn't use one of these in sniper.
- 5) use setAmbientRoomReverb("ROOM_NAME", "REVERB_NAME", 1, 1); (you can get a list of valid reverb names in globals\reverb.csv. Additionally, the extra parameters control dry and wet volumes respectively...I used "padded_cell" in sniper.
- 6) use declareAmbientPackage ("PACKAGE_NAME"); this should correspond to the package name you listed in Radiant in part 1.
- 7) use addAmbientElement ("PACKAGE_NAME", "SOUND_ALIAS", p1, p2, p3, p4); (p1 = min time, p2 = max time, p3 = min dist, p4 = max dist). You can add as many alias' to the ambient package system as you like.
So the last part of this is activating the "default" room. Instead of having to draw triggers everywhere (even out in the open), we think of the triggers you just made as an 'override'. You can set a default room and package that is 'everywhere except inside a trigger'. This is done with the activateAmbientRoom ( 0, "outdoors_room", 0); and activateAmbientPackage( 0, "oudoors_pkg", 0); you see at the end of the main() function of sniper in the example above.
