Call of Duty 4: Custom Skyboxes: Difference between revisions
New page: === Creating Custom Skybox === [http://www.planetside.co.uk/terragen '''Terragen'''] is a freeware scenery generator which can be used to create 2D skyboxes. The freeware version has a lim... |
No edit summary |
||
| Line 1: | Line 1: | ||
[[Category:Call of Duty 4]] | |||
[[Category:Skybox]] | |||
=== Creating Custom Skybox === | === Creating Custom Skybox === | ||
[http://www.planetside.co.uk/terragen '''Terragen'''] is a freeware scenery generator which can be used to create 2D skyboxes. The freeware version has a limitation that effectively limits the texture dimensions of the skybox to 960, so it can only really be used for skies at 512x512. If Terragen is registered for $99 (US), the size limitation is removed, so skies at 1024x1024 could potentially be rendered. | [http://www.planetside.co.uk/terragen '''Terragen'''] is a freeware scenery generator which can be used to create 2D skyboxes. The freeware version has a limitation that effectively limits the texture dimensions of the skybox to 960, so it can only really be used for skies at 512x512. If Terragen is registered for $99 (US), the size limitation is removed, so skies at 1024x1024 could potentially be rendered. | ||
Revision as of 16:28, 16 October 2008
Creating Custom Skybox
Terragen is a freeware scenery generator which can be used to create 2D skyboxes. The freeware version has a limitation that effectively limits the texture dimensions of the skybox to 960, so it can only really be used for skies at 512x512. If Terragen is registered for $99 (US), the size limitation is removed, so skies at 1024x1024 could potentially be rendered.
This tutorial will explain how to use a scene in Terragen to create a 2D skybox that can be used in Cod4 Radiant.
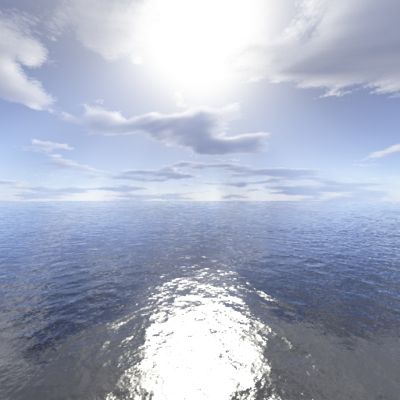
Here is an example of what you can achieve (no land on this one)
Creating the scene
Terragen can be downloaded HERE
Terragen takes a little bit of practice to get the hang of. There are many websites that can teach you the basics. Here are some good ones:
Create your scene and save it. The camera position doesn't matter for now. Terragen can render realistic land if you're very skilled however making terrain is not recommended for a 2D skybox.
Set up the script
The skybox requires six images to be rendered. This script will automate the creation of all six so you do not have to repeatedly come back to your computer and readjust the camera after each render.
Use Notepad to save the following script as skyboxscript.tgs. It can be saved anywhere.
initanim "C:\skyrender", 1

;_ft
Zoom 1.0
CamH 0
CamP 0
CamB 0
frend

;_lf
Zoom 1.0
CamH 90
CamP 0
CamB 0
frend

;_up
Zoom 1.0
CamH 270
CamP 90
CamB 0
frend

;_bk
Zoom 1.0
CamH 180
CamP 0
CamB 0
frend

;_rt
Zoom 1.0
CamH 270
CamP 0
CamB 0
frend

;_dn
Zoom 1.0
CamH 270
CamP -90
CamB 0
frend
Render the skybox
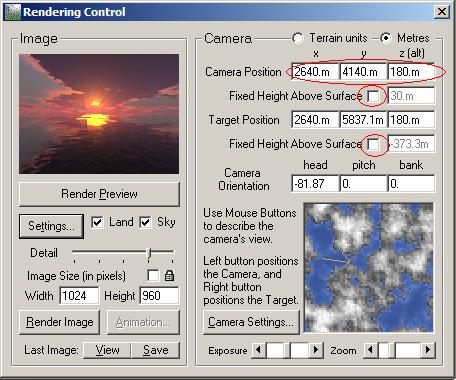
A. Now, in Terragen, uncheck both of the Fixed Height Above Surface boxes in the Rendering Control window. Place your Terragen camera where you want the viewpoint of the skybox to be. What's important here is the Camera Position. The Camera Orientation doesn't matter. Note that changing the height can affect the appearance of the clouds even though the horizon is always in the same location.
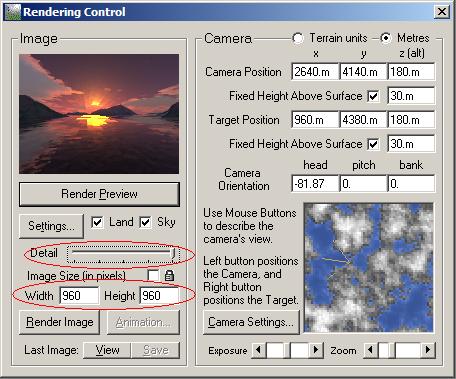
B. Set the detail all the way up in the Rendering Control window. Set the width and height both to 512. This is the best you can do with the freeware version. If you have registered Terragen, set them both to 1024.
C. You should double check that you did the first two steps right so you don't waste a lot of time. Now, choose Execute Script... from the Terragen menu, and choose the file skyboxscript.tgs that you created earlier. Now the rendering will commence. It may take a couple of hours or more.
D. When the rendering is complete, a dialog will pop up saying the script is complete. Quit Terragen.
Get the textures ready
Now, if you open up the C: drive, you'll see six new BMP files. Rename them as follows, where xxxx is whatever you want to name your sky:
Original filename       Change to
skyrender0001.bmp  xxxxft.bmp
skyrender0002.bmp  xxxxlf.bmp
skyrender0003.bmp  xxxxup.bmp
skyrender0004.bmp  xxxxbk.bmp
skyrender0005.bmp  xxxxrt.bmp
skyrender0006.bmp  xxxxdn.bmp
Use Photoshop or PaintShopPro to save them as TGA files (dont resize them!)into ...Call of Duty 4 - Modern Warfare\texture_assets\skybox. Create the folder if you have to.
Create the Material Skybox using Asset Manager
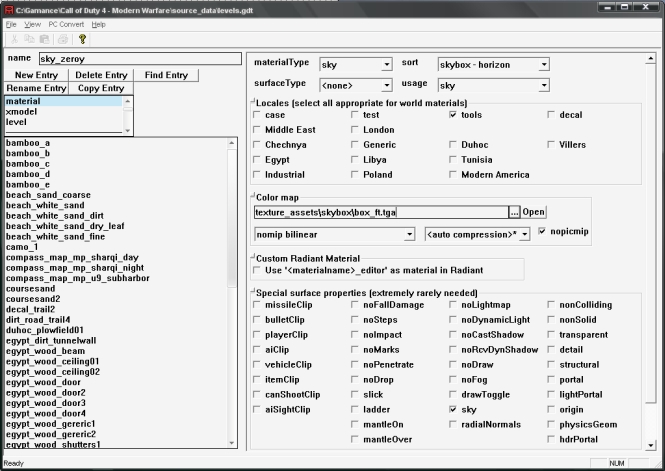
A. Open up the IW Asset Manager B. Select Material from the list, click New Entry and inout a name like sky_xxxxx C. Refer to the picture below for Asset Manager Settings
D. For the Color map note that the pic with _ft needs to be loaded E. Press F10 to convert the new Asset
Everything going well you will see your new Skybox in the texture list of Cod4 Radiant ;D - Good Luck!
--Zeroy. 14:49, 15 October 2008 (UTC)


