Call of Duty 5: Breakable Windows: Difference between revisions
Jump to navigation
Jump to search
mNo edit summary |
mNo edit summary |
||
| Line 1: | Line 1: | ||
[[Image:rgn_warning.png|right]] | [[Image:rgn_warning.png|right]] | ||
[[Image:Nutshell.png]] Tutorial by ''Badman'' adapted from COD4 for CODWAW; This is to show you how to add destructible Windows in your levels; | [[Image:Nutshell.png]] Tutorial by ''Badman'' adapted from COD4 for CODWAW; This is to show you how to add destructible Windows in your levels; | ||
=The Script= | =The Script= | ||
| Line 24: | Line 25: | ||
// The Tutorial contains one “broken” - status for the window (as e.g. with the cars!) | // The Tutorial contains one “broken” - status for the window (as e.g. with the cars!) | ||
// In order to change the value of the damage, which the window can sustain, you must adjust the value with ' targetdamage' value. | // In order to change the value of the damage, which the window can sustain, | ||
// you must adjust the value with ' targetdamage' value. | |||
// Credits: Tally, which helped me with the starting of the Script. | // Credits: Tally, which helped me with the starting of the Script. | ||
// Credits: noobCODmapper and Ghost Death for the Script on modsonline.com, which inspired me for this. | // Credits: noobCODmapper and Ghost Death for the Script on modsonline.com, which inspired me for this. | ||
| Line 33: | Line 36: | ||
windfx = loadfx ("maps/sniper/fx_glass_break"); | windfx = loadfx ("maps/sniper/fx_glass_break"); | ||
windtrigs = getentarray("window1","targetname"); | windtrigs = getentarray("window1","targetname"); | ||
for(i=0;i<windtrigs.size;i++) | for(i=0; i<windtrigs.size; i++) | ||
{ | { | ||
windtrigs[i] thread dowindow(windfx); | windtrigs[i] thread dowindow(windfx); | ||
| Line 41: | Line 44: | ||
dowindow(windfx) | dowindow(windfx) | ||
{ | { | ||
targetdamage=80; | targetdamage = 80; | ||
totaldamage=0; | totaldamage = 0; | ||
WindowShattered=false; | WindowShattered = false; | ||
WindowShatteredtwo=false; | WindowShatteredtwo = false; | ||
WindowBroken=false; | WindowBroken = false; | ||
self enablegrenadetouchdamage(); | self enablegrenadetouchdamage(); | ||
NormalState = getent(self.target,"targetname"); | NormalState = getent(self.target,"targetname"); | ||
| Line 61: | Line 64: | ||
if(totaldamage>targetdamage || getdamagetype(type)=="melee") | if(totaldamage>targetdamage || getdamagetype(type)=="melee") | ||
{ | { | ||
WindowBroken=true; | WindowBroken = true; | ||
} | } | ||
if(!WindowShattered) | if(!WindowShattered) | ||
| Line 67: | Line 70: | ||
NormalState delete(); | NormalState delete(); | ||
ShatteredState show(); | ShatteredState show(); | ||
WindowShattered=true; | WindowShattered = true; | ||
} | } | ||
else if(!WindowShatteredtwo) | else if(!WindowShatteredtwo) | ||
| Line 73: | Line 76: | ||
ShatteredState delete(); | ShatteredState delete(); | ||
ShatteredStatetwo show(); | ShatteredStatetwo show(); | ||
WindowShatteredtwo=true; | WindowShatteredtwo = true; | ||
} | } | ||
} | } | ||
| Line 87: | Line 90: | ||
getDamageType(type) | getDamageType(type) | ||
{ | { | ||
if(!isdefined(type)){return "unknown";} | if(!isdefined(type)) { return "unknown"; } | ||
type = tolower(type); | type = tolower(type); | ||
switch(type) | switch(type) | ||
| Line 100: | Line 103: | ||
} | } | ||
</pre> | </pre> | ||
= Map GSC/Zone File= | = Map GSC/Zone File= | ||
| Line 113: | Line 117: | ||
fx,maps/sniper/fx_glass_break | fx,maps/sniper/fx_glass_break | ||
</pre> | </pre> | ||
= In Radiant = | = In Radiant = | ||
| Line 154: | Line 159: | ||
* You now need to add a targetname value for the Trigger, with the Trigger selected press N and add the key/values | * You now need to add a targetname value for the Trigger, with the Trigger selected press N and add the key/values | ||
Key | Key : targetname | ||
Value : window1 | Value : window1 | ||
| Line 199: | Line 204: | ||
* Compile and test! | * Compile and test! | ||
= | |||
= Files = | |||
* You can download the script and prefab used for this tutorial [http://wiki.modsrepository.com/codww_files/codww_destwin_files.zip HERE] | * You can download the script and prefab used for this tutorial [http://wiki.modsrepository.com/codww_files/codww_destwin_files.zip HERE] | ||
Revision as of 15:45, 24 February 2009

![]() Tutorial by Badman adapted from COD4 for CODWAW; This is to show you how to add destructible Windows in your levels;
Tutorial by Badman adapted from COD4 for CODWAW; This is to show you how to add destructible Windows in your levels;
The Script
- Create a new file called _breakable_windows.gsc in:
C:\Program Files\Activision\Call of Duty - World at War\raw\maps\mp\
- In the file copy paste this code:
// *************************************************************************************************************
// Destructible Window Script Version 1.1 by BadMan
// Latest Update: Sunday, 30th November 2008
// *************************************************************************************************************
// *************************************************************************************************************
// Original Version 1.1 by -=FD=-
// Latest Update: Friday, 22nd February 2008
// *************************************************************************************************************
//
// This Script allows the use of breakable windows after a certain damage it will breaks
// This Tutorial tries to remain as simple as possible.
// The Tutorial contains one “broken” - status for the window (as e.g. with the cars!)

// In order to change the value of the damage, which the window can sustain,
// you must adjust the value with ' targetdamage' value.

// Credits: Tally, which helped me with the starting of the Script.
// Credits: noobCODmapper and Ghost Death for the Script on modsonline.com, which inspired me for this.
// Credits: IW for this great Game and the release of the tools!

main()
{
	windfx = loadfx ("maps/sniper/fx_glass_break");
	windtrigs = getentarray("window1","targetname");
	for(i=0; i<windtrigs.size; i++)
		{
			windtrigs[i] thread dowindow(windfx);
		}
}

dowindow(windfx)
{
	targetdamage = 80;
	totaldamage  = 0;
	WindowShattered = false;
	WindowShatteredtwo = false;
	WindowBroken = false;
	self enablegrenadetouchdamage();
	NormalState = getent(self.target,"targetname");
	ShatteredState = getent(NormalState.target,"targetname");
	ShatteredState hide();
	ShatteredStatetwo = getent(shatteredState.target,"targetname");
	ShatteredStatetwo hide();
	BrokenState = getent(shatteredStatetwo.target,"targetname");
	BrokenState hide();

	while(!windowbroken)
		{
			self waittill ("damage", amount,attacker, direction_vec, point, type);
			totaldamage+=amount;
			if(totaldamage>targetdamage || getdamagetype(type)=="melee")
				{
					WindowBroken = true;
				}
			if(!WindowShattered)
				{
					NormalState delete();
					ShatteredState show();
					WindowShattered = true;
				}
			else if(!WindowShatteredtwo)
				{
					ShatteredState delete();
					ShatteredStatetwo show();
					WindowShatteredtwo = true;
				}
		}

	BrokenState show();
	self playsound("glass_pane_break");
	PlayFX(windfx, BrokenState.origin );
	ShatteredState delete();
	ShatteredStatetwo delete();
	self delete();
}

getDamageType(type)
{
	if(!isdefined(type)) { return "unknown"; }
	type = tolower(type);
	switch(type)
		{
			case "mod_melee":
			case "mod_crush":
			case "melee":
			return "melee";
			default:
			return "other";
		}
}
Map GSC/Zone File
- Open your main Map gsc file and add the following right after maps\mp\_load::main();
maps\mp\_breakable_windows::main();
- Update Zone File by adding the following lines:
rawfile,maps/mp/_breakable_windows.gsc
fx,maps/sniper/fx_glass_break
In Radiant
- The Tutorial assumes you have the map/Building done and have an opening to place the Window Models
- XModels in use are:
breakable_window2_pristine
breakable_window2_brkn1
breakable_window2_brkn2
breakable_window2_brkn3
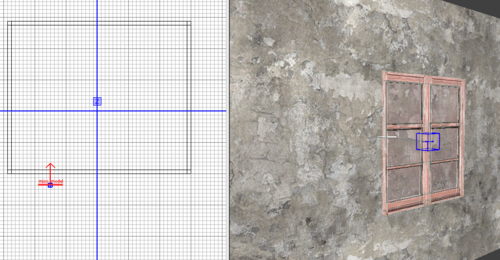
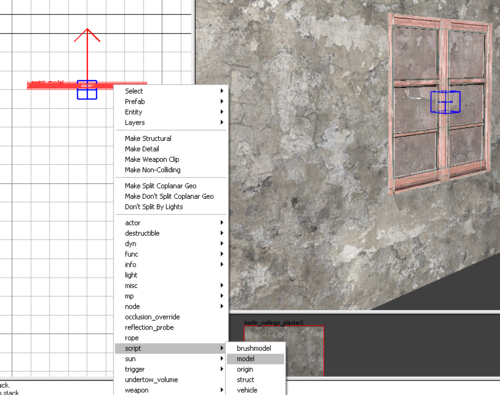
- Add the first Model (breakable_window2_pristine) into the map by right-clicking on 2D window > Misc > Model;
- With the model still selected right-click in the 2D window > script > model
- Now you can adapt the building/wall opening to the window and/or the window to the opening on the building/wall
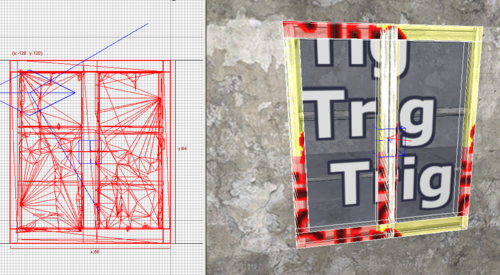
![]() The Window opening size is 64Units in Height and 56Units in Width
The Window opening size is 64Units in Height and 56Units in Width
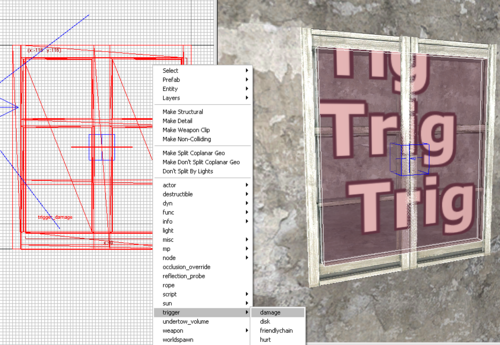
- Now for the trigger, using the Trigger Texture Tool cover the window model
- With the trigger selected right-click in the 2D window > Trigger > Damage
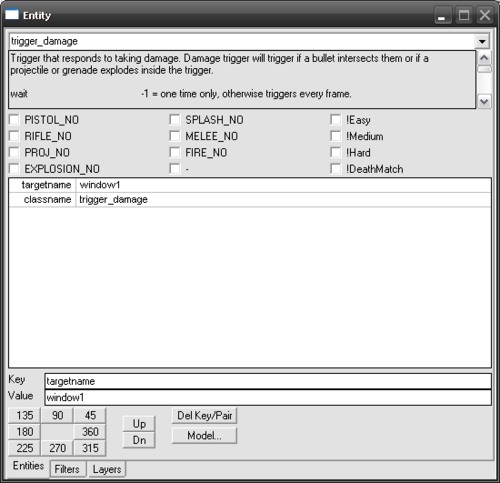
- You now need to add a targetname value for the Trigger, with the Trigger selected press N and add the key/values
Key   : targetname
Value : window1
- Now we must add the broken models for the different states of the damaged window; An easy way to do this is to place the Radiant Grid on 32Units so that you can easily move the models back to their origin, otherwise it gets confusing;
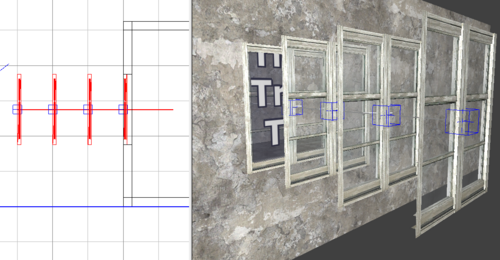
- Select the First Window model you add and press space to copy it 3 more Times, Each time move the new model so that you can see clearly;
- Now change the model and add targetname like this:
model = breakable_window2_pristine
model = breakable_window2_brkn1
model = breakable_window2_brkn2
model = breakable_window2_brkn3
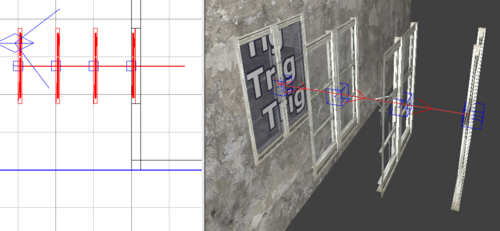
- Now to connect all this!
- Select the Trigger created then the first Window model and press W to connect them
- Deselect all then select the First window model then the second window model and again hit W
- Deselect all then select the second window model then the third one and again hit W
- Finally deselect all and select the third then fourth model and Hit W
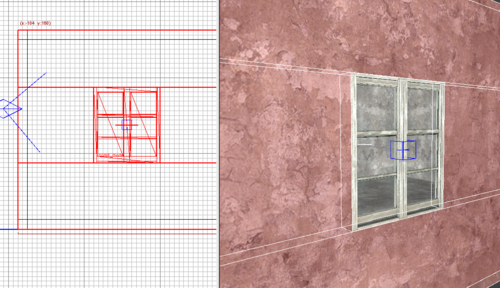
- It should look like this:
- Now place back each model on top of the first Window
- Dont forget to clip the main window so no-one can go through
![]() Note that you can use less model if you like;
Note that you can use less model if you like;
- Compile and test!
Files
- You can download the script and prefab used for this tutorial HERE
Sources: Opferlamm-Clan Board
