Call of Duty 5: Paulo88 Radiant Tips: Difference between revisions
m →Radiant |
mNo edit summary |
||
| Line 5: | Line 5: | ||
= Radiant = | = Radiant = | ||
*<font color=" | *<font color="blue">'''TIP #1'''</font> | ||
To align a texture around a corner on a brush, select the face you want to align to, Then ALT+Middle-Click on the face you want to align. The newly aligned face will also become selected so you can just keep going on more faces, like around a pillar.<br> | To align a texture around a corner on a brush, select the face you want to align to, Then ALT+Middle-Click on the face you want to align. The newly aligned face will also become selected so you can just keep going on more faces, like around a pillar.<br> | ||
| Line 11: | Line 11: | ||
{{note|The pillar must already have the texture applied to it. This tip only aligns the texture it doesn't place the texure on a caulk face}}<br><br> | {{note|The pillar must already have the texture applied to it. This tip only aligns the texture it doesn't place the texure on a caulk face}}<br><br> | ||
*<font color=" | *<font color="blue">'''TIP #2'''</font> | ||
If your finding it difficult to see what your doing in the XY or 3D view simply select the brushes / patches or even models you want to work with and press ALT + H. This will hide everything else, leaving you with a nice clear view.<br> | If your finding it difficult to see what your doing in the XY or 3D view simply select the brushes / patches or even models you want to work with and press ALT + H. This will hide everything else, leaving you with a nice clear view.<br> | ||
| Line 18: | Line 18: | ||
*<font color=" | *<font color="blue">'''TIP #3'''</font> | ||
Whilst holding CTRL + LEFT MOUSE CLICK you can drag the edge of a brush.<br> | Whilst holding CTRL + LEFT MOUSE CLICK you can drag the edge of a brush.<br> | ||
| Line 24: | Line 24: | ||
*<font color=" | *<font color="blue">'''TIP #4'''</font> | ||
If you want to smooth out a curve patch then simply select the patch and hit SHIFT + ] this will add more verts to the patch. Very usefull if you wish to smooth out an archway.<br> | If you want to smooth out a curve patch then simply select the patch and hit SHIFT + ] this will add more verts to the patch. Very usefull if you wish to smooth out an archway.<br> | ||
| Line 30: | Line 30: | ||
*<font color=" | *<font color="blue">'''TIP #5'''</font> | ||
If your wanting to place a model around your level with a random size and rotation, then simply select the following:<br><br> | If your wanting to place a model around your level with a random size and rotation, then simply select the following:<br><br> | ||
Revision as of 11:58, 15 December 2010

Radiant
- TIP #1
To align a texture around a corner on a brush, select the face you want to align to, Then ALT+Middle-Click on the face you want to align. The newly aligned face will also become selected so you can just keep going on more faces, like around a pillar.
For really smooth texture corners, don’t forget to use this method on the lightmaps as well.
- TIP #2
If your finding it difficult to see what your doing in the XY or 3D view simply select the brushes / patches or even models you want to work with and press ALT + H. This will hide everything else, leaving you with a nice clear view.
Press SHIFT + H to bring everything back.
- TIP #3
Whilst holding CTRL + LEFT MOUSE CLICK you can drag the edge of a brush.
Simply hold the above keys then drag the edge of the brush you want to move. Very useful if you want to a brush on an angle, whilst retaining its width.
- TIP #4
If you want to smooth out a curve patch then simply select the patch and hit SHIFT + ] this will add more verts to the patch. Very usefull if you wish to smooth out an archway.
Should you wish to remove verts simply hit SHIFT + [
- TIP #5
If your wanting to place a model around your level with a random size and rotation, then simply select the following:
(Random Drop & Drop level to terrain )
Then
- Place the model you want to copy into the level
- Select the model in radiant (so that is is highlighted)
- Then whilst holding CTRL + ALT simply click in the 3D view where you want your models placed.
This is great for adding grass models ;)
- TIP #6
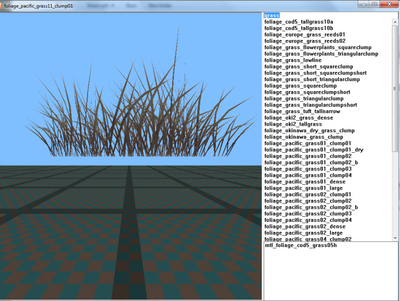
Asset Viewer is your friend !
Type a keyword in the top window to search for that ideal model.
Here I typed grass (lower case) as below...
- TIP #7
COPYING.
If you want to copy a patch but dont want to re-align it (usually this happens when pressing SPACE BAR), simply press CTRL+C then CTRL+V.
This will copy and paste the patch in exactly the same place, avoiding the need to re-align it.
--Zeroy. 07:23, 22 July 2010 (UTC)

