Call of Duty 5: SP Tutorial Spiderholes: Difference between revisions
Jump to navigation
Jump to search
| Line 63: | Line 63: | ||
:8. That's it for the Radiant setup. The final setup should look soemthing like this pic below: (trigger targets the spawner, spawner targets both the lid & the script_struct). | :8. That's it for the Radiant setup. The final setup should look soemthing like this pic below: (trigger targets the spawner, spawner targets both the lid & the script_struct). | ||
<br> | <br> | ||
[[Image: | [[Image:spiderholes1.png]] | ||
<br> | <br> | ||
Revision as of 23:27, 22 August 2009
Spiderholes
Spiderholes can be set up a few different ways, but in this example map we’ll focus on the ones that are set up entirely in Radiant. You'll need a few components, so I'll lay them out for you in the steps below. There are several spiderhole "behaviors" that you can use:
- jump_out – This causes the enemy to jump out of the spiderhole and either charge at the player or go to his targeted cover node, (more on this later).
- stumble_out – Just like jump_out but the enemy will stumble a bit, giving the player an opportunity to take him out easier.
- grenade_toss – The enemy will peek out of the hole, toss a grenade, and then randomly choose between jump_out and stumble_out behavior.
- gun_spray – The enemy will blindly spray his gun in an effort to surprise the player, after which he will choose between jump_out and stumble_out behavior.
- jump_attack – The enemy will just toss open the cover and stay inside the spiderhole firing his weapon. He will never leave the spiderhole.
Setting Up a Spiderhole:
- 1. Place the spiderhole base model into your map as a misc_model:
- Model: static_okinawa_spiderhole_base
- 2. Place the spiderhole lid into the map as a script_model and give it the exact same origin & angles as the spiderhole base placed in step 1.
- Model: okinawa_spiderhole_lid or okinawa_spiderhole_lid_tall
- 3. Select the spiderhole lid and enter the following key/value pair:
- Key: script_noteworthy
- Value: spiderhole_lid
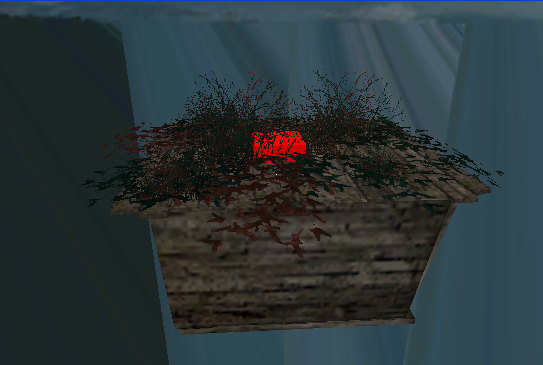
- 4. Place a script_struct into the map and give it the exact same origin & angles as the spiderhole lid and base. By now, it should look something like the picture below:
- 5. Place an appropriate Japanese actor into the map, (i.e. actor_axis_jap_guard_type99riflebayonet). Make sure to check the spawner checkbox. Below are the values you can use to set up the spawner correctly for spiderhole use:
- Key: script_spiderhole
- Desc: This tells the spawner system that this guy should use spiderhole behavior.
- Value: 1
- Key: script_spiderhole_anim
- Desc: This tells the spiderhole scripts which behavior to use.
- Value The possible values are listed below:
- jump_out
- grenade_toss
- gun_spray
- stumble_out
- jump_attack
- Key: script_spiderhole_charge
- Desc: Determines if the guy should attempt to Banzai charge the nearest player, (not valid for jump_attack). The spawner can optionally have cover nodes targeted, so if he does not Banzai attack, he can jump out and run to his targeted node.
- Value: Integer from 0-100. (A value of 0 and the guy will not charge. A value of 100 will make hm charge 100% of the time). Values less than 100 should have the spawner targeting a node so he doesn't just jump out and stand there.
- Key: script_delay_min
- Desc: Minimum amount of time to wait before spawning.
- Value: float value
- Key: script_delay_max
- Desc: Maximum amount of time to wait before spawning
- Value: float value
- 6. Now we need to link everything together:
- a. Select the spawner, then select the spiderhole lid and press W to target the spawner to the lid.
- b. Select the spawner, then select the script_struct and press W to target the spawner to the struct.
- c. Select the spawner and optionally target a node you want the guy to run to once he gets out of the spiderhole.
- 7. Place a trigger in the map that you want the spiderholes to be spawned from. Select the trigger and select the spawner and press W to target the spawner from the trigger. Make sure to check the "TRIGGER_SPAWN" checkbox for the trigger.
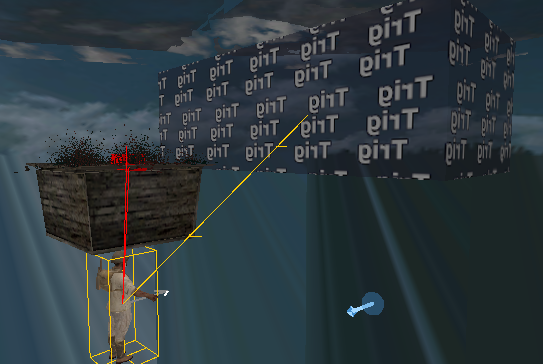
- 8. That's it for the Radiant setup. The final setup should look soemthing like this pic below: (trigger targets the spawner, spawner targets both the lid & the script_struct).
- 9. The last step is to make sure you've got all the required elements in your level zone file,(.csv), and your level script file, (.gsc).
- Put the following lines into the .csv file. The include files and _spiderhole_util.gsc are provided for you in the example_ambush.zip archive .
- rawfile,maps/_spiderhole_util.gsc
- include,spiderholes
- include,bayonet
- include,common_banzai
- xmodel,viewmodel_usa_marine_arms
- xmodel,viewmodel_usa_marine_player
- Add the following lines of script to your level script BEFORE the call to _load::main()
- maps\_spiderhole_util::init_spiderholes();
- maps\_banzai::init();
That's it! Now you should have everything you need to get the spiderholes working.
Next up: Setting up the Tree Snipers


