Call of Duty: Texturing: Difference between revisions
m New page: ==Material == In older games, a single image qualified as a texture and all that was required was that you simply drop the corresponding image into a specific folder. The general concept i... |
No edit summary |
||
| Line 29: | Line 29: | ||
Normal bump maps are added to material by use of the [[Call of Duty 5: Asset Manager Explained|Asset Manager]]. | Normal bump maps are added to material by use of the [[Call of Duty 5: Asset Manager Explained|Asset Manager]]. | ||
==Detail maps== | |||
[[Image:Detailmap_cobblestone.png|right|150px]] | |||
Detail maps can be used to give a texture a more realistic depth. They represent a material surface structure, like the rough surface irregularities of rust or stone. | |||
Detail maps can be significant smaller than their corresponding color map. The tiling (how many times it should repeat in vertical and horizontal direction relative to the color map) can be set in [[Call of Duty 5: Asset Manager Explained|Asset Manager]]. | |||
<div style="clear:both;"></div> | |||
==Specular maps== | ==Specular maps== | ||
| Line 34: | Line 44: | ||
[[Image:Specular example.jpg|right|150px]] | [[Image:Specular example.jpg|right|150px]] | ||
Specular maps in | Specular maps in CoD represent the specular intensity and color of highlights on a surface. In other words they define the "shinyness" and color of specular reflections. | ||
A specular map in CoD is actually made up of two textures: | |||
#Specular color map - the reflection color (RGB) | |||
#Cosine power map - the reflection amount / glossiness (Grayscale) | |||
The | Asset Manager merges both to a single IWI, indicated by an ampersand & in the name. The power map becomes an alpha channel and is merged together with the color map to a RGB+A texture. | ||
The goal when creating a | The brighter the color map is, the more shine is applied to the final material. | ||
The goal when creating a cosine map is to fill the image with a solid value to represent the general specularity of the surface and then darken areas where weathering would occur. | |||
The example at right has a mistake; the face of a brick would recieve less wear and tear than the edges and should therefore be more specular. Note that the cracks themselves have little to no specularity at all. | The example at right has a mistake; the face of a brick would recieve less wear and tear than the edges and should therefore be more specular. Note that the cracks themselves have little to no specularity at all. | ||
Color applied to a specular map tints the color of highlights. Bricks are made out of a sand like material and as such would reflect slightly variable tints. This too is present in the example to the right. | Color applied to a specular color map tints the color of highlights. Bricks are made out of a sand like material and as such would reflect slightly variable tints. This too is present in the example to the right. | ||
Specular maps are added to material shaders by use of the [[Call of Duty 5: Asset Manager Explained|Asset Manager]]. | Specular maps are added to material shaders by use of the [[Call of Duty 5: Asset Manager Explained|Asset Manager]]. Note that Asset Manager will reject DDS files as input, use 24bit TGA instead (24bit: RGB, 32bit: RBA+Alpha). | ||
Bump maps can be modified into a good starting point for a specular map. | Bump maps can be modified into a good starting point for a specular map. | ||
==Example== | |||
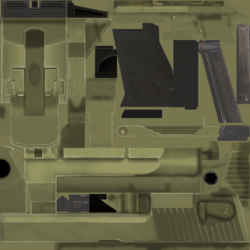
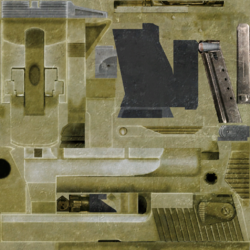
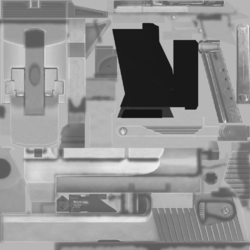
This comparison shows the differences of | |||
#Color map, | |||
#Specular color map and | |||
#Cosine power map | |||
using the example of CoD4's Golden Desert Eagles: | |||
[[Image:weapon_desert_eagle_gold_col.png|250px|Color map]] [[Image:_weapon_desert_eagle_gold_spc_f7d5bd11.png|250px|Specular color map]] [[Image:_weapon_desert_eagle_gold_cosine.png|250px|Cosine power map]] | |||
==Supported image formats== | ==Supported image formats== | ||
| Line 107: | Line 133: | ||
[http://www.modwiki.net/wiki/Texturing | Sources: [http://www.modwiki.net/wiki/Texturing Modwiki.net] | ||
--[[User:CoDEmanX|CoDEmanX]] 01:53, 24 July 2009 (UTC) | |||
[[Category:Texturing]] | [[Category:Texturing]] | ||
[[Category:Mapping]] | [[Category:Mapping]] | ||
[[Category:Modding]] | [[Category:Modding]] | ||
[[Category:Technical Reference]] | [[Category:Technical Reference]] | ||
Revision as of 01:53, 24 July 2009
Material
In older games, a single image qualified as a texture and all that was required was that you simply drop the corresponding image into a specific folder. The general concept is to use material which in turn use multiple images, each representing a different property of a surface. This makes texturing more work than it was in the past, but it also gives much more power and flexibility to the developers.
Color maps
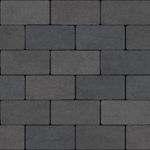
Color maps in COD represent the diffuse reflection and color of a surface. In other words they define the color and intensity of light reflected back when it strikes a surface.
The goal when creating a diffuse map is to draw a color map and darken areas where light would be absorbed. For instance, the cracks in a brick wall absorb more light than they reflect back.
The example to the right demonstrates this as the bricks themselves are a greyish value and the cracks between them almost black.
No surface reflects light back at the same intensity it's recieved. In that respect, it's a good idea to darken your diffuse maps appropriately. Generally, the smoother a surface is the less light is diffused and the brighter your diffuse map can be.
Color maps are added to material by use of the Asset Manager.
Normal maps
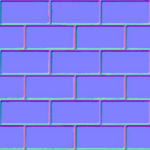
Normal maps define the slope or normals of a surface. In other words, they alter the direction a surface appears to be facing.
The normal for each pixel is defined by storing spacial X,Y,Z transformation data in the R,G,B channels. The example to the right demonstrates this.
There are two methods to create normal maps.
- Render a normal map from 3D geometry
- Convert a height map into a normal map
Normal bump maps are added to material by use of the Asset Manager.
Detail maps
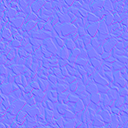
Detail maps can be used to give a texture a more realistic depth. They represent a material surface structure, like the rough surface irregularities of rust or stone.
Detail maps can be significant smaller than their corresponding color map. The tiling (how many times it should repeat in vertical and horizontal direction relative to the color map) can be set in Asset Manager.
Specular maps
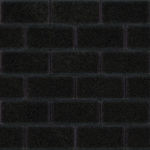
Specular maps in CoD represent the specular intensity and color of highlights on a surface. In other words they define the "shinyness" and color of specular reflections.
A specular map in CoD is actually made up of two textures:
- Specular color map - the reflection color (RGB)
- Cosine power map - the reflection amount / glossiness (Grayscale)
Asset Manager merges both to a single IWI, indicated by an ampersand & in the name. The power map becomes an alpha channel and is merged together with the color map to a RGB+A texture.
The brighter the color map is, the more shine is applied to the final material.
The goal when creating a cosine map is to fill the image with a solid value to represent the general specularity of the surface and then darken areas where weathering would occur.
The example at right has a mistake; the face of a brick would recieve less wear and tear than the edges and should therefore be more specular. Note that the cracks themselves have little to no specularity at all.
Color applied to a specular color map tints the color of highlights. Bricks are made out of a sand like material and as such would reflect slightly variable tints. This too is present in the example to the right.
Specular maps are added to material shaders by use of the Asset Manager. Note that Asset Manager will reject DDS files as input, use 24bit TGA instead (24bit: RGB, 32bit: RBA+Alpha).
Bump maps can be modified into a good starting point for a specular map.
Example
This comparison shows the differences of
- Color map,
- Specular color map and
- Cosine power map
using the example of CoD4's Golden Desert Eagles:
Supported image formats
The COD engine supports the following image formats:
Details on each format and it's quirks can be found by following the links above.
Compression Notes
See the Asset Manager page for how to automatically compress all your assets for distribution.
DDS files, and their MIP Maps, can be edited.
If one is not using ATI's The Compressonator, local maps can be prepared for compression manually. Simply copy the red channel to the alpha channel. Then delete the old red channel (to save space). The advantage to interpriting local maps in this manner, we can presume, is due to the alpha channel's higher quality. In DXT5 each 4x4 (16) pixel block is encoded with 64 bits of RGB color data, and 64 bits of alpha data. Since a local map primarily consists of only 2 channels (horizontal, usually red, and vertical, usually green), we're effectively splitting the two channels evenly across the compression scheme.
See also
General image editing applications
Seamless texture creation tools
- The Resynthesizer - GIMP Plugin
- Filter Forge - Photoshop Plugin
- Map Zone
- Texture Maker
- Genetica
- DarkTree
- FxGen
Height and normal maps
Renderbump
DDS format
Cube maps
Texture resources
Sources: Modwiki.net
--CoDEmanX 01:53, 24 July 2009 (UTC)
