Call of Duty 5: Vehicles in MP: Difference between revisions
Jump to navigation
Jump to search
| Line 13: | Line 13: | ||
* [[Image:data.png]][http://files.filefront.com/cod5+tank+pack+v13+zeroyzip/;13084471;/fileinfo.html Additional files] | * [[Image:data.png]][http://files.filefront.com/cod5+tank+pack+v13+zeroyzip/;13084471;/fileinfo.html Additional files] | ||
The latter contains soundaliases/sound/vehicle/destructibledef/destructiblepieces/gsc/clientscripts/physic and map example;<br> | **The latter contains soundaliases/sound/vehicle/destructibledef/destructiblepieces/gsc/clientscripts/physic and map example;<br> | ||
Simply unzip in your Call Of Duty 5 Installation folder;<br><br> | **Simply unzip in your Call Of Duty 5 Installation folder;<br><br> | ||
<font color="red" size="4">[[Image:Warning.png]] All files contained in the pack are custom or stock but one stock file ONLY is modded </font><font color="yellow" size="4">/maps/mp/_vehicles.gsc</font> <font color="red" size="4">so make sure to backup this file!</font><br><br> | <font color="red" size="4">[[Image:Warning.png]] All files contained in the pack are custom or stock but one stock file ONLY is modded </font><font color="yellow" size="4">/maps/mp/_vehicles.gsc</font> <font color="red" size="4">so make sure to backup this file!</font><br><br> | ||
Revision as of 02:22, 25 January 2009
![]() This tutorial will explain how to add Tanks to your Multiplayer levels.
This tutorial will explain how to add Tanks to your Multiplayer levels.
The tanks contained in the pack below (second download) are as follow:
Panzer IV: Armored MG, Unarmored MG - Armored Flamethrower, Unarmored Flamethrower
T34      : Armored MG, Unarmored MG - Armored Flamethrower, Unarmored Flamethrower
They all have fully working FXs, Sounds, Damage, HUD stuff;
Pre-requisite
- The latter contains soundaliases/sound/vehicle/destructibledef/destructiblepieces/gsc/clientscripts/physic and map example;
- Simply unzip in your Call Of Duty 5 Installation folder;
- The latter contains soundaliases/sound/vehicle/destructibledef/destructiblepieces/gsc/clientscripts/physic and map example;
![]() All files contained in the pack are custom or stock but one stock file ONLY is modded /maps/mp/_vehicles.gsc so make sure to backup this file!
All files contained in the pack are custom or stock but one stock file ONLY is modded /maps/mp/_vehicles.gsc so make sure to backup this file!
In Radiant
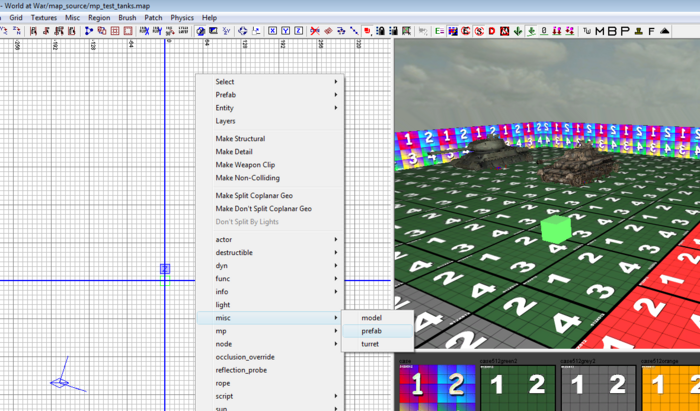
- Open your map in Radiant and place the Tank prefabs by right-clicking on the 2D view > misc > prefab
- Browse to ..\Call of Duty - World at War\map_source\_prefabs\MP\ and pick the desired prefab
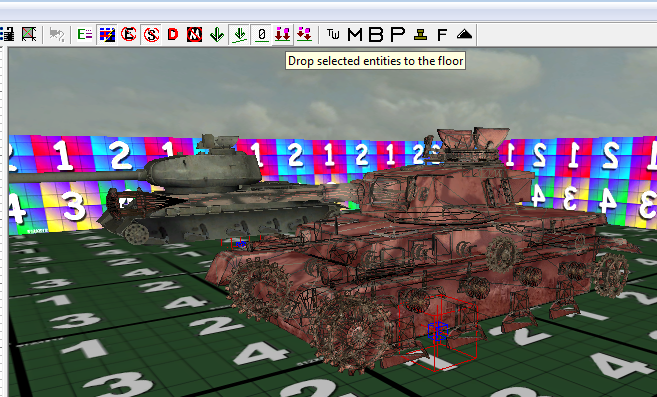
- Place in map and drop to ground using the drop to ground tool as shown below:
- Add more tank prefabs if desired
- Save your map and exit radiant
Update the Zone file
- Open your Map Zone File (in ..\Call of Duty - World at War\zone_source\) and add the following lines:
// added for tanks
include,vehicles_drivable_mp
rawfile,clientscripts/mp/mp_test_tanks.csc
sound,vehicles,veh_mp,all_mp
rawfile,clientscripts/mp/_t34_flm.csc
rawfile,clientscripts/mp/_panzeriv_flm.csc
rawfile,maps/mp/_t34_flm.gsc
rawfile,maps/mp/_panzeriv_flm.gsc
rawfile,maps/mp/_vehicles.gsc
![]() Make sure to comment out or remove the line impactfx,mp_test_tanks or the map will not start!!
Make sure to comment out or remove the line impactfx,mp_test_tanks or the map will not start!!
- Save and close
Check the map GSC file
- Check that your main Map GSC contains the line maps\mp\_load::main(); as shown in the example map in pack:
main()
{
	maps\mp\_load::main();

	game["allies"] = "marines";
	game["axis"] = "japanese";
	game["attackers"] = "allies";
	game["defenders"] = "axis";
	game["allies_soldiertype"] = "pacific";
	game["axis_soldiertype"] = "pacific";

}
Compile
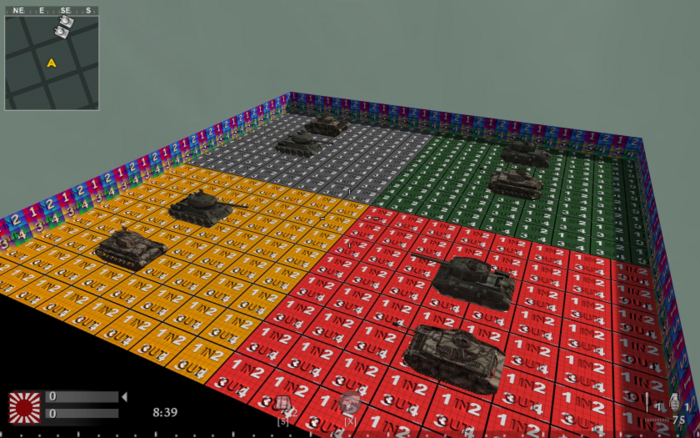
- Using Launcher compile your map and test! All going well you will have something like this:
Thanks to Sven71, ChrisP.
--Zeroy. 02:04, 25 January 2009 (UTC)


