Call of Duty 4: Your First Map: Difference between revisions
Jump to navigation
Jump to search
No edit summary |
|||
| Line 5: | Line 5: | ||
==Use 2d Picture for Layout== | ==Use 2d Picture for Layout== | ||
This is a tip i found very handy for the scaling of your project early in the making. | This is a tip i found very handy for the scaling of your project early in the making. | ||
*Create your layout on paper or on drawing/cad third-party (make it quite big, at 1024*1024) | *Create your layout on paper or on drawing/cad third-party (make it quite big, at 1024*1024) | ||
| Line 12: | Line 12: | ||
*Select your newly imported layout texture | *Select your newly imported layout texture | ||
*Create a brush > terrain patch with it for the size of your map/area to use layout | *Create a brush > terrain patch with it for the size of your map/area to use layout | ||
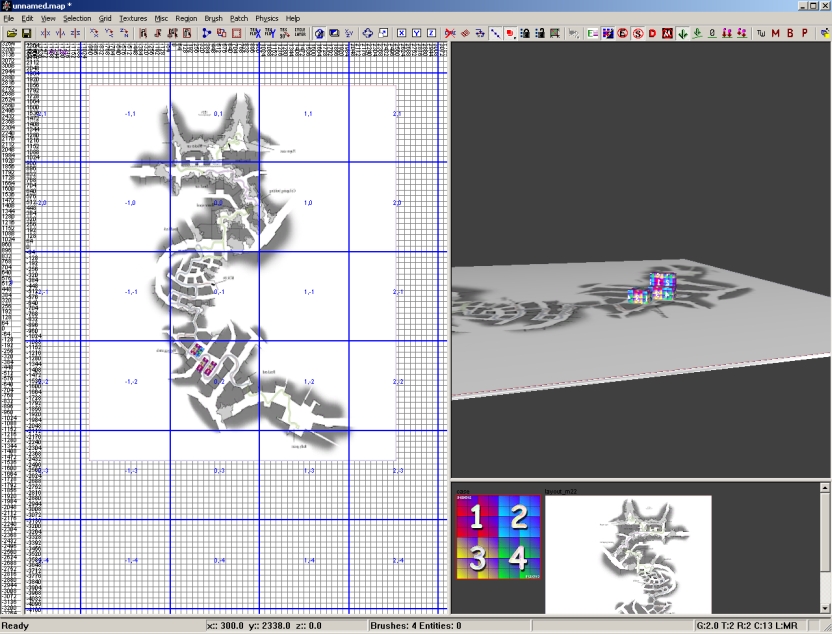
Here is the result (using stock layout pics), you can then build on top of this or place your prefabs easily | Here is the result (using stock layout pics), you can then build on top of this or place your prefabs easily | ||
Revision as of 14:18, 17 October 2008

![]() There are many many ways to build a MP map and what you will find below are the way i usually work when building a map - The information are Guidelines and isnt the only way to go about mapping for Call of Duty 4 Modern Warfare, but it's ONE way.
There are many many ways to build a MP map and what you will find below are the way i usually work when building a map - The information are Guidelines and isnt the only way to go about mapping for Call of Duty 4 Modern Warfare, but it's ONE way.
Use 2d Picture for Layout
This is a tip i found very handy for the scaling of your project early in the making.
- Create your layout on paper or on drawing/cad third-party (make it quite big, at 1024*1024)
- Use Asset Manager to import the pic in Radiant
- In radiant go to preferences (P) > tick the option "Texture Brushes in 2D"
- Select your newly imported layout texture
- Create a brush > terrain patch with it for the size of your map/area to use layout
Here is the result (using stock layout pics), you can then build on top of this or place your prefabs easily

