Call of Duty 5: Gridfile: Difference between revisions
No edit summary |
mNo edit summary |
||
| (6 intermediate revisions by one other user not shown) | |||
| Line 1: | Line 1: | ||
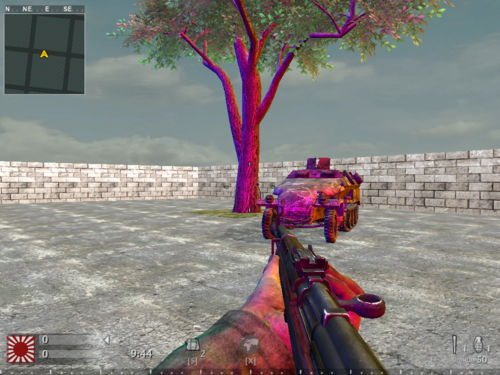
{{Note|Once you've compiled and run a custom map, models in the game might show up with a rainbow tint, such as the below viewmodel.}} | |||
{{Noob_approved}} | |||
[[Image:grid_01.png|500px]] | [[Image:grid_01.png|500px]] | ||
| Line 10: | Line 8: | ||
{{Warning|There are two methods of creating a grid file... basically, the easy way and the hard way.}} | |||
=Easy way: Using Radiant LightGrid= | |||
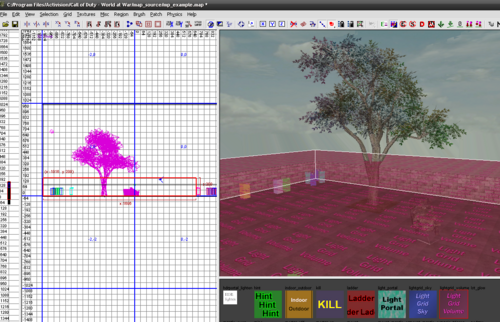
This method involves covering playable gameplay space with brushes textured with the pink lightgrid_volume texture, located in the tools texture group. | This method involves covering playable gameplay space with brushes textured with the pink lightgrid_volume texture, located in the tools texture group. | ||
[[Image:grid_02.png]] | [[Image:grid_02.png|500px]] | ||
The brushes essentially "eat up the dots" from the hard method, everywhere the brush is touching. This uses up memory, so be sure to optimize where you place the brushes. Only cover playable gameplay space, and only as high up as the player will get. Whatever you do, don't just surround your skybox in a brush with this texture, as that would be really bad memory-wise. | The brushes essentially "eat up the dots" from the hard method, everywhere the brush is touching. This uses up memory, so be sure to optimize where you place the brushes. Only cover playable gameplay space, and only as high up as the player will get. | ||
{{Warning|Whatever you do, don't just surround your skybox in a brush with this texture, as that would be really bad memory-wise.|red}} | |||
| Line 25: | Line 28: | ||
[[Image:grid_03.png]] | [[Image:grid_03.png|500px]] | ||
| Line 35: | Line 38: | ||
After adding in the lightgrid brushes, simply compile the map and run as normal. | After adding in the lightgrid brushes, simply compile the map and run as normal. | ||
= | =Hard Way: eating the dots= | ||
*The hard way involves launching a version of the map surrounded in "Pac-Man dots" that you "eat up" by running into them. In all seriousness, this method is much more memory efficient than the first, but as long as you have reasonable lightgrid volume placement it shouldn't matter too much. | *The hard way involves launching a version of the map surrounded in "Pac-Man dots" that you "eat up" by running into them. In all seriousness, this method is much more memory efficient than the first, but as long as you have reasonable lightgrid volume placement it shouldn't matter too much. | ||
| Line 41: | Line 44: | ||
*That being said, one situation where this method could come in handy is when your map has a lot of verticality. The lightgrid_volume texture will consume all the dots between a low location and a location directly above it, which can become costly depending on the layout of the map. So using this method can be handy to supplement the volume placement. You can create a new grid file, then eat up dots around areas not covered by the brushes. | *That being said, one situation where this method could come in handy is when your map has a lot of verticality. The lightgrid_volume texture will consume all the dots between a low location and a location directly above it, which can become costly depending on the layout of the map. So using this method can be handy to supplement the volume placement. You can create a new grid file, then eat up dots around areas not covered by the brushes. | ||
*To create and edit a new grid file, look | *To create and edit a new grid file, look in the Launcher Compile Tools. Select your Map in the list, then select "models collect dots"; Finally Click "Make New Grid" (or "Edit Existing Grid" if you've already created one). | ||
| Line 50: | Line 53: | ||
[[Image:grid_05.png]] | [[Image:grid_05.png|500px]] | ||
| Line 56: | Line 59: | ||
[[Category:Call of Duty 5]] | [[Category:Call of Duty 5]] | ||
[[Category:Mapping]] | [[Category:Mapping]] | ||
[[Category:Basic Editing]] | |||
[[Category:Modtools]] | |||
[[Category:Lighting]] | [[Category:Lighting]] | ||
Latest revision as of 21:13, 10 July 2009

This means that the level doesn't have a grid file, meaning models in the world won't be lit properly. The grid file should cover all areas that the player travels to, and areas with static or dynamic model placement. However, grid files do use up memory, so it should only cover as much area as it needs to.
Easy way: Using Radiant LightGrid
This method involves covering playable gameplay space with brushes textured with the pink lightgrid_volume texture, located in the tools texture group.
The brushes essentially "eat up the dots" from the hard method, everywhere the brush is touching. This uses up memory, so be sure to optimize where you place the brushes. Only cover playable gameplay space, and only as high up as the player will get.
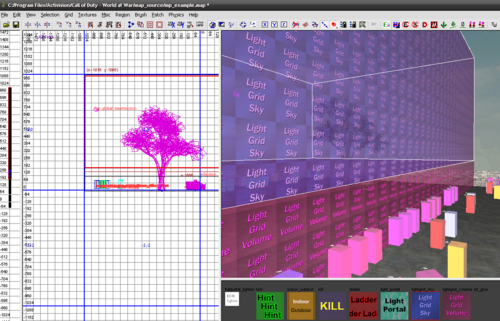
There's also a blue texture in the tools group called lightgrid_sky. This brush doesn't eat up dots, but it uses other methods for cheaply calculating a light grid. It should be used mostly in areas the player doesn't travel to.
- Basically, it's mostly for use in areas outside playable space (but where rainbow models are still appearing). It can also be used in levels with a lot of verticality.
- A lightgrid_volume above another eats up all the dots between the two, regardless of whether the volume is touching the in-between space. So if you run out of grid memory on a compile, you should replace lightgrid_volumes that aren't the ground floor with lightgrid_sky.
After adding in the lightgrid brushes, simply compile the map and run as normal.
Hard Way: eating the dots
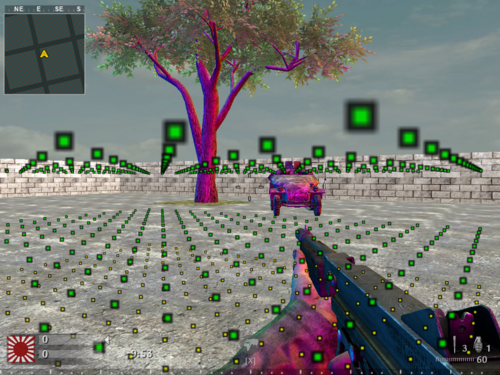
- The hard way involves launching a version of the map surrounded in "Pac-Man dots" that you "eat up" by running into them. In all seriousness, this method is much more memory efficient than the first, but as long as you have reasonable lightgrid volume placement it shouldn't matter too much.
- That being said, one situation where this method could come in handy is when your map has a lot of verticality. The lightgrid_volume texture will consume all the dots between a low location and a location directly above it, which can become costly depending on the layout of the map. So using this method can be handy to supplement the volume placement. You can create a new grid file, then eat up dots around areas not covered by the brushes.
- To create and edit a new grid file, look in the Launcher Compile Tools. Select your Map in the list, then select "models collect dots"; Finally Click "Make New Grid" (or "Edit Existing Grid" if you've already created one).
Your view should then look something like this after the map loads.
Walk around normally, and collect the dots as you move. When you're done, simply use the "quit" command in the console and the grid information will be automatically saved.


