Call of Duty 5: Patches: Difference between revisions
No edit summary |
mNo edit summary |
||
| (9 intermediate revisions by 2 users not shown) | |||
| Line 1: | Line 1: | ||
[[Image:Nutshell.png]] This tutorial explains how to use Terrain Patches. | |||
[[Image:Noobs.png|200px|right]] | |||
Terrain patches are on of the most useful parts of the editor. | Terrain patches are on of the most useful parts of the editor. | ||
When making a map always use Terrain Patches when making ground, even footpaths floors etc. | When making a map always use Terrain Patches when making ground, even footpaths floors etc. | ||
| Line 6: | Line 6: | ||
to use patches. | to use patches. | ||
Call of Duty WAW has brought in some lovely enhancements to the editor, one big improvement is on the | [[Image:Information.png]] Call of Duty WAW has brought in some lovely enhancements to the editor, one big improvement is on the patch tool section. | ||
patch tool section. | |||
We can now create a patch 31 x 31 , this makes creating large areas of terrain a breeze. | [[Image:Information.png]] We can now create a patch 31 x 31 , this makes creating large areas of terrain a breeze. | ||
Let us then look at creating a terrain. | ''Let us then look at creating a terrain.'' | ||
From your launcher program, choose radiant. | *From your launcher program, choose radiant. | ||
Now go to the Texture menu and select a grass texture for this excercise | *Now go to the Texture menu and select a grass texture for this excercise | ||
Now I am choosing the texture peleliu_terrain_grass_dark_patchy (Please note not a blend texture) | TEXTURES > Surface Type > Grass | ||
[[Image:ss1.jpg]] | |||
*Now I am choosing the texture peleliu_terrain_grass_dark_patchy (Please note not a blend texture) | |||
Obviously pick a texture to do the task at hand. | Obviously pick a texture to do the task at hand. | ||
Now in the editor zoom out slightly, then draw a brush as shown below. | *Now in the editor zoom out slightly, then draw a brush as shown below. | ||
Go to the patch menu and choose Simple Terrain Patch (Patch>Simple Terrain Patch), please note the brush you | [[Image:ss2.jpg|500px]] | ||
*Right now we have a good size brush, lets turn this into a patch. | |||
*Go to the patch menu and choose Simple Terrain Patch (Patch>Simple Terrain Patch), please note the brush you | |||
drew should still be selected at this point. | drew should still be selected at this point. | ||
[[Image:ss3.jpg|500px]] | |||
*Now set the density to 31 x 31 | |||
*Click OK. | |||
The next stage is to copy the patch to give us the area of the map that you want covered with it. | [[Image:ss4.jpg|500px]] | ||
*You will now see your brush has become a patch, the patch we have created is quite dense this is better where we want to make terrain more detailed. | |||
*The next stage is to copy the patch to give us the area of the map that you want covered with it. | |||
Your patch should still be selected so lets press space and copy it. | Your patch should still be selected so lets press space and copy it. | ||
Move the copy to align to the top as shown in the screen shot, you will need to adjust the grid size to make it align properly. | Move the copy to align to the top as shown in the screen shot, you will need to adjust the grid size to make it align properly. | ||
Next lets make the patch a nice square so select both patches (Shift left click on unselected patch) copy them and align to the right. | [[Image:ss5.jpg|500px]] | ||
*Next lets make the patch a nice square so select both patches (Shift left click on unselected patch) copy them and align to the right. | |||
[[Image:ss6.jpg|500px]] | |||
*You will now have a nice square flat bit of terrain (patches) | |||
*Lets make a hill: | |||
Press Y and you will see the Advanced Patch Editing Options as shown below (In Default Options). | |||
Now we have two ways of editing the patch with the tools, we can either choose to Allow Soft Selection or not. By default it is off. | |||
[[Image:ss7.jpg|500px]] | |||
In this case as we are dealing with the patch you have created and no other patches will be affected let us select the option Allow Soft Selection on Unselected Patches. | |||
[[Image:Warning.png]] Make sure at this point no patches are selected [highlighted] | |||
*We will also change the following values. | |||
*Check the Height check box. | |||
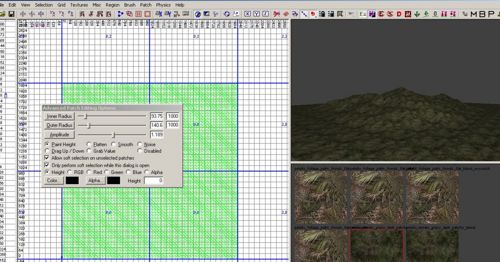
*Change the Inner Radius, Outer Radius and Amplitude settings as shown below. | |||
[[Image:ss8.jpg|500px]] | |||
*You will note I changed the max settings to 1000, this just allows us to have greater scope on the inner and outer settings. | |||
*Now position yourself in the editor so you can see the terrain at hand, then lets start making a rough hill. | |||
*Holding down the ALT key and Left mouse button, move your cursor over the patch in the 3d window of the editor. | |||
*You will see the patch start to change and rise as you move it around. | |||
*You can change the Inner/Outer and Amplitude to suit your requirements, if you do it to fast it will deform and the patches can come dis-join (You can weld the patches back, this is covered in a later tutorial) | |||
[[Image:ss9.jpg|500px]] | |||
*Now we have a hill, we could also make a depression at the front of the hill. | |||
*Holding the ALT key still, press and hold the right mouse button. You will see the landscape go down. | |||
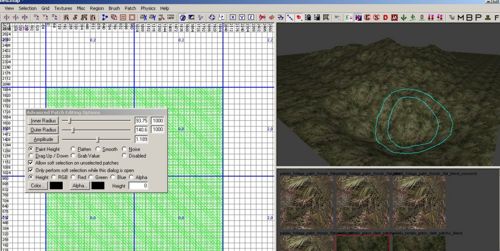
*When your done you should be able to see the changes for example see screen shot below | |||
[[Image:ss10.jpg|500px]] | |||
*Press Y to close the Advanced Editor Tool, you now have your Terrain ready for use. | |||
[[Category:Call of Duty 5]] | |||
[[Category:Basic Editing]] | |||
[[Category:Mapping]] | |||
[[Category:Terrain]] | |||
Latest revision as of 11:38, 12 December 2008
![]() This tutorial explains how to use Terrain Patches.
This tutorial explains how to use Terrain Patches.

Terrain patches are on of the most useful parts of the editor. When making a map always use Terrain Patches when making ground, even footpaths floors etc. When we come to blending and other parts of the patch tools you will see why it is important to use patches.
![]() Call of Duty WAW has brought in some lovely enhancements to the editor, one big improvement is on the patch tool section.
Call of Duty WAW has brought in some lovely enhancements to the editor, one big improvement is on the patch tool section.
![]() We can now create a patch 31 x 31 , this makes creating large areas of terrain a breeze.
We can now create a patch 31 x 31 , this makes creating large areas of terrain a breeze.
Let us then look at creating a terrain.
- From your launcher program, choose radiant.
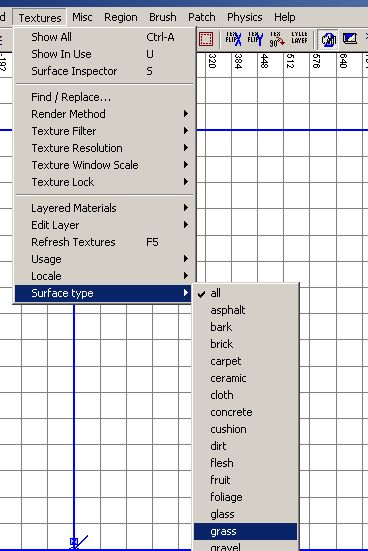
- Now go to the Texture menu and select a grass texture for this excercise
TEXTURES > Surface Type > Grass
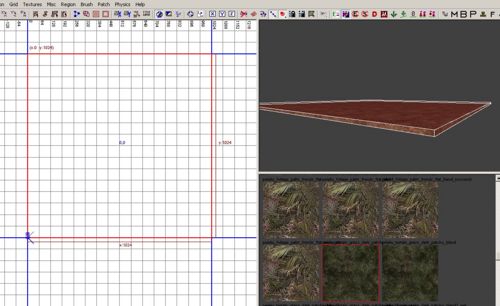
- Now I am choosing the texture peleliu_terrain_grass_dark_patchy (Please note not a blend texture)
Obviously pick a texture to do the task at hand.
- Now in the editor zoom out slightly, then draw a brush as shown below.
- Right now we have a good size brush, lets turn this into a patch.
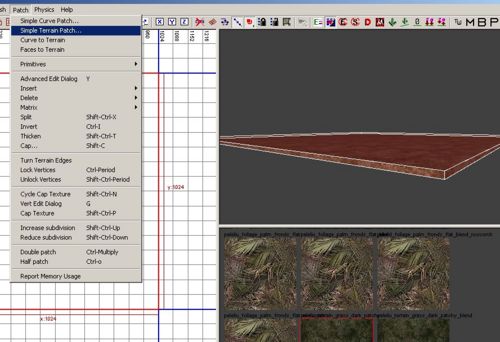
- Go to the patch menu and choose Simple Terrain Patch (Patch>Simple Terrain Patch), please note the brush you
drew should still be selected at this point.
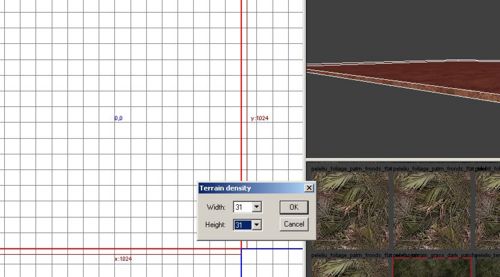
- Now set the density to 31 x 31
- Click OK.
- You will now see your brush has become a patch, the patch we have created is quite dense this is better where we want to make terrain more detailed.
- The next stage is to copy the patch to give us the area of the map that you want covered with it.
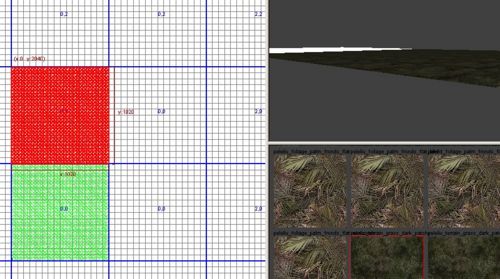
Your patch should still be selected so lets press space and copy it. Move the copy to align to the top as shown in the screen shot, you will need to adjust the grid size to make it align properly.
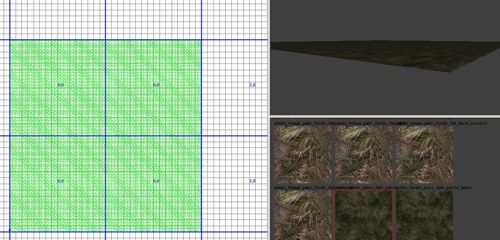
- Next lets make the patch a nice square so select both patches (Shift left click on unselected patch) copy them and align to the right.
- You will now have a nice square flat bit of terrain (patches)
- Lets make a hill:
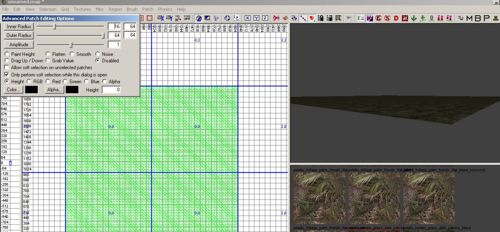
Press Y and you will see the Advanced Patch Editing Options as shown below (In Default Options). Now we have two ways of editing the patch with the tools, we can either choose to Allow Soft Selection or not. By default it is off.
In this case as we are dealing with the patch you have created and no other patches will be affected let us select the option Allow Soft Selection on Unselected Patches.
 Make sure at this point no patches are selected [highlighted]
- We will also change the following values.
- Check the Height check box.
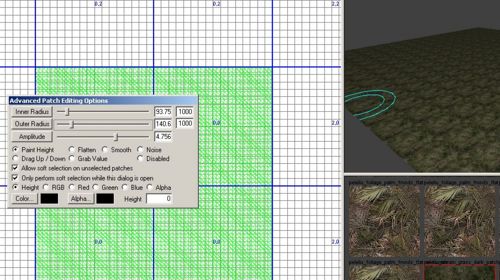
- Change the Inner Radius, Outer Radius and Amplitude settings as shown below.
- You will note I changed the max settings to 1000, this just allows us to have greater scope on the inner and outer settings.
- Now position yourself in the editor so you can see the terrain at hand, then lets start making a rough hill.
- Holding down the ALT key and Left mouse button, move your cursor over the patch in the 3d window of the editor.
- You will see the patch start to change and rise as you move it around.
- You can change the Inner/Outer and Amplitude to suit your requirements, if you do it to fast it will deform and the patches can come dis-join (You can weld the patches back, this is covered in a later tutorial)
- Now we have a hill, we could also make a depression at the front of the hill.
- Holding the ALT key still, press and hold the right mouse button. You will see the landscape go down.
- When your done you should be able to see the changes for example see screen shot below
- Press Y to close the Advanced Editor Tool, you now have your Terrain ready for use.
