Call of Duty 4: Minimap BlackOps Like: Difference between revisions
Jump to navigation
Jump to search
Created page with "{{Warning_advanced}} {{Note|Advanced tutorial using '''Adobe Photoshop''' to create Minimap Images just like in Call Of Duty BlackOps!. By Cornrow Wallace}} [[File:bo_minimap_cw..." |
mNo edit summary |
||
| (2 intermediate revisions by the same user not shown) | |||
| Line 2: | Line 2: | ||
{{Note|Advanced tutorial using '''Adobe Photoshop''' to create Minimap Images just like in Call Of Duty BlackOps!. By Cornrow Wallace}} | {{Note|Advanced tutorial using '''Adobe Photoshop''' to create Minimap Images just like in Call Of Duty BlackOps!. By Cornrow Wallace}} | ||
[[File:bo_minimap_cw_1.jpg|center]] | [[File:bo_minimap_cw_1.jpg|center|700px]] | ||
== Outline the buildings. == | |||
[[ | *After you've already taken your [[Call of Duty 4: Minimap|minimap screenshot tutorial]], open it in Photoshop and crop just within the white border. | ||
[[File:bo_minimap_cw_2.jpg|400px]] | |||
*Duplicate your background image layer & hide the original "Background" layer. | *Duplicate your background image layer & hide the original "Background" layer. | ||
{{ | {{Info|Create a new layer for the outlines, don't draw directly on the minimap image. Name this layer "outlines". Make sure this layer is above the Background copy layer in the stack.}} | ||
*Select the Pencil Tool, set it to 2px width, set the color to #bac3c8 and outline all the buildings. | *Select the Pencil Tool, set it to 2px width, set the color to #bac3c8 and outline all the buildings. | ||
| Line 34: | Line 34: | ||
*'''Helpful Tip:''' To outline rotated objects like large vehicles or crates, don't try to outline them as they are. One way of outling them is to create a square or rectangle close to it's normal size, select the new outline you just drew, then rotate it into place by using the Edit > Transform > Rotate function. | *'''Helpful Tip:''' To outline rotated objects like large vehicles or crates, don't try to outline them as they are. One way of outling them is to create a square or rectangle close to it's normal size, select the new outline you just drew, then rotate it into place by using the Edit > Transform > Rotate function. | ||
[[File:bo_minimap_cw_3.jpg| | [[File:bo_minimap_cw_3.jpg|400px]] | ||
== Crop outside of the outlines. == | == Crop outside of the outlines. == | ||
| Line 41: | Line 41: | ||
* Select the Rectangular Marquee Tool (square selection) and start selecting & deleting outside of your outlines until you're only left with the outlines & your playable area. | * Select the Rectangular Marquee Tool (square selection) and start selecting & deleting outside of your outlines until you're only left with the outlines & your playable area. | ||
[[File:bo_minimap_cw_4.jpg| | [[File:bo_minimap_cw_4.jpg|400px]] | ||
== Color overlays == | == Color overlays == | ||
| Line 55: | Line 55: | ||
*'''Helpful Tip:''' To remove from a current selection, use alt+left click & drag. | *'''Helpful Tip:''' To remove from a current selection, use alt+left click & drag. | ||
[[File:bo_minimap_cw_5.jpg| | [[File:bo_minimap_cw_5.jpg|400px]] | ||
''Secondary overlays:'' | ''Secondary overlays:'' | ||
| Line 65: | Line 65: | ||
*Set the Blend Mode (to the left of Opacity in the Layer panel) to Hue. | *Set the Blend Mode (to the left of Opacity in the Layer panel) to Hue. | ||
[[File:bo_minimap_cw_6.jpg|center]] | [[File:bo_minimap_cw_6.jpg|center|500px]] | ||
[[Category:Call of Duty 4]] | [[Category:Call of Duty 4]] | ||
[[Category:Call of Duty 5]] | [[Category:Call of Duty 5]] | ||
[[Category:Minimap]] | [[Category:Minimap]] | ||
Latest revision as of 10:33, 17 January 2012
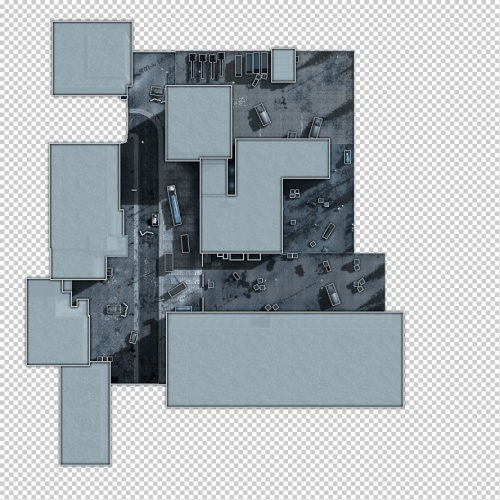
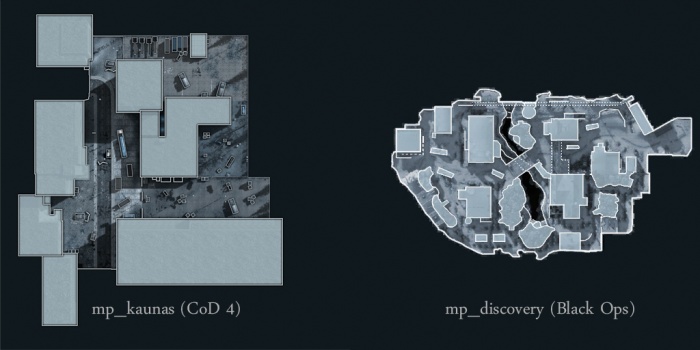
Advanced tutorial using Adobe Photoshop to create Minimap Images just like in Call Of Duty BlackOps!. By Cornrow Wallace
Outline the buildings.
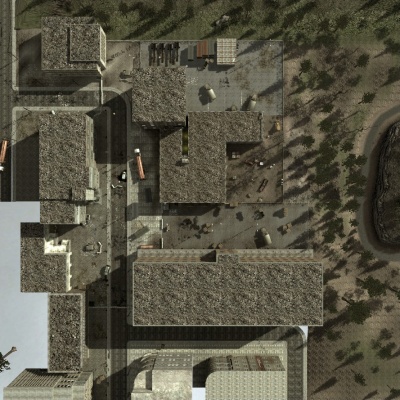
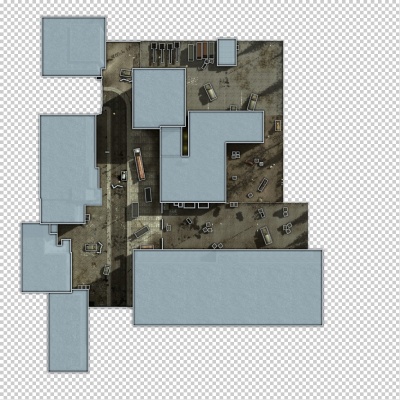
- After you've already taken your minimap screenshot tutorial, open it in Photoshop and crop just within the white border.
- Duplicate your background image layer & hide the original "Background" layer.
Create a new layer for the outlines, don't draw directly on the minimap image. Name this layer "outlines". Make sure this layer is above the Background copy layer in the stack.
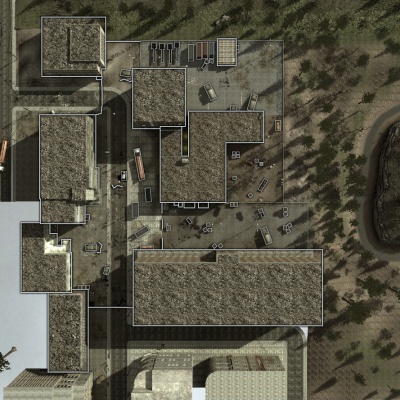
- Select the Pencil Tool, set it to 2px width, set the color to #bac3c8 and outline all the buildings.
Helpful Tip: hold Shift while drawing to draw a straight line.
- For other objects such as crates, vehicles, etc.. I usually use a 1px width.
- After you've outlined all your buildings & objects, outline the borders as closely as possible.
- When you're done outlining, left click on the Outlines layer, then click on FX button at the bottom of the layers window, click on Outer Glow... and enter these settings:
Blend Mode: Normal
Opacity: 100%
Noise: 0%
Color: Black (#000000)
(Elements and Quality settings are unmodified)
- Helpful Tip: To use dotted lines instead of solid lines, click on the Brush panel (if not visible, click on the "Toggle Brush Panel" button to the right of the brush size) and set the spacing to 200%, 1% for solid lines.
- Helpful Tip: To outline rotated objects like large vehicles or crates, don't try to outline them as they are. One way of outling them is to create a square or rectangle close to it's normal size, select the new outline you just drew, then rotate it into place by using the Edit > Transform > Rotate function.
Crop outside of the outlines.
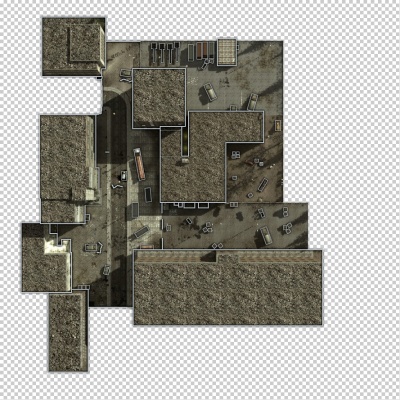
- Select your Background Copy layer.
- Select the Rectangular Marquee Tool (square selection) and start selecting & deleting outside of your outlines until you're only left with the outlines & your playable area.
Color overlays
There are 2 layers of overlays used here: one for buildings, the other for everything else.
Building overlays:
Create a new layer, name it Overlay, make sure it's above the Background copy layer and below the Outlines layer. Using the Rectangular Marquee Tool again, draw a selection box around one building at a time, then select the Paint Bucket Tool, set the color to #92a5ac, and fill the selection. After you've done this for each building, set the layer Opacity (top right of the Layer panel) to 88%.
- Helpful Tip: ctrl+D with the Rectangular Marquee Tool active deselects everything.
- Helpful Tip: To add to a current selection, use shift+left click & drag.
- Helpful Tip: To remove from a current selection, use alt+left click & drag.
Secondary overlays:
- Create a new layer, name it Overlay 2, make sure it's just below the Overlay layer in the stack.
- Select the Paint Bucket Tool, set the color to #353d43, fill the entire area. Next we have to cut out two blocks using layer selections.
- Ctrl+left click on the thumbnail of the Overlay layer, this will create a selection of everything in the layer. Make sure the Overlay 2 layer is still active and press Delete. Press ctrl+D to deselect.
- Ctrl+left click on the thumbnail of the Background copy layer, press shift+ctrl+i to invert the selection, again making sure the Overlay 2 layer is still active, and press Delete. Press ctrl+D to deselect.
- Set the Blend Mode (to the left of Opacity in the Layer panel) to Hue.
