Call of Duty 4: Import COD2 Models: Difference between revisions
No edit summary |
No edit summary |
||
| (5 intermediate revisions by the same user not shown) | |||
| Line 1: | Line 1: | ||
[[Category:Call of Duty 4]] | |||
[[Category:Modtools]] | |||
[[Category:Radiant]] | |||
[[Category:Advanced Editing]] | |||
[[Category:Import]] | |||
[[Category:Modtools]] | |||
{{warning_forpro}} | {{warning_forpro}} | ||
[[Image:rgn_warning.png|right]] | |||
[[Image:Nutshell.png]] This tutorial will explain how you can import Call of Duty 2 models into Cod4 to use in your custom maps. | [[Image:Nutshell.png]] This tutorial will explain how you can import Call of Duty 2 models into Cod4 to use in your custom maps. | ||
| Line 20: | Line 27: | ||
*Get Call of duty 2 installed on your PC and extract '''all''' the .iwd found in /main/ to \Call of Duty 2\raw (if raw folder isnt there then create it). Not sure if they are required but to be on the safe side install the Cod2 mod tools as well, get them [http://callofduty.filefront.com/file/CoD2_Updated_MapMod_Tools;61008 here] | *Get Call of duty 2 installed on your PC and extract '''all''' the .iwd found in /main/ to \Call of Duty 2\raw (if raw folder isnt there then create it). Not sure if they are required but to be on the safe side install the Cod2 mod tools as well, get them [http://callofduty.filefront.com/file/CoD2_Updated_MapMod_Tools;61008 here] | ||
Of course this also assume you have | Of course this also assume you have Call of Duty 4 [[Call of Duty 4: needed#Modtools|Modtools]] installed | ||
==Exporting the chosen model to .OBJ== | ==Exporting the chosen model to .OBJ== | ||
| Line 31: | Line 38: | ||
[[Image:importcod2_01.jpg]] | [[Image:importcod2_01.jpg|500px]] | ||
| Line 43: | Line 50: | ||
[[Image:importcod2_02.jpg]] | [[Image:importcod2_02.jpg|500px]] | ||
| Line 53: | Line 60: | ||
[[Image:importcod2_03.jpg]] | [[Image:importcod2_03.jpg|500px]] | ||
| Line 81: | Line 88: | ||
[[Image:importcod2_04.jpg]] | [[Image:importcod2_04.jpg|500px]] | ||
Latest revision as of 13:42, 19 October 2008

![]() This tutorial will explain how you can import Call of Duty 2 models into Cod4 to use in your custom maps.
This tutorial will explain how you can import Call of Duty 2 models into Cod4 to use in your custom maps.
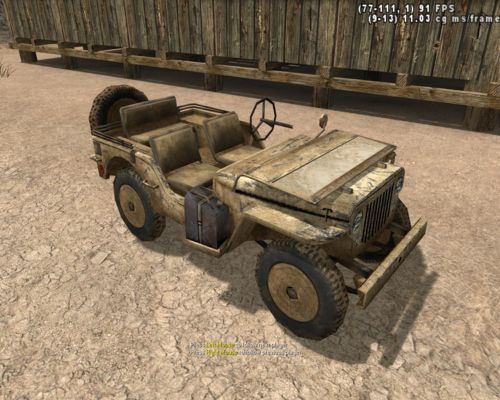
Result:
Required
First you will need a few programs:
- XModel Creator for CoD2 V0.6, get it here
- XModel Exporter V5.0.0.3, get it here
- IrfanView, get it here
- A legal copy of Call of Duty 2 by Activision
Note: all 3 are freewares.
- Get Call of duty 2 installed on your PC and extract all the .iwd found in /main/ to \Call of Duty 2\raw (if raw folder isnt there then create it). Not sure if they are required but to be on the safe side install the Cod2 mod tools as well, get them here
Of course this also assume you have Call of Duty 4 Modtools installed
Exporting the chosen model to .OBJ
A - Open XModel Exporter and point to \Call of Duty 2\raw\xmodels, a list of model will show up, pick the one you wish to import in Cod4
B - Export Material images as dds by clicking on each .iwi file in the three and using the "convert to DDS" button
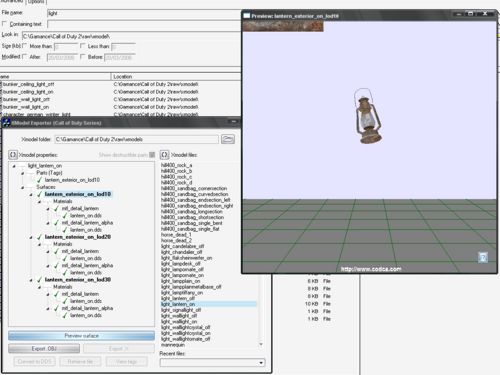
Once done, you can pick the first model in list, its usually either _high or _lod10 and hit "Preview Surface" to see the textured model:
C - When happy with the Model to export click the "Export .OBJ" Button
D - Keep XModel Exporter open on that same model as you will need it again later
Convert Material(s) to .TGA
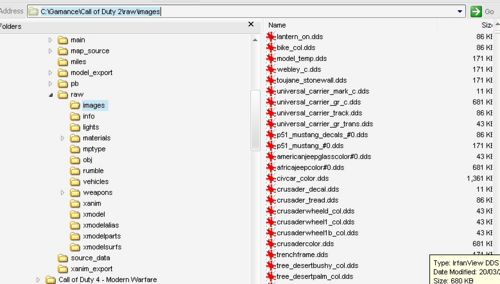
A - Browse to \Call of Duty 2\raw\images and look for the most recent files modified you should find the newly converted .dds:
B - Open the DDS one at the time using IrFanview (if you converted more than one) and save the file as .TGA in \Call of Duty 4 - Modern Warfare\texture_assets (create texture_assets if not already there) NOTE: dont touch any options when saving as .TGA
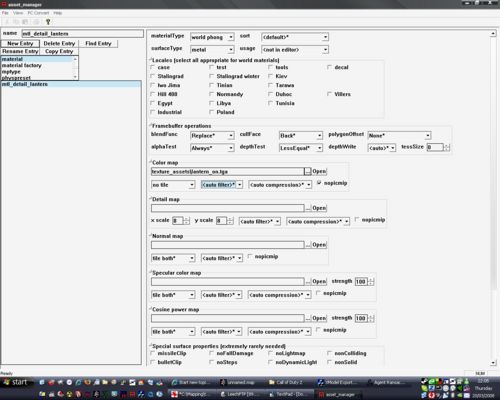
C - Open up IW Cod4 Asset Manager and select material from drop down list and hit "New Entry", for the name it is VERY important to select the same as the original name used in Cod2 for the chosen Model, in my example its mtl_detail_lantern - Use Xmodel Exporter (still open) to double check mtl_ name
Use the settings sen in screenshot below for each .tga you need to import in cod4, changing the Surface Type to appropriate in your case (Metal in my example):
Once ready, hit F10 to convert the asset, repeat if more than one material to create (some models have more than one)
Convert .OBJ back to xmodel_export
A - Browse to \Call of Duty 2\raw\obj\ where you should find 3 files created earlier, in my case they are:
lantern_exterior_on_lod10.mtl
lantern_exterior_on_lod10.obj
light_lantern_on_tags.txt
Copy all 3 files over to \Call of Duty 4 - Modern Warfare\model_export\custom\ (create custom folder is not present)
B - Open XModel Creator (Midi file plays quite loud!) , in "input" browse and select the .obj in \Call of Duty 4 - Modern Warfare\model_export\custom\
Click "import" then "More options" and "Materials", you should see the previously created material on the left hand side. Finally hit the "export" button and close XModel Creator
Convert xmodel_export to usuable textured Model
A - Copy the folder \Call of Duty 4 - Modern Warfare\raw\physic\ and all its file into \Call of Duty 4 - Modern Warfare\share\main\ ( create \share\main first)
B - Open up the Asset Manager again but this time select xmodel from list and click "New Entry" select any name you want
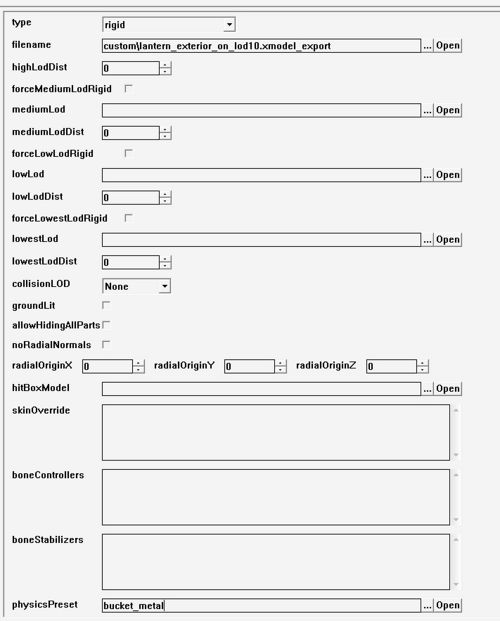
On the left hand side window go and browse the newly created .modelexport file in \Call of Duty 4 - Modern Warfare\model_export\custom\ (in my example its lantern_exterior_on_lod10.xmodel_export), select the physic from list that suit the best to your model:
Hit F10 when ready and everything going well the AssMan will convert your model without errors ;D
Et Voila! The model will now be accessible in COD4 Radiant, dont forget to add a clip for it or it will have no collision!
--Zeroy. 22:24, 16 October 2008 (UTC)

