Call of Duty 5: Texturing: Difference between revisions
New page: Image:Nutshell.png This tutorial goes through the INs and OUTs of texturing in Radiant. == Intorduction: Caulk == Everything should first be made in caulk because when the map is ran... |
mNo edit summary |
||
| (2 intermediate revisions by one other user not shown) | |||
| Line 1: | Line 1: | ||
{{Note|This tutorial goes through the INs and OUTs of texturing in Radiant.}} | |||
{{Noob_approved}} | |||
== | == Introduction: Caulk == | ||
Everything should first be made in caulk because when the map is ran it is nothing but a placeholder. In the editor it is a viable surface to edit but in the game it is invisible and never drawn. Why is this important? | Everything should first be made in caulk because when the map is ran it is nothing but a placeholder. In the editor it is a viable surface to edit but in the game it is invisible and never drawn. Why is this important? | ||
| Line 8: | Line 8: | ||
Although caulk is not required, it is a very good habit to get into for quality maps and is often noted at competitions. | Although caulk is not required, it is a very good habit to get into for quality maps and is often noted at competitions. | ||
== Textures menu == | == Textures menu == | ||
Latest revision as of 19:09, 28 July 2009

Introduction: Caulk
Everything should first be made in caulk because when the map is ran it is nothing but a placeholder. In the editor it is a viable surface to edit but in the game it is invisible and never drawn. Why is this important?
If a map has two versions, one done properly with caulk and another done without, you will see a notable difference in frame rate because if a texture is applied to a surface then the game renders it whether the player can see it or not. If you caulk the hidden areas like under building and surfaces on the outside of a boundary then the game skips these and increases overall frame rate.
Although caulk is not required, it is a very good habit to get into for quality maps and is often noted at competitions.
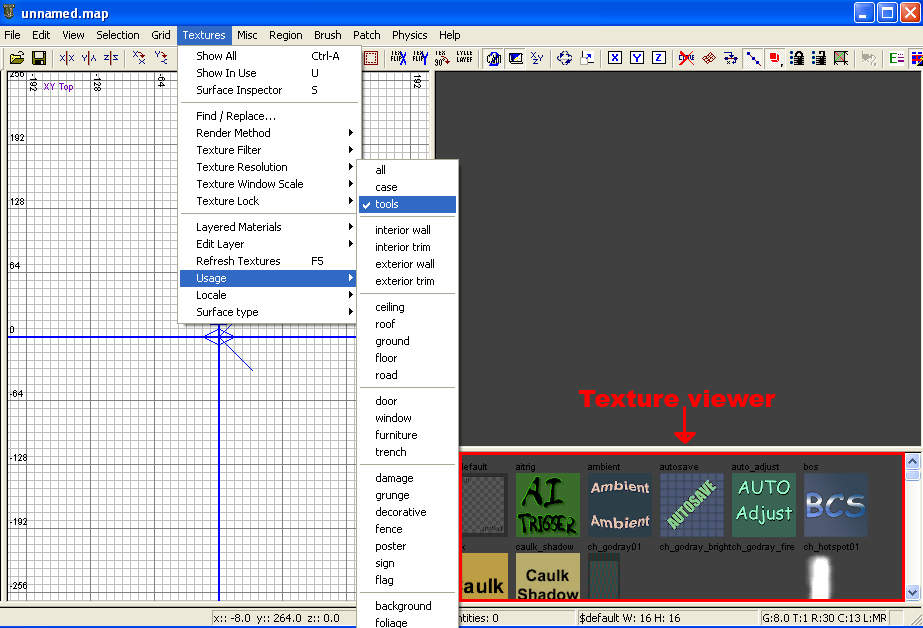
- Show All - Shows all textures in the game directory.
- Show In Use - Shows all the textures used by the loaded map.
- Surface Inspector - For detailed texture movement.
- Find / Replace - Opens a window, enter the texture in the map you want to replace and then the texture to replace it with.
- Render Method - How you want Radiant to render your map.
- Texture Filter - Level of Detail falloff.
- Texture Resolution - Level of Detail of textures shown in radiant.
- Texture Window Scale - Percent of texture's size for the viewing window.
- Texture Lock - Once placed, a texture will remain as it was. If this is off then the texture will scroll as the object moves.
- Last 3 options contain the textures but are filtered in different ways.
- Usage - Filters textures by their purpose.
- Locale - Filters textures by their theme or map.
- Surface type - Filters textures by their surface properties.
- Note: You can filter by all 3, for example you can select "Exterior Wall" from Usage and "Brick" from Surface Type.
Applying textures
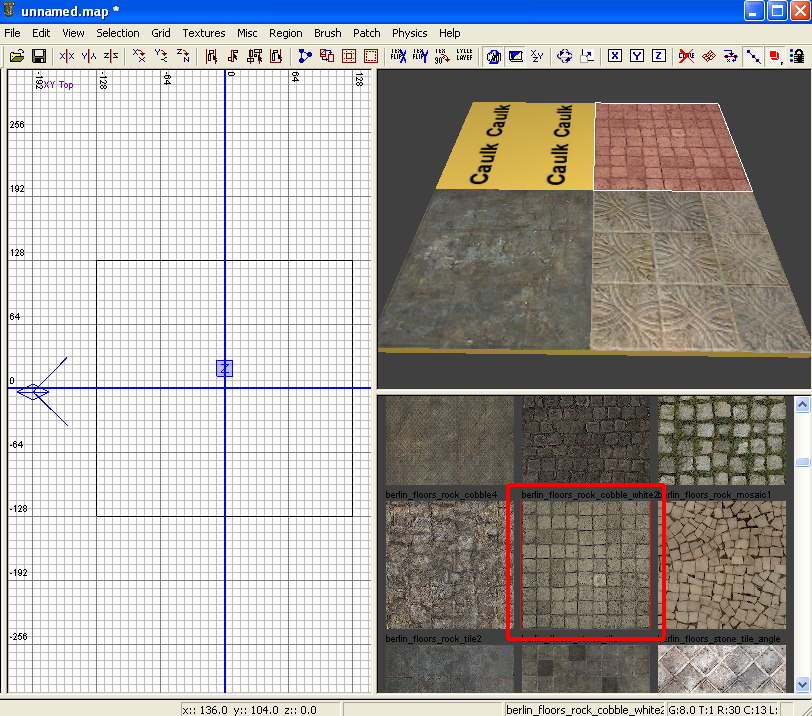
1. Pick what texture you want and get it visible in the texture window.
2. Select the face of the brush you want to apply the texture to (Ctrl + Shift + Left Click).
3. With that face selected, click on the texture in it's window and Caulk will now be replaced with your texture.
- Chances are that the texture isnt aligned how you want it, that's when we use the surface inspector below.
Surface Inspector
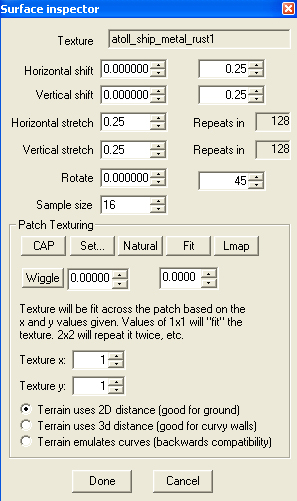
To use the surface inspector you have to select a face that already has a texture applied. Surface Inspector may also be toggled by pressing "S".
- Texture - Displays the name of the texture about to be edited.
- Horizontal and Vertical Shift - How many units to move your texture across the face.
- First set of boxes is the actual movement.
- Second set of boxes are the increments.
- Horizontal and Vertical Stretch - Same idea as shift but you are stretching the texture.
- Rotate - Rotates the texture in degrees defined to the right.
- CAP - Reapply the default mapping of the texture.
- Natural - Bends the texture for a more natural feeling on curved surfaces.
- Fit - Stretches the texture to fir the face selected.
- Set... - Similar to "Fit" but you can customize how many times the texture repeats.
- Set is used with "Texture x" and "Texture y:", this defines how many times a texture is to repeat along the axis.
- Wiggle - Random position within the set amount of units.
Sources: Treyarch's Wiki


