Call of Duty 5: Reskinning Weapons: Difference between revisions
New page: =Plugin and Tools Required= To get started with reskinning the textures in Call of Duty: World at War, you are going to need a couple tools, and a DDS plugin for older versions of Photosh... |
m Protected "Call of Duty 5: Reskinning Weapons" [edit=autoconfirmed:move=autoconfirmed] |
(No difference)
| |
Latest revision as of 15:58, 17 July 2009
Plugin and Tools Required
To get started with reskinning the textures in Call of Duty: World at War, you are going to need a couple tools, and a DDS plugin for older versions of Photoshop. If you don't have Photshop, you can download Paint.NET for free. Version 3.10 and above has DDS support included.
The two tools mentioned above are dds2iwi and iwi2dds converter executables. You can download these two files plus the Photoshop DDS plugin HERE.
Once downloaded, install the plugin if you need to. To make things easier, let's place the dds2iwi and iwi2dds converter executables onto your desktop. These two exes are your main pathway for taking an IWI and turning it into a DDS so that you can view it and alter it in Photoshop or Paint.net.
Locating and Converting the Original Files
If we are going to alter the way the game looks, we need to find the original images that the game displays when running. There are thousands of image files to search through, so you can be very creative in what you want to reskin. Let's stick with something easy for now and find a gun model we want to change. If you don't already have it, please download WinRar HERE so that you can view the IWD archives that contain the images used in the game.
- 1. Navigate to 'C:\Program Files\Activision\Call of Duty - World at War\main' and notice about 23 IWD files, the first of which starts at iw_00.iwd.
- 2. Open up iw_09.iwd and scroll down to the files beginning with the letter "w_" or "weapon_".
- 3. For this tutorial, find "w_type99_lmg_mp_c.iwi" and click-drag it to your desktop.
- 4. Now click the "w_type99_lmg_mp_c.iwi" file that is on your desktop and drag it on top of the iwi2dds executable, and let go. Doing so will spit out a DDS file called "w_type99_lmg_mp_c.iwi_out.dds"
- 5. Open this DDS file in Photoshop or Paint.net.
Understanding and Altering an Unwrapped Weapon Skin
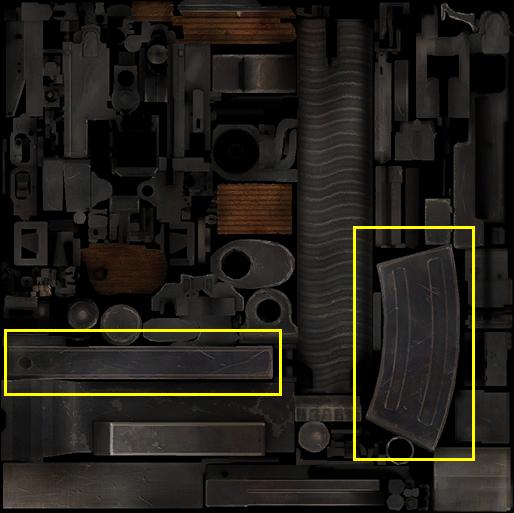
After you have converted your IWI to a DDS and opened it for viewing, you will see an arrangment of wood and metal. This is your gun... flattened out. As you can see below, I have highlighted the areas that we are going to customize. (the side and back edge of the ammo magazine).
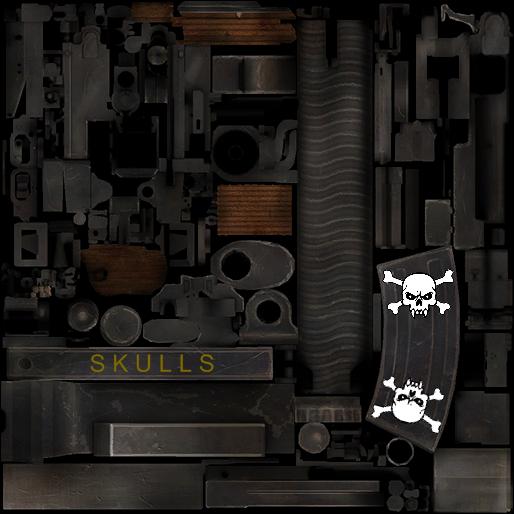
Now comes the fun part. Add whatever you feel like to the image. Pretend you are painting a real gun in front of you. For this example I'm going to add a Skull and Crossbones across the side. Obviously this is a simple cut and paste job, but you can learn to take your time and add fine details like blood splatter or different types of camo. If you feel this is too much for you at the moment, just try writing some text, maybe your name, across the area that I've selected for you.
Saving and Reconverting
Now that you have made your artistic changes, save your file. Choose .dds as your save format, and when the options appear, make sure you have DXT5 selected, and check the box that says to generate Mip Maps. Save this as "w_type99_lmg_mp_c.dds".
Now click your new file and drag it on to the dds2iwi executable and let go. Doing so will spit out an IWI file called "w_type99_lmg_mp_c.iwi".
Packing Your New Skin
The simplest way to see your changes in-game is to make a quick mod in your /mods folder and add your new files to it.
- 1. Navigate to 'C:\Program Files\Activision\Call of Duty - World at War\mods\
- 2. Right-click and create a new folder. Name it "mp_skintest".
- 3. Navigate into the folder you just created and create a new folder inside it called "images".
- 4. Place your new "w_type99_lmg_mp_c.iwi" file into the "images" folder you just created.
- 5. Now right-click your "images" folder and highlight "Send To". When the side menu appears choose "Compressed (zipped) Folder". (this will create a file called "images.zip").
- 6. Rename "images.zip" to "mp_skintest.iwd". (It will ask you if this is okay to do. Click Yes).
- 7. Navigate to 'C:\Documents and Settings\[user_name]\Local Settings\Application Data\Activision\CoDWaW\mods and repeat step 2.
- 8. Now copy "mp_skintest.iwd" from your first folder and paste it into the folder you created in step 7.
Viewing Your New Skin
- 1. Launch CoDWaWmp.exe and click Mods from the Main Menu.
- 2. Locate "mp_skintest" from the list and double-click it.
- 3. Once the executable restarts, click Start New Server.
- 4. Select any one of the stock MP maps from the list and start a non-dedicated server.
- 5. Once it completely loads, choose Auto-Assign and then choose Heavy Gunner.
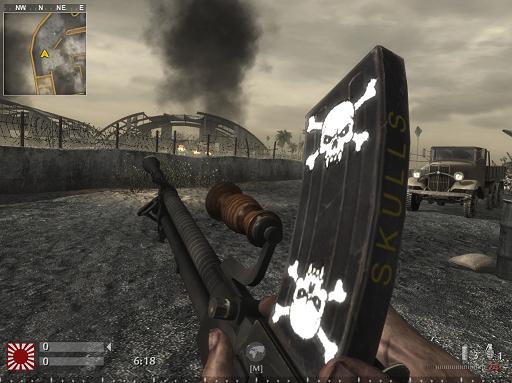
Your gun should look like this in-game:
And there you have it. These techniques can be applied to many facets of the game. Anything that calls an .iwi file for a texture can essentially be altered to look however you like. If you have any questions, or something isn't working for you, please post in the Discussion tab and we will do our best to help you.
Also, feel free to post screenshots of your talented work. We enjoy seeing what people create.
Sources: Treyarch's Wiki


