Call of Duty 4: Flapping Shutters: Difference between revisions
No edit summary |
mNo edit summary |
||
| (One intermediate revision by one other user not shown) | |||
| Line 1: | Line 1: | ||
{{warning_radiant}} | {{warning_radiant}} | ||
''By HarkoninVSC'' | ''By HarkoninVSC'' | ||
{{Note|So everyone has been in their raw/maps/mp folder and seen all the gsc's in there right? And how many people have said _shutter.gsc wtf?}} | |||
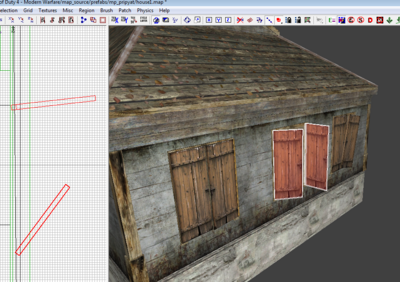
The stock _shutter script adds alot of character and atmosphere to a map. Here I will give a brief tutorial on how to make it work for you. | The stock _shutter script adds alot of character and atmosphere to a map. Here I will give a brief tutorial on how to make it work for you. | ||
[[Image:Shutters.png|400px]] | [[Image:Shutters.png|400px]] | ||
==In Radiant== | ==In Radiant== | ||
| Line 16: | Line 14: | ||
*The first thing we need to do is to create a brush to cover our window. | *The first thing we need to do is to create a brush to cover our window. | ||
For this tut we will make a brush that is 48 units high x 32 units long and 4 units deep. | For this tut we will make a brush that is 48 units high x 32 units long and 4 units deep. | ||
Once your brush is constructed, use the space bar to clone it. Resize the copy to about 2 units long and | Once your brush is constructed, use the space bar to clone it. Resize the copy to about 2 units long and 2 units deep (height is the same). Select the origin texture for this brush and place it where your hinge would be on the left side. | ||
*Ok now that the geometry is done select both brushes and right click your 2D window. Scroll down to script and select brushmodel. | *Ok now that the geometry is done select both brushes and right click your 2D window. Scroll down to script and select brushmodel. | ||
After this we need to pull up the entity window with the N key. Use the following Key/Value: | After this we need to pull up the entity window with the {{Key|N}} key. Use the following Key/Value: | ||
targetname | targetname | ||
| Line 26: | Line 24: | ||
*If using more than one shutter repeat steps 1 and 2 but placing on the right side and using the targetname of '''shutter_right'''. | *If using more than one shutter repeat steps 1 and 2 but placing on the right side and using the targetname of '''shutter_right'''. | ||
{{Info|There is also a function for a moving wire in this script to simulate a "thread in the wind". To use the function simply create a cylinder patch and name it wire. Add two script origins on each end of the wire. Select the wire first and then one of the origins. Hit the W key to link them. Copy the targetname of the first origin into the second (they must be the same).}} | |||
==Scripting== | ==Scripting== | ||
All thats left to do is to make sure you have this entry in your mapname.gsc | All thats left to do is to make sure you have this entry in your mapname.gsc | ||
maps\mp\_load::main(); | maps\mp\_load::main(); | ||
With that done simply recompile your BSP, update your zone file with | With that done simply recompile your BSP, update your zone file with | ||
rawfile,maps/mp/_shutter.gsc | rawfile,maps/mp/_shutter.gsc | ||
and check out your new "flapping shutters". | and check out your new "flapping shutters". | ||
==Sources== | ==Sources== | ||
| Line 46: | Line 46: | ||
--[[User:Zeroy|Zeroy.]] 20:59, 17 October 2008 (UTC) | --[[User:Zeroy|Zeroy.]] 20:59, 17 October 2008 (UTC) | ||
[[Category:Call of Duty 4]] | |||
[[Category:Modtools]] | |||
[[Category:Radiant]] | |||
[[Category:Scripting]] | |||
[[Category:Advanced Editing]] | |||
Latest revision as of 20:26, 15 April 2009
 This tutorial assumes that you are already familiar with Radiant, Triggers and Entities
By HarkoninVSC
The stock _shutter script adds alot of character and atmosphere to a map. Here I will give a brief tutorial on how to make it work for you.
In Radiant
- The first thing we need to do is to create a brush to cover our window.
For this tut we will make a brush that is 48 units high x 32 units long and 4 units deep. Once your brush is constructed, use the space bar to clone it. Resize the copy to about 2 units long and 2 units deep (height is the same). Select the origin texture for this brush and place it where your hinge would be on the left side.
- Ok now that the geometry is done select both brushes and right click your 2D window. Scroll down to script and select brushmodel.
After this we need to pull up the entity window with the [N] key. Use the following Key/Value:
targetname
shutter_left
- If using more than one shutter repeat steps 1 and 2 but placing on the right side and using the targetname of shutter_right.
Scripting
All thats left to do is to make sure you have this entry in your mapname.gsc
maps\mp\_load::main();
With that done simply recompile your BSP, update your zone file with
rawfile,maps/mp/_shutter.gsc
and check out your new "flapping shutters".
Sources
--Zeroy. 20:59, 17 October 2008 (UTC)

